

Table of Contents
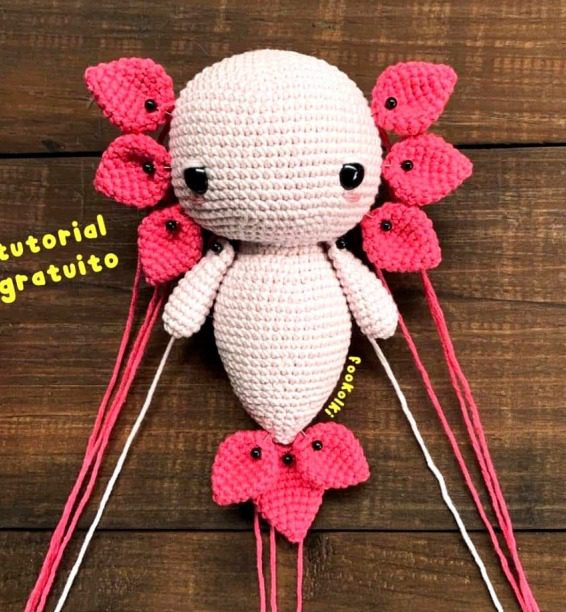
Axolotls have taken the crafting world by storm with their unique appearance and endearing features. These charming aquatic creatures make perfect subjects for amigurumi projects, combining cute facial expressions with distinctive gills and a whimsical body shape. This comprehensive guide will walk you through creating your own crochet axolotl, complete with colorful branchia (gills) and delicate details that capture the essence of these fascinating animals.
Materials Needed for Your Axolotl
Before beginning your axolotl project, gather these essential supplies:
- 2.25mm crochet hook
- 2mm yarn in colors of your choice (the sample uses white/light pink for the body and bright pink for the gills)
- Safety eyes (10mm) – one pair
- Polyester stuffing
- Tapestry needle for assembly
- Medium pink yarn for embroidering the cheeks
- Stitch markers
- Pins for positioning pieces before sewing
- Scissors
The finished axolotl will measure approximately 15cm (6 inches) from head to tail, though this may vary depending on your yarn and tension.
Understanding the Axolotl Abbreviations
This pattern uses standard crochet terminology:
- aum – increase (2 single crochets in the same stitch)
- dism – decrease (2 single crochets worked together)
- cad – chain
- pb – single crochet
- cm – magic ring
- pma – half double crochet
- pa – double crochet
- pe – slip stitch
Creating the Head and Body
The axolotl’s head and body are worked as a single piece, creating a seamless design that forms the foundation of your amigurumi.
Start with the color chosen for your axolotl’s body:
- Make a magic ring with 6 sc [6]
- 6 increases [12]
- (1 sc, 1 inc) repeat 6 times [18]
- (2 sc, 1 inc) repeat 6 times [24]
- (3 sc, 1 inc) repeat 6 times [30]
- (4 sc, 1 inc) repeat 6 times [36]
- (5 sc, 1 inc) repeat 6 times [42]
- (6 sc, 1 inc) repeat 6 times [48]
- (7 sc, 1 inc) repeat 6 times [54]
- (8 sc, 1 inc) repeat 6 times [60] 11-22. 1 sc in each of the 60 sc [60]
At this point, place the safety eyes in round 18, with 14 stitches between them. Use pins to mark the position before securing them.
For the cheeks, embroider with medium pink yarn, taking 3 stitches with two strands of yarn in a straight line inside the same stitch. Position the cheeks slightly below the eyes. You can also embroider the eyelids with the body color, using two strands of yarn in a diagonal inside the same stitch.
Continue with the body:
- (8 sc, 1 dec) repeat 6 times [54]
- (7 sc, 1 dec) repeat 6 times [48]
- (6 sc, 1 dec) repeat 6 times [42]
- (5 sc, 1 dec) repeat 6 times [36]
- 18 decreases [18]
Don’t cut the yarn yet, continue working the body:
- (2 sc, 1 inc) repeat 6 times [24]
- 1 sc in each of the 24 sc [24]
- (3 sc, 1 inc) repeat 6 times [30]
- 1 sc in each of the 30 sc [30]
- (4 sc, 1 inc) repeat 6 times [36]
- 1 sc in each of the 36 sc [36]
- (5 sc, 1 inc) repeat 6 times [42]
At this point, stuff only the head portion and continue:
35-40. 1 sc in each of the 42 sc [42] 41. (5 sc, 1 dec) repeat 6 times [36] 42-43. 1 sc in each of the 36 sc [36] 44. (4 sc, 1 dec) repeat 6 times [30] 45-46. 1 sc in each of the 30 sc [30] 47. (3 sc, 1 dec) repeat 6 times [24] 48. 1 sc in each of the 24 sc [24]
Add more stuffing to the body, but not completely fill it:
- (2 sc, 1 dec) repeat 6 times [18]
- 1 sc in each of the 18 sc [18]
- (1 sc, 1 dec) repeat 6 times [12]
- 1 sc in each of the 12 sc [12]
Fill the remaining space with stuffing and finish:
- 6 decreases [6]
Cut the yarn, leaving a long tail. Thread through the final 6 stitches and pull tight to close. Hide the remaining yarn inside the body.
Creating the Arms
Make 2 arms in the same color as the body:
- Make a magic ring with 6 sc [6]
- 6 increases [12] 3-11. 1 sc in each of the 12 sc [12]
Stuff each arm slightly less than halfway to prevent them from standing up. Fold and join the opposite sides with 5 sc, leaving a long tail for sewing to the body.
Creating the Central Tail
Make 1 in the same color as the body:
- Make a magic ring with 6 sc [6]
- 1 sc in each of the 6 sc [6]
- 6 increases [12]
- 1 sc in each of the 12 sc [12]
- (1 sc, 1 inc) repeat 6 times [18] 6-10. 1 sc in each of the 18 sc [18]
- (1 sc, 1 dec) repeat 6 times [12]
- 6 decreases [6]
Cut the yarn, leaving a long tail for sewing.
Creating the Side Tails and Gills
Make 8 pieces in the color chosen for the gills (bright pink in the sample):
- Make a magic ring with 6 sc [6]
- 1 sc in each of the 6 sc [6]
- 6 increases [12]
- 1 sc in each of the 12 sc [12]
- (1 sc, 1 inc) repeat 6 times [18] 6-7. 1 sc in each of the 18 sc [18]
- (1 sc, 1 dec) repeat 6 times [12]
- 6 decreases [6]
Cut the yarn, leaving a long tail for sewing.
Creating the Flowers
Make 3 flowers in different colors:
- Chain 14. Starting from the second chain from the hook, work 1 sc, chain 2, skip a stitch, in the next stitch work 1 sc. Repeat 6 times, chain 1 and turn your work.
- This creates 6 small arches. In the first arch, work 4 double crochet stitches, and in the join of the arch (where the sc from the previous round is), work 1 slip stitch. Repeat 6 times, cut the yarn leaving a long tail for sewing.
Thread the remaining yarn and pass the needle through the open spaces formed at the bottom of the flower (once from below, once from above). Repeat as needed, pulling the yarn (the flower will gather, which is what we want). Shape the flower and secure with a few stitches to keep it from opening.
Creating the Leaves
Make 2 leaves in green:
- Chain 8. In the second chain from the hook, work 1 sc, 1 hdc, 3 dc, 1 hdc, 3 sc together in the last stitch.
- Continue along the other side of the chain, making 1 hdc, 3 dc, 1 hdc, 1 sc.
Cut the yarn, leaving a long tail for sewing.
Assembly Instructions
Now it’s time to bring your axolotl to life by assembling all the pieces:
- Central Tail: Fold and sew to the lower central part of the body (at the point). Weave in the excess yarn inside the body.
- Side Tails: Fold and sew one to each side of the central tail (on the body, not on the tail). Weave in the excess yarn inside the body.
- Gills: Fold and sew 3 to each side of the head, positioned 4 stitches away from the eyes. Pins are very useful for positioning the parts before sewing. Weave in the excess yarn inside the head.
- Flowers: Sew the 3 flowers to the lower part of the doll (not on the tail), forming a small bouquet. Weave in the excess yarn inside the body.
- Leaves: Sew one on each side of the flowers. Weave in the excess yarn in the body. It’s recommended to sew the leaves at the base of one of the flowers so they don’t stick out too much and give the appearance of coming out from below.
- Arms: Sew to the sides of the body.
Detailed Round-by-Round Instructions for Axolotl Amigurumi
Head and Body (worked as one piece)
Using your chosen body color (white/light pink in the sample):
- Round 1: 6 sc in magic ring [6]
- Round 2: Inc in each st around [12]
- Round 3: (1 sc, inc) repeat 6 times [18]
- Round 4: (2 sc, inc) repeat 6 times [24]
- Round 5: (3 sc, inc) repeat 6 times [30]
- Round 6: (4 sc, inc) repeat 6 times [36]
- Round 7: (5 sc, inc) repeat 6 times [42]
- Round 8: (6 sc, inc) repeat 6 times [48]
- Round 9: (7 sc, inc) repeat 6 times [54]
- Round 10: (8 sc, inc) repeat 6 times [60]
- Rounds 11-22: Sc in each st around [60]
Place the safety eyes in round 18, with approximately 14 stitches between them Embroider the cheeks with medium pink yarn Embroider the eyelids with the body color yarn
Continue decreasing to form the neck:
- Round 23: (8 sc, dec) repeat 6 times [54]
- Round 24: (7 sc, dec) repeat 6 times [48]
- Round 25: (6 sc, dec) repeat 6 times [42]
- Round 26: (5 sc, dec) repeat 6 times [36]
- Round 27: 18 decreases [18]
Begin the body section:
- Round 28: (2 sc, inc) repeat 6 times [24]
- Round 29: Sc in each st around [24]
- Round 30: (3 sc, inc) repeat 6 times [30]
- Round 31: Sc in each st around [30]
- Round 32: (4 sc, inc) repeat 6 times [36]
- Round 33: Sc in each st around [36]
- Round 34: (5 sc, inc) repeat 6 times [42]
At this point, stuff the head only
- Rounds 35-40: Sc in each st around [42]
- Round 41: (5 sc, dec) repeat 6 times [36]
- Rounds 42-43: Sc in each st around [36]
- Round 44: (4 sc, dec) repeat 6 times [30]
- Rounds 45-46: Sc in each st around [30]
- Round 47: (3 sc, dec) repeat 6 times [24]
- Round 48: Sc in each st around [24]
Add more stuffing to the body
- Round 49: (2 sc, dec) repeat 6 times [18]
- Round 50: Sc in each st around [18]
- Round 51: (1 sc, dec) repeat 6 times [12]
- Round 52: Sc in each st around [12]
Add final stuffing
- Round 53: 6 decreases [6]
Close the opening by threading yarn through the final stitches and pulling tight. Hide the yarn tail inside the body.
Arms (make 2)
- Round 1: 6 sc in magic ring [6]
- Round 2: Inc in each st around [12]
- Rounds 3-11: Sc in each st around [12]
Stuff each arm less than halfway. Fold opposite sides together and join with 5 sc. Leave a long tail for attaching to the body.
Central Tail (make 1)
- Round 1: 6 sc in magic ring [6]
- Round 2: Sc in each st around [6]
- Round 3: Inc in each st around [12]
- Round 4: Sc in each st around [12]
- Round 5: (1 sc, inc) repeat 6 times [18]
- Rounds 6-10: Sc in each st around [18]
- Round 11: (1 sc, dec) repeat 6 times [12]
- Round 12: 6 decreases [6]
Leave a long tail for attaching to the body.
Side Tails and Gills (make 8 in gill color)
- Round 1: 6 sc in magic ring [6]
- Round 2: Sc in each st around [6]
- Round 3: Inc in each st around [12]
- Round 4: Sc in each st around [12]
- Round 5: (1 sc, inc) repeat 6 times [18]
- Rounds 6-7: Sc in each st around [18]
- Round 8: (1 sc, dec) repeat 6 times [12]
- Round 9: 6 decreases [6]
Leave a long tail for attaching to the body.
Flowers (make 3 in different colors)
- Row 1: Ch 14, sc in 2nd chain from hook, ch 2, skip next ch, sc in next ch, repeat from * 5 more times, ch 1, turn
- Row 2: In first arch work 4 dc, 1 slip st in the join of the arch. Repeat in each arch.
Thread remaining yarn through spaces at bottom of flower to gather it into shape.
Leaves (make 2 in green)
- Row 1: Ch 8, starting from 2nd ch from hook: 1 sc, 1 hdc, 3 dc, 1 hdc, 3 sc together in last stitch
- Row 2: Working on opposite side of foundation chain: 1 hdc, 3 dc, 1 hdc, 1 sc
Leave a long tail for attaching.
Tips for Success
- Use pins to position all parts before sewing them to ensure proper placement
- The head and body are worked as one piece, which creates a seamless look
- For a neat finish, always hide yarn ends inside the amigurumi
- The gills should be evenly spaced around the head for a balanced look
- The flowers add a charming detail to your axolotl and can be customized with different colors
Customizing Your Axolotl
One of the joys of creating an axolotl amigurumi is the opportunity to customize its colors. In nature, axolotls come in various colors including white, pink, golden, and black. You can choose colors that match real axolotls or get creative with bright, fantasy colors:
- Try a black body with gray gills for a melanoid axolotl
- Use gold or yellow for a golden/leucistic axolotl
- Stick with white and pink for the classic albino look
- Get creative with blues, purples, or even rainbow gills for a fantasy creature
The pattern shown features a white/light pink body with bright pink gills, but you can substitute any colors you prefer to create your perfect axolotl companion.
Check this out :Crochet Harry Potter Amigurumi Characters
Conclusion
Creating an axolotl amigurumi is a delightful journey into the world of these fascinating aquatic creatures. As you complete each section—from the expressive face to the distinctive branchia (gills)—you’re not just making a stuffed toy but capturing the essence of one of nature’s most unique animals. The detailed pattern allows even intermediate crocheters to craft a recognizable representation that showcases both skill and creativity.
The charm of amigurumi lies in its ability to transform simple stitches into character and personality. Your finished axolotl, with its cute round head, delicate gills, and adorable embroidered features, perfectly embodies this transformation. Whether displayed proudly on a shelf, given as a thoughtful handmade gift, or used as an educational tool about these remarkable salamanders, your creation will undoubtedly bring joy and wonder.
Beyond the satisfaction of the finished product, the process itself offers valuable practice in essential amigurumi techniques—working in continuous rounds, creating gradual increases and decreases, embroidering facial features, and assembling multiple components into a cohesive whole. Each stitch contributes to your growth as a crafter while building toward a finished piece that’s both adorable and distinctive.
As your axolotl takes its final form with the addition of colorful flowers and detailed elements, take a moment to appreciate both the craftsmanship you’ve invested and the unique character you’ve brought to life. In an age of mass-produced items, there’s something special about creating something by hand—especially something as charming and distinctive as this axolotl amigurumi that’s sure to be treasured for years to come.
