

Table of Contents
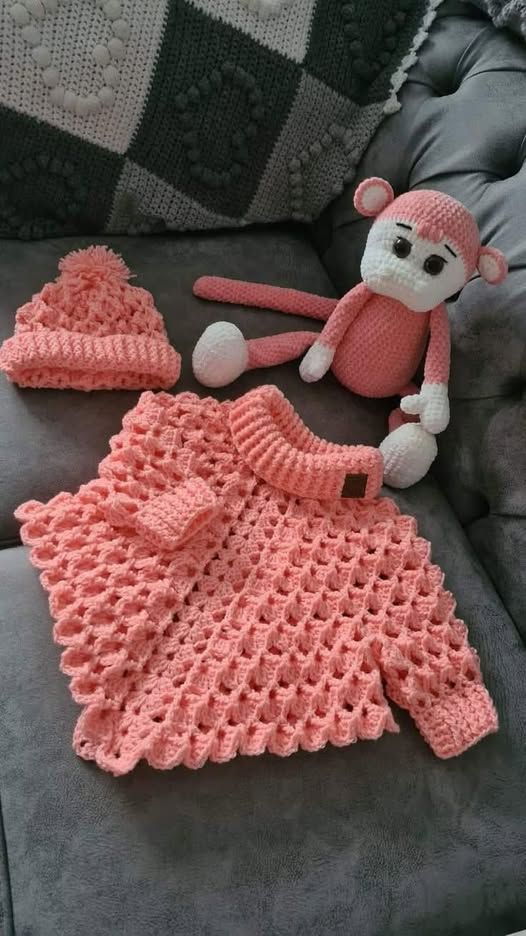
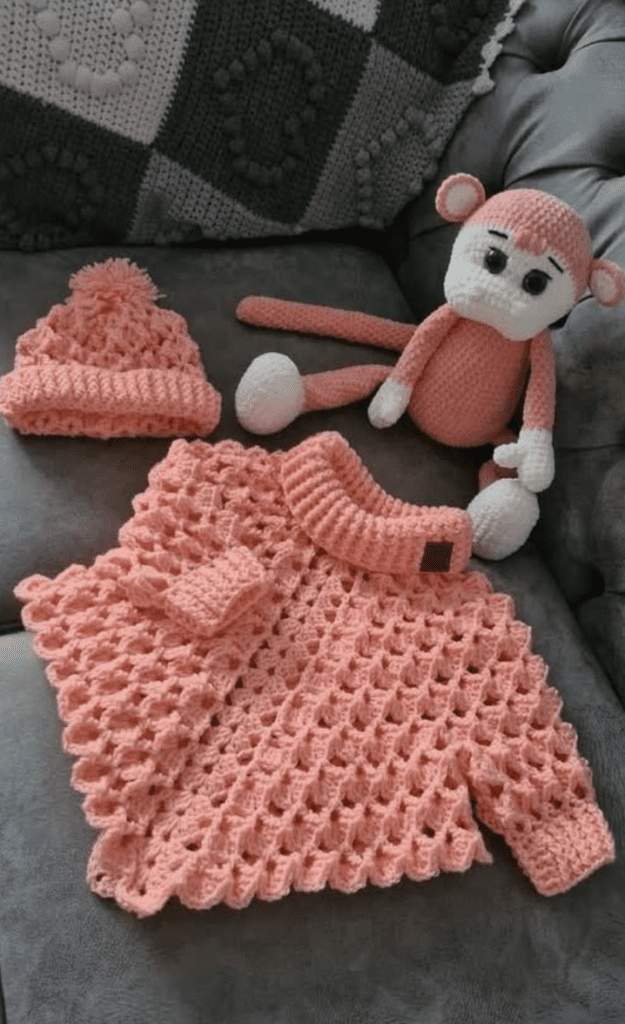
Create a Monkey Set Pattern an adorable coordinated baby gift set with this comprehensive pattern for a cozy baby cardigan, matching hat, and cuddly monkey toy. Perfect for baby showers or as a special gift for a new arrival, this set works up in soft, washable yarn and features sweet monkey-themed details that parents and babies will love.
Materials
Yarn
- 3 skeins (100g/218yds each) of medium weight (category 4) yarn in main color (MC) – Light brown or beige suggested
- 1 skein (100g/218yds) of medium weight yarn in contrast color 1 (CC1) – Dark brown suggested
- Small amounts of medium weight yarn in contrast color 2 (CC2) – Cream or off-white suggested
- Small amounts of black yarn for facial features
Recommended yarns: Lion Brand Vanna’s Choice, Bernat Softee Baby, or any washable medium weight yarn suitable for baby items
Notions to make the Monkey Set
- 4mm (G/6) crochet hook for main pieces
- 3.5mm (E/4) crochet hook for edging and details
- Stitch markers
- Yarn needle
- Five 1/2″ (12mm) buttons for cardigan
- Polyester fiberfill for stuffing monkey
- Scissors
- Tape measure
- Safety eyes (10mm) – optional, or can be embroidered
Gauge
- 16 sts × 20 rows = 4″ (10cm) in single crochet using 4mm hook
Size Information
This pattern includes instructions for three sizes:
- 0-3 months (16″ chest)
- 3-6 months (18″ chest)
- 6-12 months (20″ chest)
Instructions for larger sizes are given in parentheses: (3-6 months, 6-12 months)
Abbreviations
- ch = chain
- sc = single crochet
- dc = double crochet
- hdc = half double crochet
- sl st = slip stitch
- st(s) = stitch(es)
- inc = increase (2 sc in same stitch)
- dec = decrease (sc2tog – single crochet 2 stitches together)
- BLO = back loop only
- FLO = front loop only
- RS = right side
- WS = wrong side
- rep = repeat
- sk = skip
- [] = work instructions within brackets the number of times specified
Baby Cardigan Pattern
Back Panel
Foundation: Ch 33 (37, 41) with MC.
Row 1 (RS): Sc in 2nd ch from hook and in each ch across. Ch 1, turn. [32 (36, 40) sts]
Rows 2-30 (2-34, 2-38): Sc in each st across. Ch 1, turn.
Armhole Shaping:
- Size 0-3 months: At 7″ (18cm) from beginning, fasten off.
- Size 3-6 months: At 8″ (20cm) from beginning, fasten off.
- Size 6-12 months: At 9″ (23cm) from beginning, fasten off.
Left Front Panel
Foundation: Ch 17 (19, 21) with MC.
Row 1 (RS): Sc in 2nd ch from hook and in each ch across. Ch 1, turn. [16 (18, 20) sts]
Rows 2-24 (2-28, 2-32): Sc in each st across. Ch 1, turn.
Neck Shaping:
- Row 25 (29, 33): Sc in first 13 (15, 17) sts, dec over last 2 sts. Ch 1, turn. [14 (16, 18) sts]
- Row 26 (30, 34): Dec over first 2 sts, sc to end. Ch 1, turn. [13 (15, 17) sts]
- Row 27 (31, 35): Sc across. Ch 1, turn.
- Row 28 (32, 36): Dec over first 2 sts, sc to end. Ch 1, turn. [12 (14, 16) sts]
- Row 29 (33, 37): Sc across. Ch 1, turn.
- Row 30 (34, 38): Sc across. Fasten off.
Right Front Panel
Work as for Left Front Panel, reversing shaping.
Neck Shaping:
- Row 25 (29, 33): Dec over first 2 sts, sc to end. Ch 1, turn. [14 (16, 18) sts]
- Row 26 (30, 34): Sc to last 2 sts, dec over last 2 sts. Ch 1, turn. [13 (15, 17) sts]
- Row 27 (31, 35): Sc across. Ch 1, turn.
- Row 28 (32, 36): Sc to last 2 sts, dec over last 2 sts. Ch 1, turn. [12 (14, 16) sts]
- Row 29 (33, 37): Sc across. Ch 1, turn.
- Row 30 (34, 38): Sc across. Fasten off.
Sleeves (Make 2)
Foundation: Ch 26 (28, 30) with MC.
Row 1 (RS): Sc in 2nd ch from hook and in each ch across. Ch 1, turn. [25 (27, 29) sts]
Row 2: Sc in each st across. Ch 1, turn.
Row 3: Sc in first st, inc in next st, sc across to last 2 sts, inc in next st, sc in last st. Ch 1, turn. [27 (29, 31) sts]
Rows 4-5: Sc in each st across. Ch 1, turn.
Row 6: Rep Row 3. [29 (31, 33) sts]
Rows 7-8: Sc in each st across. Ch 1, turn.
Row 9: Rep Row 3. [31 (33, 35) sts]
Continue in this pattern, increasing 2 sts every 3rd row until you have 35 (39, 43) sts.
Work even in sc until sleeve measures 7″ (8″, 9″) from beginning. Fasten off.
Assembly
- Sew shoulder seams, joining front panels to back panel.
- Set in sleeves, sewing to armhole edges.
- Sew side and sleeve seams.
Button Band (Right Front)
With RS facing and using MC, attach yarn at lower edge of right front.
Row 1: Ch 1, work 30 (34, 38) sc evenly spaced along front edge. Ch 1, turn.
Row 2-3: Sc in each st across. Ch 1, turn.
Fasten off.
Buttonhole Band (Left Front)
With RS facing and using MC, attach yarn at lower edge of left front.
Row 1: Ch 1, work 30 (34, 38) sc evenly spaced along front edge. Ch 1, turn.
Row 2: Sc in 3 sts, [ch 2, sk 2 sts, sc in next 5 sts] 4 times, sc in remaining sts. Ch 1, turn.
Row 3: Sc in each st and ch-2 sp across. Ch 1, turn.
Fasten off.
Collar
With RS facing and using MC, attach yarn at right front neck edge.
Row 1: Ch 1, work 44 (48, 52) sc evenly around neck edge, ending at left front neck edge. Ch 1, turn.
Rows 2-4: Sc in each st across. Ch 1, turn.
Fasten off.
Monkey Appliqué (Make 1)
Head:
- With CC1 (dark brown), make a magic ring.
- Rnd 1: 6 sc in ring. [6 sts]
- Rnd 2: Inc in each st around. [12 sts]
- Rnd 3: [Sc in next st, inc in next st] 6 times. [18 sts]
- Rnds 4-6: Sc in each st around.
- Fasten off, leaving a long tail for sewing.
Ears (Make 2):
- With CC1, ch 4.
- Rnd 1: 6 sc in 2nd ch from hook. Join with sl st to first sc.
- Rnd 2: Ch 1, [inc, sc] 3 times. Join with sl st. [9 sts]
- Fasten off, leaving a tail for sewing.
Muzzle:
- With CC2 (cream), make a magic ring.
- Rnd 1: 6 sc in ring. [6 sts]
- Rnd 2: Inc in each st around. [12 sts]
- Fasten off, leaving a tail for sewing.
Sew the monkey appliqué to the left front of the cardigan:
- Attach the head first, positioning it on the left chest area.
- Sew on the ears at the top of the head.
- Attach the muzzle to the center of the face.
- With black yarn, embroider eyes, a nose, and a smiling mouth.
Finishing
- Weave in all ends.
- Sew buttons to right front band, opposite buttonholes.
Baby Hat Pattern
Basic Hat
With MC and 4mm hook:
Rnd 1: Ch 4, join with sl st to form a ring. Ch 1, 8 sc in ring. Join with sl st to first sc. [8 sts]
Rnd 2: Ch 1, inc in each sc around. Join with sl st to first sc. [16 sts]
Rnd 3: Ch 1, [sc in next st, inc in next st] 8 times. Join with sl st to first sc. [24 sts]
Rnd 4: Ch 1, [sc in next 2 sts, inc in next st] 8 times. Join with sl st to first sc. [32 sts]
Rnd 5: Ch 1, [sc in next 3 sts, inc in next st] 8 times. Join with sl st to first sc. [40 sts]
Rnd 6: Ch 1, [sc in next 4 sts, inc in next st] 8 times. Join with sl st to first sc. [48 sts]
For Size 3-6 months:
- Rnd 7: Ch 1, [sc in next 5 sts, inc in next st] 8 times. Join with sl st to first sc. [56 sts]
For Size 6-12 months:
- Rnd 7: Ch 1, [sc in next 5 sts, inc in next st] 8 times. Join with sl st to first sc. [56 sts]
- Rnd 8: Ch 1, [sc in next 6 sts, inc in next st] 8 times. Join with sl st to first sc. [64 sts]
Next Rnds: Work even in sc until hat measures:
- 0-3 months: 5″ (13cm)
- 3-6 months: 5.5″ (14cm)
- 6-12 months: 6″ (15cm)
Ear Flaps (Optional)
For each ear flap:
- Position markers where you want ear flaps (typically on opposite sides of hat, slightly toward the back).
- With RS facing, attach yarn at a marker.
- Ch 1, sc in next 10 sts.
- Row 1: Ch 1, turn, sc in each st across. [10 sts]
- Row 2: Ch 1, turn, dec, sc in next 6 sts, dec. [8 sts]
- Row 3: Ch 1, turn, dec, sc in next 4 sts, dec. [6 sts]
- Row 4: Ch 1, turn, dec, sc in next 2 sts, dec. [4 sts]
- Fasten off.
Monkey Ears (Make 2)
Same as ears for appliqué, but make slightly larger:
- With CC1, ch 5.
- Rnd 1: 6 sc in 2nd ch from hook. Join with sl st to first sc.
- Rnd 2: Ch 1, [inc, sc] 4 times. Join with sl st. [12 sts]
- Rnd 3: Ch 1, sc in each st around. Join with sl st.
- Fasten off, leaving a tail for sewing.
Sew monkey ears to top of hat.
Brim
With hat upside down, join MC at center back:
- Rnd 1: Ch 1, sc in each st around. Join with sl st to first sc.
- Rnd 2: Ch 1, sc in BLO of each st around. Join with sl st to first sc.
- Rnds 3-4: Ch 1, sc in each st around. Join with sl st to first sc.
- Fasten off.
Braided Ties (If using ear flaps)
Cut 6 strands of MC, each 30″ (76cm) long. Divide into two bundles of 3 strands each. For each tie:
- Fold strands in half and use hook to pull folded end through corner of ear flap, creating a loop.
- Pull the loose ends through this loop and tighten.
- Braid the 6 strands together.
- Tie a knot at the end and trim.
Monkey Toy Pattern
Head and Body
With CC1 (dark brown):
Rnd 1: Make a magic ring, 6 sc in ring. [6 sts]
Rnd 2: Inc in each sc around. [12 sts]
Rnd 3: [Sc in next st, inc in next st] 6 times. [18 sts]
Rnd 4: [Sc in next 2 sts, inc in next st] 6 times. [24 sts]
Rnd 5: [Sc in next 3 sts, inc in next st] 6 times. [30 sts]
Rnd 6: [Sc in next 4 sts, inc in next st] 6 times. [36 sts]
Rnds 7-12: Sc in each st around. [36 sts]
Rnd 13: [Sc in next 4 sts, dec] 6 times. [30 sts]
Rnd 14: [Sc in next 3 sts, dec] 6 times. [24 sts]
Rnd 15: [Sc in next 2 sts, dec] 6 times. [18 sts]
Begin stuffing head firmly.
Rnd 16: [Sc in next st, dec] 6 times. [12 sts]
Rnd 17: [Dec] 6 times. [6 sts]
Do not fasten off, continue for body:
Rnd 18: Inc in each st around. [12 sts]
Rnd 19: [Sc in next st, inc in next st] 6 times. [18 sts]
Rnd 20: [Sc in next 2 sts, inc in next st] 6 times. [24 sts]
Rnd 21: [Sc in next 3 sts, inc in next st] 6 times. [30 sts]
Rnds 22-28: Sc in each st around. [30 sts]
Rnd 29: [Sc in next 3 sts, dec] 6 times. [24 sts]
Rnd 30: [Sc in next 2 sts, dec] 6 times. [18 sts]
Rnd 31: [Sc in next st, dec] 6 times. [12 sts]
Stuff body firmly.
Rnd 32: [Dec] 6 times. [6 sts]
Fasten off, leaving a tail. Thread tail through remaining sts and pull tight to close.
Face
With CC2 (cream):
Rnd 1: Make a magic ring, 6 sc in ring. [6 sts]
Rnd 2: Inc in each sc around. [12 sts]
Rnd 3: [Sc in next st, inc in next st] 6 times. [18 sts]
Rnd 4: [Sc in next 2 sts, inc in next st] 6 times. [24 sts]
Rnds 5-6: Sc in each st around. [24 sts]
Fasten off, leaving a long tail for sewing. Sew face to front of head.
Ears (Make 2)
With CC1:
Rnd 1: Make a magic ring, 6 sc in ring. [6 sts]
Rnd 2: Inc in each sc around. [12 sts]
Rnd 3: [Sc in next st, inc in next st] 6 times. [18 sts]
Fasten off, leaving a tail for sewing. Sew ears to top of head.
Arms (Make 2)
With CC1:
Rnd 1: Make a magic ring, 6 sc in ring. [6 sts]
Rnd 2: Inc in each sc around. [12 sts]
Rnds 3-15: Sc in each st around. [12 sts]
Stuff lightly.
Rnd 16: [Dec] 6 times. [6 sts]
Fasten off, leaving a tail. Sew arms to sides of body.
Legs (Make 2)
With CC1:
Rnd 1: Make a magic ring, 6 sc in ring. [6 sts]
Rnd 2: Inc in each sc around. [12 sts]
Rnd 3: [Sc in next st, inc in next st] 6 times. [18 sts]
Rnds 4-16: Sc in each st around. [18 sts]
Stuff lightly.
Rnd 17: [Sc in next st, dec] 6 times. [12 sts]
Rnd 18: [Dec] 6 times. [6 sts]
Fasten off, leaving a tail. Sew legs to bottom of body.
Tail
With CC1:
Rnd 1: Make a magic ring, 6 sc in ring. [6 sts]
Rnds 2-20: Sc in each st around. [6 sts]
Fasten off, leaving a tail for sewing. Sew tail to back of body.
Finishing
- With black yarn, embroider eyes and nose on face.
- With black yarn, embroider a smiling mouth.
- With CC2, add small tufts of hair at top of head if desired.
- Weave in all ends securely.
Finishing the Set
- Block all pieces if necessary by laying flat on a towel, misting with water, and allowing to dry completely.
- Ensure all ends are woven in securely.
- Check that all buttons and appliqués are attached firmly.
Care Instructions
- Machine wash on gentle cycle with mild detergent
- Lay flat to dry
- Do not bleach
- Do not iron directly on decorative elements
This adorable monkey-themed baby set makes a perfect gift that will be treasured by parents and loved by little ones. The coordinated design creates a cohesive look while each piece remains functional and practical for everyday use.
Happy crocheting!
