

Table of Contents
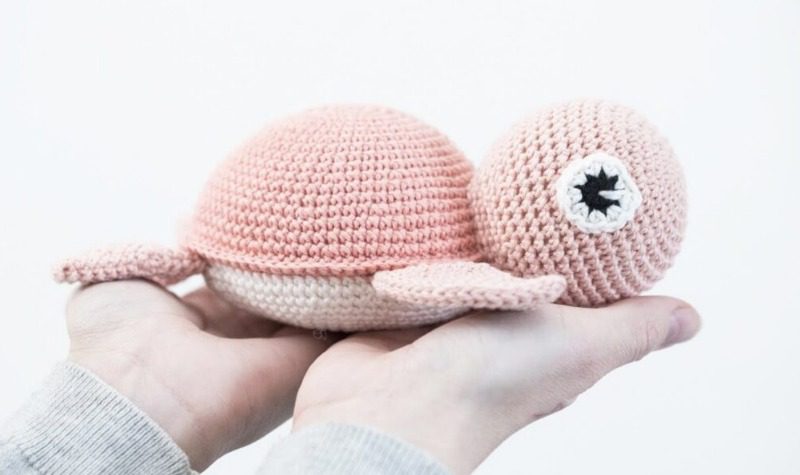
Are you searching for a charming ocean-themed crochet project? This Turtle Amigurumi sea turtle amigurumi pattern creates a delightful stuffed marine friend with a distinctive shell and sweet expression. Perfect for beginners advancing to intermediate techniques, this detailed guide walks you through creating a huggable turtle that combines simple stitches with unique construction methods for a rewarding finished project.
Essential Materials for Your Sea Turtle Amigurumi
Before diving into this oceanic Turtle Amigurumi project, gather these supplies:
- Turtle Amigurumi Yarn:
- Medium Weight Cotton Yarn (Lace 4) in:
- Salmon (for shell)
- Light Gray (for head, legs, and tail)
- Dark Gray (for shell details)
- White (for underbelly)
- Black (for eyes)
- Medium Weight Cotton Yarn (Lace 4) in:
- Hook: 3.5 mm (US size E) crochet hook
- Notions:
- Polyester fiberfill stuffing
- Yarn needle
- Scissors
- Stitch markers
Turtle Amigurumi Crochet Terminology Used
- mr: Magic ring – starting ring that can be tightened
- ch: Chain stitch
- sl st: Slip stitch
- sc: Single crochet
- reverse sc: Reverse single crochet (crab stitch)
- BLO: Back loop only
- FLO: Front loop only
- dec: Decrease – two single crochet stitches worked together
- inc: Increase – two single crochet stitches in the same stitch
- F/O: Fasten off
- … repeat **: Repeat the pattern between asterisks the number of times indicated
Step-by-Step Sea Turtle Amigurumi Pattern Instructions
Turtle Amigurumi Creating the Body/Shell (Salmon and White Yarn)
Round 1: 8 sc in a magic ring (8) Round 2: inc around (16) Round 3: 1 sc, inc, repeat around (24) Round 4: 2 sc, inc, repeat around (32) Round 5: 3 sc, inc, repeat around (40) Round 6: sc even (40) Round 7: 4 sc, inc, repeat around (48) Rounds 8-9: sc even (48) Round 10: 5 sc, inc, repeat around (56) Rounds 11-12: sc even (56) Round 13: 6 sc, inc, repeat around (64) Round 14: Working in FLO, 64 reverse sc (64) – This creates the distinctive shell edge
Switch to white yarn for the underbelly:
Round 15: Work in BLO of round 13, 6 sc, dec, repeat around (56) Round 16: 5 sc, dec, repeat around (48) Round 17: 4 sc, dec, repeat around (40) – Begin stuffing the body Round 18: 3 sc, dec, repeat around (32) Round 19: 2 sc, dec, repeat around (24) Round 20: 1 sc, dec, repeat around (16) – Complete stuffing firmly Round 21: dec around (8)
Fasten off, close the hole, and hide the yarn end.
Using dark gray yarn, embroider several short horizontal lines on the shell for texture and detail.
Turtle Amigurumi Forming the Head (Light Gray Yarn)
Round 1: 6 sc in a magic ring (6) Round 2: inc around (12) Round 3: 1 sc, inc, repeat around (18) Round 4: 2 sc, inc, repeat around (24) Round 5: 3 sc, inc, repeat around (30) Round 6: 4 sc, inc, repeat around (36) Rounds 7-11: sc even (36) Round 12: 4 sc, dec, repeat around (30) Round 13: 3 sc, dec, repeat around (24) Round 14: 2 sc, dec, repeat around (18)
Fasten off, leaving a long tail of yarn for sewing the head to the body. Stuff the head firmly.
Using black yarn, embroider V-shaped eyes on the head to give your turtle character.
Turtle Amigurumi Crafting the Front Legs (Light Gray Yarn – Make 2)
Round 1: 6 sc in a magic ring (6) Round 2: 4 sc, 2 inc (8) Round 3: sc even (8) Round 4: 6 sc, 2 inc (10) Round 5: sc even (10) Round 6: 8 sc, 2 inc (12) Round 7: 10 sc, 2 inc (14) Round 8: 4 sc, 2 inc, 4 sc, 2 dec (14) Round 9: dec, 3 sc, 2 inc, 3 sc, 2 dec (13) Round 10: 1 sc, dec around (7)
Fasten off, leaving a long tail of yarn for sewing. Do not stuff the leg; instead, flatten it before attaching to the front side of the body below the reverse sc round (shell edge).
Turtle Amigurumi Creating the Back Legs (Light Gray Yarn – Make 2)
Round 1: 6 sc in a magic ring (6) Round 2: 4 sc, 2 inc (8) Round 3: sc even (8) Round 4: 6 sc, 2 inc (10) Round 5: sc even (10) Round 6: 8 sc, 2 inc (12) Round 7: 3 sc, 2 inc, 3 sc, 2 dec (12) Round 8: dec, 2 sc, 2 inc, 2 sc, 2 dec (11) Round 9: 1 sc, dec around (6)
Fasten off, leaving a long tail of yarn for sewing. Do not stuff the leg; instead, flatten it before attaching to the back side of the body below the reverse sc round (shell edge).
Making the Tail (Light Gray Yarn)
Round 1: 4 sc in a magic ring (4) Round 2: 1 sc, inc, repeat twice (6) Round 3: 2 sc, inc, repeat twice (8)
Fasten off, leaving a long tail of yarn for sewing. Do not stuff the tail; instead, flatten it before attaching to the back of the body below the reverse sc round (shell edge).
Final Assembly Instructions
- Attach the Head:
- Position the head at the front of the body
- Sew securely to the white underbelly portion
- Ensure the face is properly aligned with the front of the shell
- Attach the Front Legs:
- Position the flattened front legs on either side of the body
- Place them below the shell edge (reverse sc round)
- Sew securely, angling them slightly outward
- Attach the Back Legs:
- Position the flattened back legs on either side of the body toward the rear
- Place them below the shell edge
- Sew securely, angling them slightly backward
- Attach the Tail:
- Position the flattened tail at the back of the body
- Place it centered below the shell edge
- Sew securely in place
Special Technique Highlight: The Turtle Shell
The distinctive feature of this sea turtle is its textured shell created with the reverse single crochet stitch (also known as crab stitch). This stitch creates a rounded, cord-like edge that perfectly defines the boundary between the turtle’s shell and its body. The technique involves working single crochet stitches from left to right (the opposite direction of normal crochet), which creates a twisted, rope-like appearance.
To work reverse single crochet:
- Insert hook from front to back into the stitch to the right
- Yarn over and pull up a loop
- Yarn over and pull through both loops on hook
- Continue working from right to left around the entire shell edge
Customization Ideas for Your Sea Turtle Amigurumi
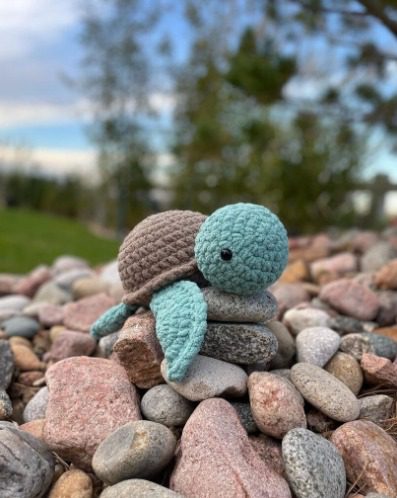
- Color Variations: Create turtles in different natural shell colors like green, brown, or blue
- Size Adjustments: Use different yarn weights to create larger or smaller turtles
- Shell Texture: Add more embroidery or surface stitches to the shell for added texture
- Facial Features: Try different eye placements or add a small smile
- Accessorize: Add small marine elements like a tiny starfish or seaweed
Ocean-Themed Display Ideas
- Create a sea turtle family with different sizes
- Pair with crocheted coral, fish, or other ocean creatures
- Display in a beach-themed room or bathroom
- Use as a nurturing tool to teach children about marine conservation
- Create a mobile for an ocean-themed nursery
Check this out :Crocheting a Charming Amigurumi Squirrel with Acorn
Care Instructions for Your Crocheted Sea Turtle
- Spot clean with mild soap and water as needed
- Air dry thoroughly away from direct heat
- Reshape flattened appendages gently if needed
- Store in a clean, dry place
- If giving to a child, periodically check security of all attached parts
Creating this adorable sea turtle amigurumi combines several basic crochet techniques with the special reverse single crochet stitch to achieve a realistic shell effect. The result is a charming ocean friend that captures the essence of these beloved marine creatures. Whether made as a gift for a turtle enthusiast or as a decorative item for your own space, this project offers both creativity and satisfaction.
Happy crocheting!
