

Table of Contents
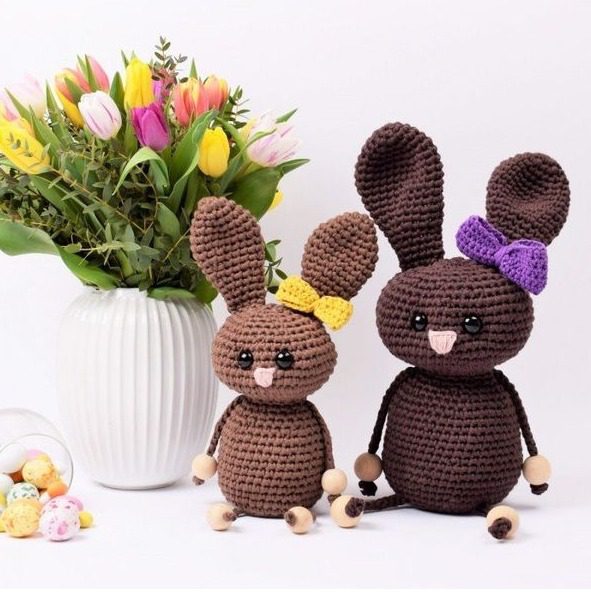
Looking for a delightful Easter decoration that brings warmth and character to your holiday celebrations? This Flora Easter Bunny Flora amigurumi pattern creates an adorable, huggable companion that stands approximately 38 centimeters tall (including ears). With its charming design and cuddly proportions, this Easter bunny makes a perfect seasonal gift or a sweet addition to your spring décor collection.
Materials for Your Easter Bunny Flora
Before beginning this enchanting crochet project, gather these supplies:
- Crochet hooks in sizes 4.0 mm and 5.0 mm
- Hobbii Ribbon yarn in brown (col. 40) – approximately 345g
- Rainbow Cotton 8/4 in pink (col. 46) – approximately 3 meters for the nose
- Rainbow Cotton 8/4 in contrasting color (col. 39) – approximately 10g for the bow
- One pair of safety eyes (18 mm)
- Four wooden beads (30 mm)
- Polyester toy stuffing (150-175g)
- Tapestry needle for assembly
Understanding Flora Terminology
To help you follow the pattern smoothly, here’s a guide to the abbreviations used:
- Chain (ch): The foundation stitch that begins many crochet projects
- Stitch (st): A single crochet unit
- Magic ring (mr): A technique to begin crocheting in the round with no hole in the center
- Single crochet (sc): The basic stitch used for most of this pattern
- Slip stitch (sl st): Used for joining rounds and creating a smooth finish
- Half double crochet (hdc): A stitch slightly taller than a single crochet
- Back loops only (BLO): Working through only the back loop of each stitch
- Together (tog): Combining stitches together, typically for decreasing
Creating Flora Body
The body forms the foundation of your Easter bunny. Using brown yarn and a 5.0 mm crochet hook:
Round 1: Create 6 single crochets in a magic ring [6 stitches total] Round 2: Increase in each stitch by making 2 single crochets in each stitch [12 stitches total] Round 3: Work (1 single crochet, increase in next stitch) 6 times around [18 stitches total] Round 4: Work (1 single crochet in next 2 stitches, increase in next stitch) 6 times around [24 stitches total] Round 5: Work (1 single crochet in next 3 stitches, increase in next stitch) 6 times around [30 stitches total] Round 6: Work (1 single crochet in next 4 stitches, increase in next stitch) 6 times around [36 stitches total] Round 7: Work (1 single crochet in next 5 stitches, increase in next stitch) 6 times around [42 stitches total] Round 8: Working in back loops only, work (1 single crochet in next 6 stitches, increase in next stitch) 6 times around [48 stitches total] Round 9: Work (1 single crochet in next 7 stitches, increase in next stitch) 6 times around [54 stitches total] Rounds 10-14: Work 1 single crochet in each stitch for 5 rounds [54 stitches remain] Round 15: Work (1 single crochet in next 7 stitches, decrease) 6 times around [48 stitches total] Rounds 16-20: Work 1 single crochet in each stitch for 5 rounds [48 stitches remain] Round 21: Work (1 single crochet in next 6 stitches, decrease) 6 times around [42 stitches total] Round 22: Work 1 single crochet in each stitch [42 stitches remain] Round 23: Work (1 single crochet in next 5 stitches, decrease) 6 times around [36 stitches total] Round 24: Work (1 single crochet in next 4 stitches, decrease) 6 times around [30 stitches total] Round 25: Work (1 single crochet in next 3 stitches, decrease) 6 times around [24 stitches total] Round 26: Work (1 single crochet in next 2 stitches, decrease) 6 times around [18 stitches total]
Don’t finish off here, as you’ll continue crocheting to form the head. Make sure to stuff the body firmly at this point.
Forming the Bunny’s Head
The head Flora connects directly to the body in this design, creating a seamless look:
Round 27: Increase in each stitch by making 2 single crochets in each stitch [36 stitches total] Round 28: Work (1 single crochet in next 5 stitches, increase in next stitch) 6 times around [42 stitches total] Round 29: Work (1 single crochet in next 6 stitches, increase in next stitch) 6 times around [48 stitches total] Round 30: Work (1 single crochet in next 7 stitches, increase in next stitch) 6 times around [54 stitches total] Round 31: Work (1 single crochet in next 8 stitches, increase in next stitch) 6 times around [60 stitches total] Rounds 32-36: Work 1 single crochet in each stitch for 5 rounds [60 stitches remain] Round 37: Work (1 single crochet in next 8 stitches, decrease) 6 times around [54 stitches total] Round 38: Work (1 single crochet in next 7 stitches, decrease) 6 times around [48 stitches total] Round 39: Work (1 single crochet in next 6 stitches, decrease) 6 times around [42 stitches total] Round 40: Work (1 single crochet in next 5 stitches, decrease) 6 times around [36 stitches total]
At this point, place the safety eyes between rounds 35-36 (which correspond to rounds 9-10 of the head section) with 6-7 stitches between them.
Round 41: Work (1 single crochet in next 4 stitches, decrease) 6 times around [30 stitches total] Round 42: Work (1 single crochet in next 3 stitches, decrease) 6 times around [24 stitches total]
Stuff the head firmly as you continue decreasing.
Round 43: Work (1 single crochet in next 2 stitches, decrease) 6 times around [18 stitches total] Round 44: Work (1 single crochet, decrease) 6 times around [12 stitches total] Round 45: Decrease 6 times around [6 stitches total]
Sew the opening closed securely. Using pink cotton yarn, embroider a simple nose on the front of the face.
Creating Flora the Bunny’s Limbs
The legs and arms are created using the same technique, giving your bunny a cohesive look:
Using brown yarn and a 5.0 mm crochet hook, make 2 identical pieces (each serves as both arms and legs):
Chain 54 stitches. Starting from the second chain from the hook, work 1 slip stitch in each chain to the end of the row.
Pull one chain assembly through round 9 of the body, spacing them about 10-11 stitches apart. Place a wooden bead on each end to secure. Pull the other chain assembly through just below the head and place wooden beads on each end. This creates both the arms and legs in one step.
Crafting Flora the Bunny’s Ears
The ears give your Easter bunny its distinctive character. Using brown yarn and a 5.0 mm crochet hook, make 2:
Round 1: Create 6 single crochets in a magic ring [6 stitches total] Round 2: Increase in each stitch by making 2 single crochets in each stitch [12 stitches total] Round 3: Work (1 single crochet, increase in next stitch) 6 times around [18 stitches total] Round 4: Work 1 single crochet in each stitch [18 stitches remain] Round 5: Work (1 single crochet in next 2 stitches, increase in next stitch) 6 times around [24 stitches total] Round 6: Work (1 single crochet in next 7 stitches, increase in next stitch) 3 times around [27 stitches total] Rounds 7-8: Work 1 single crochet in each stitch for 2 rounds [27 stitches remain] Round 9: Work (1 single crochet in next 7 stitches, decrease) 3 times around [24 stitches total] Round 10: Work 1 single crochet in each stitch [24 stitches remain] Round 11: Work (1 single crochet in next 6 stitches, decrease) 3 times around [21 stitches total] Round 12: Work 1 single crochet in each stitch [21 stitches remain] Round 13: Work (1 single crochet in next 5 stitches, decrease) 3 times around [18 stitches total] Round 14: Work 1 single crochet in each stitch [18 stitches remain] Round 15: Work (1 single crochet in next 4 stitches, decrease) 3 times around [15 stitches total] Round 16: Work 1 single crochet in each stitch [15 stitches remain] Round 17: Work (1 single crochet in next 3 stitches, decrease) 3 times around [12 stitches total] Rounds 18-20: Work 1 single crochet in each stitch for 3 rounds [12 stitches remain]
Close the opening with single crochets, leaving a long yarn tail for attachment. Sew the ears securely to the top of the bunny’s head.
Adding the Decorative Bow
The bow adds a charming finishing touch to your Easter bunny. Using your choice of colored cotton yarn (contrasting with the brown) and a 4.0 mm crochet hook:
Work with double strands of yarn throughout:
Chain 32 stitches and join into a ring with a slip stitch. Row 1: Chain 1, work 1 half double crochet in each stitch around, join with a slip stitch. Row 2: Chain 1, work 1 half double crochet in each stitch around, join with a slip stitch. Row 3: Chain 1, work 1 half double crochet in each stitch around, join with a slip stitch. Row 4: Chain 1, work 1 half double crochet in each stitch around, join with a slip stitch.
Leave a long tail for assembly. Wrap the yarn several times around the middle section to create the bow shape. Sew the completed bow to the front of one ear on your bunny.
Check this out :Amigurumi Wolf Crochet Pattern
Your Completed Easter Bunny Flora
Congratulations on creating your Easter Bunny Flora! Standing approximately 38 centimeters tall including the ears, this charming bunny brings a touch of handmade warmth to your Easter decorations. The combination of the cuddly brown body, distinctive long ears, and decorative bow makes this bunny a standout piece that can be displayed year after year.
Feel free to customize your bunny by choosing different colors for the bow or even the body. You might create a family of bunnies in various sizes by adjusting the hook size or yarn weight. The wooden beads used for the limbs add a special touch of craftsmanship that elevates this amigurumi beyond ordinary stuffed toys.
Your Easter Bunny Flora will make a wonderful seasonal decoration, a special gift for children or adults, or a cherished addition to your spring decor collection. If you share your creation on social media, consider tagging the original designer to connect with other crafters who’ve enjoyed making this delightful pattern.
Happy crocheting, and may your Easter Bunny Flora bring joy to your holiday celebrations!
