

Table of Contents
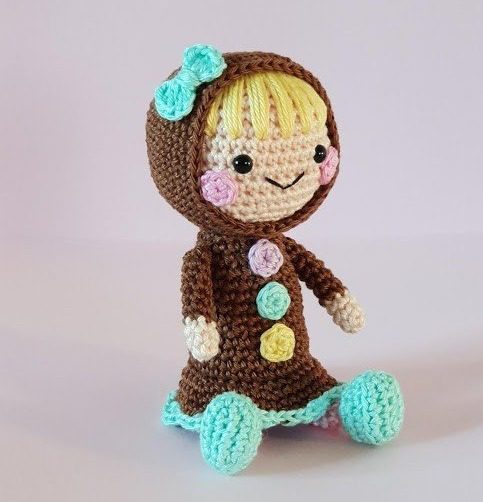
Create Girl Doll an adorable amigurumi girl doll with this comprehensive crochet pattern. This charming doll, measuring approximately 5 inches tall by 2½ inches wide (13 x 6 cm), features a cute brown dress with mint accents, striped legs, and delicate details. Perfect for intermediate to experienced crocheters, this pattern will guide you through creating a sweet handmade doll that makes an excellent gift or cherished keepsake.
Materials Needed for Your Amigurumi Doll
Before starting your Girl Doll journey, gather these materials:
- Crochet hook size B/C-2/3 (2.5 mm)
- Rainbow Cotton 8/4 yarn in the following colors:
- Light purple (40)
- Pastel mint (25)
- Pastel yellow (53)
- White (01)
- Pink (44)
- Nude (03)
- Brown (007)
- Sewing pins for assembly
- Fiber filling for stuffing
- Black embroidery yarn for facial features
- Safety eyes (6mm)
- Tapestry needle for sewing pieces together
You’ll need approximately one skein of each yarn color to complete the project.
Understanding Girl Doll Terminology
To follow thisGirl Doll successfully, familiarize yourself with these terms:
- Magic Ring: The starting point for crocheting in the round
- Chain (ch): The foundation stitch for starting rows
- Single Crochet (sc): The basic stitch used throughout most of the pattern
- Increase (inc): Working two single crochet stitches in the same stitch
- Decrease (dec): Working two stitches together to reduce count
- Slip Stitch (sl st): Used to join rounds
- Half Double Crochet (hdc): A slightly taller stitch used for certain details
Creating Girl Doll Head
Using nude-colored yarn:
Round 1: Create a magic ring and work 6 single crochet stitches into it [6 stitches] Round 2: Increase in each stitch around [12 stitches] Round 3: Work 1 single crochet, then increase in next stitch repeat 6 times [18 stitches] Round 4: Work 1 single crochet, increase, work 2 single crochet, then increase repeat 5 times, work 1 single crochet [24 stitches] Round 5: Work 3 single crochet, then increase repeat 6 times [30 stitches] Round 6: Work 2 single crochet, increase, work 4 single crochet, then increase repeat 5 times, work 2 single crochet [36 stitches] Round 7: Work 5 single crochet, then increase repeat 6 times [42 stitches] Rounds 8-13: Work 42 single crochet for 6 rounds [42 stitches] Round 14: Work 5 single crochet, then decrease repeat 6 times [36 stitches]
At this point, attach safety eyes between rounds 10 and 11, with approximately 6 stitches between the eyes.
Round 15: Work 2 single crochet, decrease, work 4 single crochet, then decrease repeat 5 times, work 2 single crochet [30 stitches] Round 16: Work 3 single crochet, then decrease repeat 6 times [24 stitches]
Begin stuffing the head with fiber filling and continue adding stuffing as you work.
Round 17: Work 1 single crochet, decrease, work 2 single crochet, then decrease repeat 5 times, work 1 single crochet [18 stitches] Round 18: Work 1 single crochet, then decrease repeat 6 times [12 stitches] Round 19: Decrease 6 times [6 stitches]
Fasten off and sew the remaining hole closed. Embroider a black mouth on the face. Add hair using brown or yellow yarn according to your preference.
Girl Doll Adding Rosy Cheeks
Using pink yarn, make two cheeks:
Round 1: Create a magic ring and work 6 single crochet stitches into it [6 stitches] Finish with 1 slip stitch in the first single crochet. Fasten off, weaving in the end, but leave a long tail of approximately 4 inches for attaching the cheeks to the face.
Girl Doll Crafting the Hood
Using brown yarn:
Round 1: Create a magic ring and work 6 single crochet stitches into it [6 stitches] Round 2: Increase in each stitch around [12 stitches] Round 3: Work 1 single crochet, then increase repeat 6 times [18 stitches] Round 4: Work 1 single crochet, increase, work 2 single crochet, then increase repeat 5 times, work 1 single crochet [24 stitches] Round 5: Work 3 single crochet, then increase repeat 6 times [30 stitches] Round 6: Work 2 single crochet, increase, work 4 single crochet, then increase repeat 5 times, work 2 single crochet [36 stitches] Round 7: Work 5 single crochet, then increase repeat 6 times [42 stitches] Rounds 8-18: Work 42 single crochet for 11 rounds [42 stitches]
Finish with 1 slip stitch in the last stitch. Fasten off, weaving in the end, but leave a long tail for sewing the hood to the head. Place the hood on the head and secure it with small, neat stitches.
Girl Doll Making the Legs
Make two legs using your chosen colors for the feet:
Round 1: Chain 5 Round 2: Start in the 2nd chain from the hook, work 3 single crochet, work 3 single crochet in the same stitch, turn without turning the work, work 2 single crochet, work 2 single crochet in the same stitch Round 3: Work 2 single crochet in the same stitch, work 3 single crochet, work 2 single crochet in the same stitch, work 1 single crochet, work 2 single crochet in the same stitch, work 2 single crochet, work 2 single crochet in the same stitch, work 1 single crochet Round 4: Working through back loops only, work 5 single crochet, 3 half double crochet, 6 single crochet Round 5: Work 4 single crochet, decrease once, work 2 single crochet, decrease once, work 4 single crochet
Add fiber filling to the foot.
Round 6: Decrease 6 times [6 stitches] Round 7: Switch to pink yarn, work 6 single crochet [6 stitches] Round 8: Switch to white yarn, work 6 single crochet [6 stitches] Round 9: Switch to pink yarn, work 6 single crochet [6 stitches] Round 10: Switch to white yarn, work 6 single crochet [6 stitches] Round 11: Switch to pink yarn, work 6 single crochet [6 stitches] Round 12: Switch to white yarn, work 6 single crochet [6 stitches] Round 13: Switch to pink yarn, work 6 single crochet [6 stitches] Round 14: Switch to white yarn, work 6 single crochet [6 stitches] Round 15: Switch to pink yarn, work 6 single crochet [6 stitches]
Fasten off, weaving in the end, but leave a long tail for attaching the legs to the body later.
Girl Doll Forming the Body and Dress
Using brown yarn:
Round 1: Create a magic ring and work 6 single crochet stitches into it [6 stitches] Round 2: Increase in each stitch around [12 stitches] Round 3: Work 1 single crochet, then increase repeat 6 times [18 stitches] Round 4: Work 1 single crochet, increase, work 2 single crochet, then increase repeat 5 times, work 1 single crochet [24 stitches] Round 5: Work 3 single crochet, then increase repeat 6 times [30 stitches] Round 6: Work 30 single crochet [30 stitches] Round 7: Working through back loops only, work 30 single crochet [30 stitches] Round 8: Work 13 single crochet, decrease once, work 13 single crochet, decrease once [28 stitches] Round 9: Work 6 single crochet, decrease once, work 12 single crochet, decrease once, work 6 single crochet [26 stitches] Round 10: Work 26 single crochet [26 stitches] Round 11: Decrease once, work 13 single crochet, decrease once, work 9 single crochet [24 stitches] Round 12: Work 24 single crochet [24 stitches] Round 13: Work 4 single crochet, decrease once, work 10 single crochet, decrease once, work 6 single crochet [22 stitches] Round 14: Work 22 single crochet [22 stitches] Round 15: Decrease once, work 9 single crochet, decrease once, work 9 single crochet [20 stitches] Round 16: Work 20 single crochet [20 stitches] Round 17: Work 2 single crochet, decrease once, work 8 single crochet, decrease once, work 6 single crochet [18 stitches] Round 18: Work 18 single crochet [18 stitches]
Finish with 1 slip stitch in the last stitch.
Now, create the skirt using the front loops of round 7:
Round 1: Work 2 single crochet, increase, work 4 single crochet, then increase repeat 5 times, work 2 single crochet [36 stitches] Round 2: Work 5 single crochet, then increase repeat 6 times [42 stitches] Round 3: Work 3 single crochet, increase, work 6 single crochet, then increase repeat 5 times, work 3 single crochet [48 stitches] Rounds 4-5: Work 48 single crochet for 2 rounds [48 stitches] Round 6: Switch to pastel mint yarn, work 1 stitch together, skip 1 stitch, work 5 stitches in the same stitch, skip 1 stitch repeat around
Finish with 1 slip stitch. Fasten off and weave in ends.
Girl Doll Creating the Arms
Make two arms using nude-colored yarn:
Round 1: Create a magic ring and work 6 single crochet stitches into it [6 stitches] Rounds 2-3: Work 6 single crochet for 2 rounds [6 stitches] Rounds 4-10: Switch to brown yarn, work 6 single crochet for 7 rounds [6 stitches]
Fasten off, weaving in the end, but leave a long tail for attaching the arms to the body.
Making Decorative Buttons
Make three buttons in different colors (purple, pastel mint, and pink):
Round 1: Create a magic ring and work 6 single crochet stitches into it [6 stitches] Finish with 1 slip stitch in the first single crochet. Fasten off, weaving in the end, but leave a long tail for attaching the buttons to the dress.
Crafting the Bow
Using pastel mint yarn:
Create a magic ring but don’t tighten it completely. You will work all stitches inside this spacious ring. Work 3 chain stitches, 2 stitches, 3 chain stitches, 1 stitch together, 3 chain stitches, 2 stitches, 3 chain stitches, 1 slip stitch. Now tighten the ring to form the bow shape.
Fasten off, weaving in the end, but leave a long tail of approximately 8 inches. Use this tail to wind around the middle of the bow several times until you achieve the desired appearance.
Final Assembly
- Attach the head with the hood to the body using pins to position it correctly, then sew securely
- Attach the legs with pins and sew them to the bottom of the body, one at a time
- Position the arms with pins and sew them to the sides of the body
- Sew the decorative buttons to the front of the dress
- Attach the bow to the side of the head for a finishing touch
Check this out :Crochet an Adorable Amigurumi Giraffe with Complete Pattern
Completion and Care Tips
Your amigurumi girl doll is now complete! This charming handcrafted doll showcases your crochet skills and attention to detail. The combination of the brown dress with mint accents, striped legs, and sweet facial features creates an irresistible character that will be treasured.
For best results when displaying or gifting your amigurumi doll:
- Store in a clean, dry place away from direct sunlight to prevent color fading
- If the doll becomes dusty, gently spot clean with a damp cloth
- Ensure all parts are securely attached before giving to small children
- Consider creating matching accessories or companion dolls to build a collection
Amigurumi dolls are wonderful projects that combine basic crochet techniques with charming results. The attention to small details—like the striped legs, decorative buttons, and sweet expression—transforms simple yarn into a character full of personality.
Whether you’re creating this doll for yourself or as a gift, the finished piece represents your crafting skill and creativity. Each stitch contributes to a delightful handmade treasure that brings joy to creator and recipient alike.
Happy crocheting, and may your amigurumi girl doll bring smiles to all who see her!
