

Table of Contents
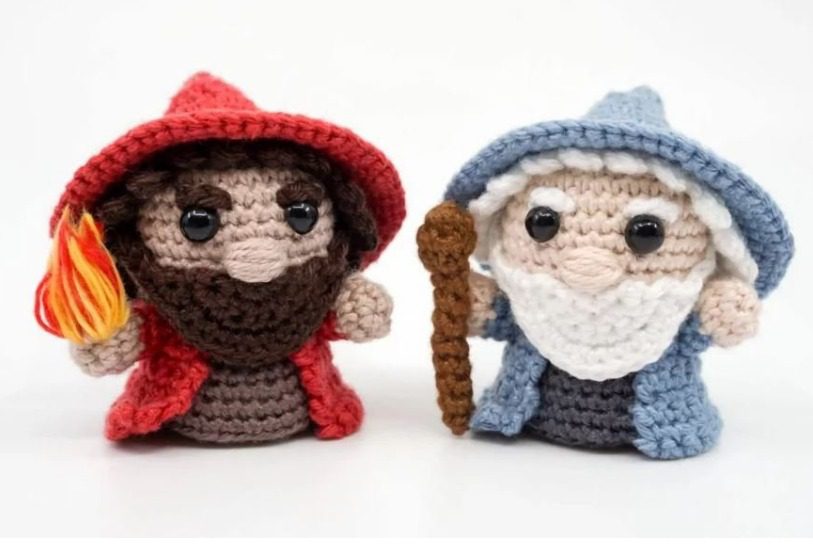
Bring magic into your home with these charming mage and wizard amigurumi dolls! This Mage And Wizard comprehensive crochet pattern guides you through creating two enchanting characters: a blue mage with white hair and a red wizard with coffee-colored hair. Perfect for fantasy lovers, these magical figures make wonderful gifts, decorations, or collectibles for your handmade amigurumi collection.
Materials Needed For Your Mage And Wizard
Before beginning your magical journey, gather these supplies:
- Yarn in the following colors:
- For the blue mage: Soft Apricot (skin), Anthracite (body), Denim (coat/hat), White (hair/beard), Maroon (wand)
- For the red wizard: Bast (skin), Teddy (body), Cherry (coat/hat), Coffee (hair/beard), Sun/Signal Red/Mango (flame)
- Crochet hook (size appropriate for your yarn)
- Safety eyes
- Polyfill stuffing
- Yarn needle
- Stitch markers
- Scissors
- Fur brush (for the flame effect)
Mage And Wizard Important Notes Before You Begin
The blue mage and red wizard follow almost identical Mage And Wizard, with the primary difference being the colors used and the final embellishment (wand versus flame). This pattern uses standard amigurumi techniques, working in continuous spiral rounds unless otherwise noted. Keep your stitches tight to prevent stuffing from showing through. Let’s start creating your magical companions!
Mage And Wizard Creating The Head And Body
The head and body are crocheted as one piece, beginning with the head and working downward.
Mage And Wizard Head
Start with Soft Apricot (blue mage) or Bast (red wizard) yarn. Round 1: Create a magic ring and work 6 single crochet stitches into it. Round 2: Increase in each stitch around (12 stitches). Round 3: Work [1 single crochet, 1 increase] repeated around (18 stitches). Round 4: Work 1 single crochet, 1 increase, then [2 single crochet, 1 increase] repeated 5 times, ending with 1 single crochet (24 stitches). Round 5: Work [3 single crochet, 1 increase] repeated around (30 stitches). Rounds 6-11: Work single crochet in each stitch around for 6 rounds (30 stitches). Round 12: Work [3 single crochet, 1 decrease] repeated around (24 stitches). Round 13: Work 1 single crochet, 1 decrease, then [2 single crochet, 1 decrease] repeated 5 times, ending with 1 single crochet (18 stitches). Round 14: Work [1 single crochet, 1 decrease] repeated around (12 stitches).
Mage And Wizard Body
Round 15: Working in the front loops only, change to Anthracite (blue mage) or Teddy (red wizard). Work [1 single crochet, 1 increase] repeated around (18 stitches). Round 16: Stuff the head with polyfill. Work 1 single crochet, 1 increase, then [2 single crochet, 1 increase] repeated 5 times, ending with 1 single crochet (24 stitches). Rounds 17-18: Work single crochet in each stitch around for 2 rounds (24 stitches). Round 19: Work [7 single crochet, 1 increase] repeated around (27 stitches). Round 20: Work 4 single crochet, 1 increase, then [8 single crochet, 1 increase] repeated 2 times, ending with 4 single crochet (30 stitches). Round 21: Work single crochet in each stitch around (30 stitches). Round 22: Working in the back loops only, work [3 single crochet, 1 decrease] repeated around (24 stitches). Round 23: Working in the back loops only, work single crochet in each stitch (24 stitches). Rounds 24-25: Work single crochet in each stitch around for 2 rounds (24 stitches). Round 26: Work 1 single crochet, 1 decrease, then [2 single crochet, 1 decrease] repeated 5 times, ending with 1 single crochet (18 stitches). Round 27: Work [1 single crochet, 1 decrease] repeated around (12 stitches). Round 28: Work decrease stitches all around (6 stitches).
Stuff only the head with polyfill, leaving the body unstuffed. Cut the yarn with a generous tail, close the opening, and weave in the end.
Mage And Wizard Creating The Arms
Make two arms using the same technique.
Start with Soft Apricot (blue mage) or Bast (red wizard) yarn. Round 1: Create a magic ring and work 6 single crochet stitches into it. Round 2: Increase in each stitch around (12 stitches). Round 3: Decrease in each stitch around (6 stitches). Round 4: Change to Denim (blue mage) or Cherry (red wizard). Work single crochet in each stitch around (6 stitches). Round 5: Work single crochet in each stitch around (6 stitches).
Stuff only the front part of each arm with a small amount of polyfill. Cut the yarn leaving a long tail for sewing the arms to the body later.
Mage And Wizard Creating The Coat
The coat forms the main body of the wizard’s robe, worked in rows rather than rounds.
Using Denim (blue mage) or Cherry (red wizard) yarn: Row 1: Chain 25 stitches. Row 2: Work single crochet in the second chain from the hook and in each remaining chain (24 stitches). Row 3: Chain 1 (turning chain), work single crochet in each stitch across (24 stitches). Row 4: Chain 1, work 6 single crochet, 1 decrease, 8 single crochet, 1 decrease, 6 single crochet (22 stitches). Row 5: Chain 1, work single crochet in each stitch across (22 stitches). Row 6: Chain 1, work 5 single crochet, 1 decrease, 8 single crochet, 1 decrease, 5 single crochet (20 stitches). Row 7: Chain 1, work single crochet in each stitch across (20 stitches). Row 8: Chain 1, work 4 single crochet, 1 decrease, 8 single crochet, 1 decrease, 4 single crochet (18 stitches). Row 9: Chain 1, work single crochet in each stitch across (18 stitches).
Cut the yarn, leaving a generous tail for sewing the coat to the body. Cut the thread at the slip knot and weave in the end.
Mage And Wizard Creating The Wizard’s Hat
The pointed hat is a signature part of any wizard’s ensemble.
Using Denim (blue mage) or Cherry (red wizard) yarn: Round 1: Create a magic ring and work 6 single crochet stitches into it. Round 2: Work single crochet in each stitch around (6 stitches). Round 3: Work [1 single crochet, 1 increase] repeated around (9 stitches). Round 4: Work 1 single crochet, 1 increase, then [2 single crochet, 1 increase] repeated 2 times, ending with 1 single crochet (12 stitches). Round 5: Work 2 single crochet, 1 half double crochet, 1 double crochet increase, 4 double crochet, 1 double crochet increase, 1 half double crochet, 2 single crochet (14 stitches). Round 6: Work [2 single crochet, 1 increase] repeated 4 times, then 2 single crochet (18 stitches). Round 7: Work [5 single crochet, 1 increase] repeated around (21 stitches). Round 8: Work 3 single crochet, 1 increase, then [6 single crochet, 1 increase] repeated 2 times, ending with 3 single crochet (24 stitches). Round 9: Work [7 single crochet, 1 increase] repeated around (27 stitches). Round 10: Work 4 single crochet, 1 increase, then [8 single crochet, 1 increase] repeated 2 times, ending with 4 single crochet (30 stitches). Round 11: Work [9 single crochet, 1 increase] repeated around (33 stitches). Round 12: Work 5 single crochet, 1 increase, then [10 single crochet, 1 increase] repeated 2 times, ending with 5 single crochet (36 stitches). Round 13: Working in the front loops only, work [5 single crochet, 1 increase] repeated around (42 stitches). Round 14: Work 3 single crochet, 1 increase, then [6 single crochet, 1 increase] repeated 5 times, ending with 3 single crochet (48 stitches). Round 15: Work [7 single crochet, 1 increase] repeated around (54 stitches). Round 16: Work 4 single crochet, 1 increase, then [8 single crochet, 1 increase] repeated 5 times, ending with 4 single crochet (60 stitches). Round 17: Work just 1 slip stitch.
Cut the yarn and weave in the end.
Mage And Wizard Adding The Hair
The hair is worked into the loops created on round 13 of the hat, where you worked in the front loops only.
Using White (blue mage) or Coffee (red wizard) yarn: Begin by inserting your hook through the first loop from round 13 of the hat (the one right before the slight unevenness between two loops). Pull your yarn through and begin creating the hair strands:
1st Hair Strand: Chain 1, work 1 single crochet into the same stitch you pulled the yarn through, chain 3, work 1 half double crochet into the second chain from hook, work 1 half double crochet, then 2 single crochet along the hat.
Long Hair Sections: Repeat [chain 3, 1 half double crochet into the second chain from hook, 1 half double crochet, 2 single crochet along the hat] 6 times.
Short Hair Sections: Repeat [chain 2, 1 half double crochet into the second chain from hook, 2 single crochet along the hat] 4 times.
Long Hair Sections Again: Repeat [chain 3, 1 half double crochet into the second chain from hook, 1 half double crochet, 2 single crochet along the hat] 6 times.
Last Hair Strand: Chain 3, work 1 half double crochet into the second chain from hook, work 1 half double crochet, then 1 slip stitch on the hat.
Cut the yarn and weave in the end.
Mage And Wizard Creating The Beard
The flowing beard gives your wizard character and wisdom.
Using White (blue mage) or Coffee (red wizard) yarn: Row 1: Create a magic ring and work 3 single crochet stitches into it. Row 2: Chain 1 (turning chain), work 1 increase, 3 single crochet into the next stitch, 1 increase (7 stitches). Row 3: Chain 1, repeat [1 increase, 1 single crochet] 3 times, then 1 increase (11 stitches). Row 4: Chain 1, repeat [2 single crochet, 1 increase] 3 times, then 2 single crochet (14 stitches). Row 5: Chain 8, work single crochet in the second chain from hook and in each remaining chain (7 stitches). Row 6: Work 1 single crochet in the next stitch on the beard, 12 slip stitches, 1 single crochet. Row 7: Chain 8, work single crochet in the second chain from hook and in each remaining chain (7 stitches), work 1 slip stitch into the last stitch at the beard.
Cut the yarn, leaving a generous tail for sewing the beard to the face.
Mage And Wizard Creating The Eyebrows
The expressive eyebrows add character to your wizard’s face.
Using White (blue mage) or Coffee (red wizard) yarn, make two identical eyebrows: Row 1: Chain 3 stitches.
Cut the yarn, leaving a generous tail for sewing the eyebrows above the eyes.
Creating The Mage’s Wand
The blue mage needs a magical wand to cast spells.
Using Maroon yarn: Round 1: Create a magic ring and work 6 single crochet stitches into it. Round 2: Increase in each stitch around (12 stitches). Round 3: Decrease in each stitch around (6 stitches). Round 4: Work 1 decrease, 1 single crochet, 1 decrease, 1 single crochet (4 stitches). Rounds 5-10: Work single crochet in each stitch around for 6 rounds (4 stitches).
Cut the yarn, close the opening, and weave in the end.
Creating The Wizard’s Flame
The red wizard needs a magical flame to demonstrate his fire magic.
Using Sun, Signal Red, and Mango yarn:
- Cut two strands of each color (Sun, Signal Red, and Mango) to the same length.
- Knot these threads together in the middle using Bast colored yarn.
- Cut the threads on both sides to equal lengths.
- Use a fur brush to fray the individual threads, creating a fluffy texture.
- Cut the frayed threads into a flame-like shape using scissors.
Leave a length of Bast yarn attached for sewing the flame to the wizard’s hand.
Assembling Your Magical Characters
Now it’s time to bring your magical characters to life by assembling all the pieces:
- Body Preparation: Press the bottom of the body inward to create a stable base, allowing your wizard to stand independently. The body should fold at the stitch edges.
- Coat Attachment: Wrap the coat around the neck with the 18-stitch side at the top and the opening at the front. Sew the coat to the body using Denim (blue mage) or Cherry (red wizard) yarn.
- Arms Placement: Sew the arms to the sides of the body, positioning them just under the head and attaching them to the coat.
- Eyes Installation: Attach the safety eyes after the 7th stitch row from the top center of the head, positioned 4 stitches apart.
- Nose Creation: Embroider the nose with Soft Apricot (blue mage) or Bast (red wizard) yarn. Center the nose under the eyes by pulling the thread horizontally several times between stitches, skipping one stitch and repeating until a thick nose forms.
- Beard Attachment: Sew the beard directly below the nose using White (blue mage) or Coffee (red wizard) yarn. Position the outer ends of the beard so they reach around to the back of the head.
- Eyebrows Placement: Attach the eyebrows directly above the eyes. Pull the ends of the eyebrow threads through two stitches above each eye, with 1 stitch distance between them.
- Hat Positioning: Place the hat on the wizard’s head with the short hair section facing forward, and securely sew it to the head.
- Magical Accessories:
- For the blue mage: Sew the wand to either the right or left hand using Soft Apricot yarn.
- For the red wizard: Sew the flame to either the right or left hand using Bast yarn.

Check this out :Amigurumi Fox Crochet Pattern Tutorial With Cute Hat
Conclusion
Congratulations! You’ve successfully created your magical mage and wizard amigurumi characters. These enchanting figures bring a touch of fantasy and whimsy to any space and make wonderful gifts for fantasy enthusiasts or collectors of handcrafted treasures.
The beauty of amigurumi lies in the personalization – feel free to experiment with different color combinations to create various magical characters. Perhaps a green earth wizard with brown hair or a purple celestial mage with silver accents? Let your imagination guide your hook!
These magical companions make wonderful decorations for bookshelves, desks, or anywhere that could use a touch of enchantment. They’re also perfect companions for storytelling, inspiring magical adventures for children and adults alike.
Remember that each handmade creation carries its own unique charm and character. Embrace any small variations as part of what makes your magical character one-of-a-kind. The time and care you’ve invested in creating these detailed characters results in truly special handcrafted treasures.
Whether you’re creating these magical figures for yourself or as a gift, they’re sure to bring smiles and a sense of wonder. Happy crocheting and may your hook always be filled with magic!
