

Table of Contents
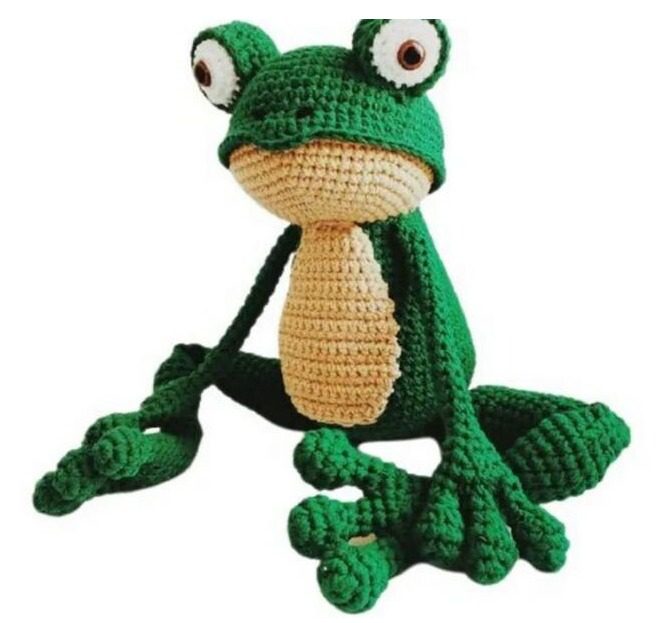
Bring a charming amphibian friend to life with this detailed amigurumi frog crochet pattern. Perfect for crafters looking to expand their amigurumi skills, this frog combines simple techniques with delightful details to create an irresistibly cute companion. Follow along as we guide you through each step of creating your own handmade frog friend.
Introduction to Amigurumi Frog Crochet
Amigurumi—the Japanese art of crocheting small stuffed creatures—has captured the hearts of crafters worldwide. This frog pattern showcases the versatility of amigurumi techniques while being accessible to intermediate crocheters. With its expressive eyes, adorable posture, and charming details, this frog makes a perfect gift or delightful addition to your handmade collection.
Essential Crochet Terminology
Before we begin, let’s review the key abbreviations and techniques you’ll encounter throughout this pattern:
- MR – Magic Ring: A technique to start crocheting in the round with no hole in the center
- Ch – Chain: Creating a series of linked stitches
- Sl st – Slip stitch: Used to join rounds or move across stitches without adding height
- Sc – Single crochet: The fundamental stitch for most amigurumi projects
- Hdc – Half double crochet: A stitch taller than single crochet but shorter than double crochet
- Dc – Double crochet: Creates height and texture in specific sections
- Tr (or trc) – Triple (or treble) crochet: An even taller stitch used for special details
- Inc – Increase: Creating two stitches where one previously existed
- Dec – Decrease: Combining two stitches to reduce the stitch count
- Join – Connecting two stitches, typically using a slip stitch
- Rep – Repeat: Instructions to repeat a sequence of stitches
- FLO – Front loop only: Working through just the front loop of each stitch
Materials Needed
Gather these supplies before beginning your amigurumi frog project:
- Worsted weight yarn in green (main body)
- Worsted weight yarn in yellow or lighter green (belly)
- Worsted weight yarn in white (eyes)
- Small amount of black yarn (pupils)
- Crochet hook appropriate for your yarn (typically 3.5mm-4.5mm)
- Fiberfill stuffing
- Yarn needle
- Scissors
- Stitch markers
- Safety eyes (optional, can be crocheted instead)
Creating the Frog Head
The head forms the distinctive shape of your amigurumi frog. Using green yarn:
- Start with a magic ring and work 6 single crochets into the ring
- Increase in each stitch around (12 stitches)
- Work (1 single crochet, increase) 6 times around (18 stitches)
- Work (2 single crochets, increase) 6 times around (24 stitches)
- Work (3 single crochets, increase) 6 times around (30 stitches)
- Work (4 single crochets, increase) 6 times around (36 stitches)
- Work (5 single crochets, increase) 6 times around (42 stitches)
- Work (6 single crochets, increase) 6 times around (48 stitches)
- Work (7 single crochets, increase) 6 times around (54 stitches)
- Work (8 single crochets, increase) 6 times around (60 stitches) 11-14. Work 4 rows of single crochet without increases (60 stitches per row)
- Work 60 single crochets in the front loops only
For the head continuation: 16. Work 27 single crochets, 1 double crochet, 2 half double crochets, 2 half double crochets, 1 double crochet, 27 single crochets (60 stitches total)
Fasten off, leaving a long tail for sewing. This forms the top portion of the head.
Next, you’ll create the yellow/lighter green belly section by repeating rounds 1-14 in your contrasting color. This piece will be attached to the head using the back loops left free from round 15 of the head.
Remember to stuff the head firmly before closing completely.
Crafting the Frog Body
The body connects to the head and creates the rounded belly of your frog. Using green yarn:
- Follow the same pattern as the head from rounds 1-14 to create a piece with 60 stitches
- Work (8 single crochets, decrease) 6 times around (54 stitches) 3-4. Work 2 rows of single crochet without changes (54 stitches per row)
- Work 16 single crochets, decrease, 7 single crochets, decrease 3 times in total (51 stitches)
- Work 51 single crochets
- Work 15 single crochets, decrease, 6 single crochets, decrease 3 times in total (48 stitches)
- Work 48 single crochets
- Work 14 single crochets, decrease, 5 single crochets, decrease 3 times in total (45 stitches)
- Work 45 single crochets
- Work 13 single crochets, decrease, 4 single crochets, decrease 3 times in total (42 stitches)
- Work 42 single crochets
- Work 12 single crochets, decrease, 3 single crochets, decrease 3 times in total (39 stitches) 14-15. Work 2 rows of single crochet without changes (39 stitches per row)
Creating the Body Patch
The contrasting belly patch adds character to your frog. Using yellow/lighter green yarn:
- Chain 9, then work 8 single crochets starting from the second chain from hook
- Chain 1, turn, work 8 single crochets
- Chain 1, turn, work 10 single crochets (increasing at edges) 4-5. Work 2 rows of 10 single crochets
- Chain 1, turn, work 12 single crochets (increasing at edges) 7-8. Work 2 rows of 12 single crochets 9-10. Work 2 rows of 14 single crochets (increasing at edges) 11-20. Begin decreasing at edges in each row until piece is complete
Once finished, sew the body patch to the front of the frog’s body.
Crafting the Expressive Eyes
The large, expressive eyes give your frog its character. For each eye (make two):
White portion:
- Start with a magic ring and work 6 single crochets into the ring
- Increase in each stitch around (12 stitches)
- Work (1 single crochet, increase) 6 times around (18 stitches)
Green portion:
- Start with a magic ring and work 6 single crochets into the ring using green yarn
- Increase in each stitch around (12 stitches)
- Work (3 single crochets, increase) 3 times around (15 stitches)
- Work (4 single crochets, increase) 3 times around (18 stitches)
- Work (5 single crochets, increase) 3 times around (21 stitches)
- Work 21 single crochets
- Work (5 single crochets, decrease) 3 times around (18 stitches)
Combine the white and green pieces, working single crochets around the edge to join them. Add a small black pupil to the center of each eye, either crocheted or using safety eyes if preferred.
Stuff the eyes lightly before closing and attach them to the head, positioning them for maximum cuteness.
Creating the Frog Feet
Your frog needs four feet—two front and two back. For each foot:
- Start with a magic ring and work 6 single crochets into the ring
- Increase in each stitch around (12 stitches)
- Work 12 single crochets
- Work (decrease) 6 times (6 stitches) 5-6. Work 2 rows of 6 single crochets
For the toes: 7. Chain 7, then working into the second chain from hook, create 6 single crochets along the chain 8. Work 18 single crochets around the foot, incorporating the toe 9. Work (4 single crochets, decrease) 3 times (15 stitches) 10. Work (3 single crochets, decrease) 3 times (12 stitches) 11-12. Work 2 rows of 12 single crochets 13. Work (2 single crochets, decrease) 3 times (9 stitches) 14. Work (1 single crochet, decrease) 3 times (6 stitches)
Fasten off and weave in ends. Repeat to create all four feet.
Forming the Frog Legs
The legs give your frog its character and posture. For each leg:
- Start with a magic ring and work 9 single crochets into the ring 2-6. Work 5 rows of 9 single crochets
- Work (2 single crochets, increase) 3 times (12 stitches)
- Work 12 single crochets
- Work (3 single crochets, increase) 3 times (15 stitches) 10-11. Work 2 rows of 15 single crochets
- Work (3 single crochets, decrease) 3 times (12 stitches)
- Work (1 single crochet, decrease) 4 times (8 stitches)
- Work 8 single crochets
- Chain 1, work 4 single crochets
- Work 8 single crochets around the loops (8 stitches) 17-18. Work 2 rows of 8 single crochets
- Work (1 single crochet, increase) 4 times (12 stitches)
- Work 12 single crochets
- Work (3 single crochets, increase) 3 times (15 stitches) 22-25. Work 4 rows of 15 single crochets
- Work (4 single crochets, increase) 3 times (18 stitches)
- Work 18 single crochets
- Work (5 single crochets, increase) 3 times (21 stitches) 29-30. Work 2 rows of 21 single crochets
- Work (5 single crochets, decrease) 3 times (18 stitches)
- Work (4 single crochets, decrease) 3 times (15 stitches)
- Work (3 single crochets, decrease) 3 times (12 stitches)
- Chain 1, join with single crochet to complete
Stuff the legs firmly before closing and attach them to the body.
Creating the Frog Hands
The small front hands add charm to your frog. For each hand:
- Start with a magic ring and work 4 single crochets into the ring
- Increase in each stitch around (8 stitches)
- Work 8 single crochets
- Work (decrease) 4 times (4 stitches)
- Work 4 single crochets
For the fingers: 6. Chain 7, then create two additional fingers using the same technique 7. Work 11 single crochets, decrease once (12 stitches) 8. Work 12 single crochets 9. Work (2 single crochets, decrease) 3 times (9 stitches) 10. Work 9 single crochets 11. Work (1 single crochet, decrease) 3 times (6 stitches) 12-26. Work 15 rows of 6 single crochets 27. Chain 1, join with 3 single crochets
Leave a long tail for sewing. You can stuff the hands lightly if desired, though they can remain unstuffed for a flatter look.
Assembly Instructions
Now that you have created all the components, it’s time to assemble your amigurumi frog:
- Sew the yellow/lighter green belly piece to the green head using the back loops left from round 15
- Join the head and body sections together
- Attach the eyes to the top of the head, positioning them for the desired expression
- Sew the body patch to the front of the frog’s body
- Attach the legs to the bottom sides of the body
- Sew the hands to the upper front of the body
- Sew the feet to the ends of the legs
- Add any final details or embellishments
Understanding Round Progression in This Pattern
The round progression in this amigurumi frog pattern follows a thoughtful design approach:
- Expanding rounds: Create the basic shapes by systematically increasing stitches in a mathematical pattern (e.g., rounds 1-10 of the head)
- Straight rounds: Build volume and height with rows that maintain the same stitch count (e.g., rounds 11-14 of the head)
- Technique variation rounds: Switch between working in front loops only, back loops only, or both loops to create structure and texture (e.g., round 15 of the head)
- Feature-creating rounds: Shape specific body features through strategic placement of different stitches (e.g., round 16 of the head with its mixture of single crochet, half double crochet, and double crochet)
- Decreasing rounds: Shape the piece by systematically decreasing stitches (e.g., the body shaping in rounds 5-13)
Understanding these different types of rounds helps you follow the pattern more effectively and develop skills for creating your own amigurumi designs in the future.
Finishing Touches
Your amigurumi frog is now complete! Take a moment to adjust the positioning of all components and add any personal touches you’d like. Consider these optional enhancements:
- Embroider a small smile beneath the eyes
- Add small spots to the back using a contrasting color
- Create a lily pad base for your frog to sit on
- Add a small bowtie or hat for extra character
- Create a tiny crown if you want to turn your frog into a prince or princess
Check this out :Crochet a Marsupilami Amigurumi
Conclusion
Creating an amigurumi frog combines various crochet techniques into one charming project. This pattern introduces you to working with multiple colors, creating dimensional features, and developing the skills needed for future amigurumi projects.
Your finished frog will have a distinctive personality thanks to its expressive eyes, charming posture, and the care you’ve put into each stitch. Whether made as a gift or for your own collection, this amigurumi frog brings a touch of handmade joy to any space.
The techniques mastered in this project—including magic rings, increasing and decreasing in precise patterns, and creating three-dimensional forms—provide valuable skills that transfer to countless other amigurumi patterns. Each frog you create will have its own unique character based on your tension, yarn choices, and personal creative decisions.
Remember that amigurumi is both a craft and an art form—allow yourself to experiment with colors, proportions, and details to make each creation truly your own. Your handcrafted frog is not just a toy but a testament to your creativity and skill as a fiber artist.
If you share photos of your finished frog on social media, consider tagging the original pattern creator to show appreciation for their design. Happy crocheting!
