

Table of Contents
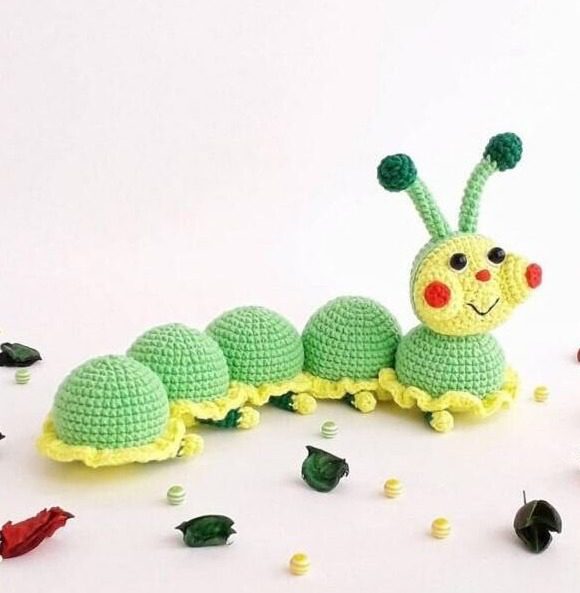
Discover Amigurumi Caterpillar how to create a charming amigurumi caterpillar with this comprehensive crochet pattern. This delightful multi-segmented creature combines vibrant colors and simple techniques to create a huggable friend that’s perfect for children and crochet enthusiasts alike. Follow our detailed instructions to bring this adorable caterpillar to life with your own hands.
Introduction to Amigurumi Caterpillar Crochet
Amigurumi—the Japanese art of crocheting small, stuffed yarn creatures—allows crafters to create endless charming characters. This caterpillar pattern showcases the versatility of amigurumi while being accessible to intermediate crocheters. With its segmented body, colorful details, and expressive face, this caterpillar brings whimsy and charm to any collection.
Materials Required for Your Amigurumi Caterpillar
Before beginning your amigurumi caterpillar project, gather these essential materials:
- Yarnart Jeans or similar medium weight yarn in:
- Green (two shades—light and dark—for the main body and horns)
- Yellow (for frills and accents)
- Polyester fiberfill or synthetic stuffing
- 2mm crochet hook (size 2)
- Half-bead eyes (safety eyes can be substituted)
- Yarn needle for assembly
- Scissors
- Stitch markers
Understanding Amigurumi Caterpillar Terminology
Familiarize yourself with these standard crochet abbreviations used throughout the pattern:
- SC – Single crochet: The fundamental stitch for amigurumi
- sl-st – Slip stitch: Used to join rounds or move position without adding height
- HDC – Half double crochet: A stitch of medium height
- DC – Double crochet: Creates height and is used for decorative elements
- CH – Chain: Creates a series of linked stitches
- DEC – Decrease: Combining two stitches into one to reduce your stitch count
- INC – Increase: Creating two stitches in one stitch to expand your work
- Magic ring: A technique to start crocheting in the round with no hole at the center
Amigurumi Caterpillar Crafting the Caterpillar Legs
Your caterpillar needs ten identical legs. This might seem like a lot, but each leg is simple and quick to create:
- Using yellow yarn, create a magic ring and work 6 single crochets into the ring
- Work 6 single crochets in the round
- Change to green yarn and work 6 single crochets 4-7. Work 4 more rounds of 6 single crochets
- Close the hole, fasten off, and weave in the end
Make a total of 10 legs following these instructions. Set them aside for final assembly.
Amigurumi Caterpillar Creating the Distinctive Caterpillar Horns
The horns give your caterpillar personality and character. Make two identical horns:
- Using dark green yarn, create a magic ring and work 6 single crochets into the ring
- Increase in each stitch around (12 stitches) 3-4. Work 2 rounds of 12 single crochets
- Decrease every 2 stitches (6 stitches)
- Change to light green yarn and work 6 single crochets 7-15. Work 9 more rounds of 6 single crochets
Stuff lightly with fiberfill before fastening off. Leave a long tail on each horn for attaching to the head later.
Amigurumi Caterpillar Forming the Caterpillar Body Segments
The caterpillar’s body consists of 5 identical segments that will be joined together. For each segment:
- Using green yarn, create a magic ring and work 6 single crochets into the ring
- Increase in each stitch around (12 stitches)
- Work (1 single crochet, increase) 6 times around (18 stitches)
- Work (2 single crochets, increase) 6 times around (24 stitches)
- Work (3 single crochets, increase) 6 times around (30 stitches)
- Work (4 single crochets, increase) 6 times around (36 stitches)
- Work (5 single crochets, increase) 6 times around (42 stitches) 8-12. Work 5 rounds of 42 single crochets
For the decorative yellow edge: 13. Change to yellow yarn and work 42 single crochets in the back loops only
Continue with yellow yarn: 14. Work (5 single crochets, decrease) 6 times around (36 stitches) 15. Work (4 single crochets, decrease) 6 times around (30 stitches) 16. Work (3 single crochets, decrease) 6 times around (24 stitches) 17. Work (2 single crochets, decrease) 6 times around (18 stitches) 18. Work (1 single crochet, decrease) 6 times around (12 stitches)
Close the hole by pulling the yarn tail through the remaining stitches, then fasten off and weave in the end.
Add a decorative frill by attaching yellow yarn to the front loops left from round 13 and working two double crochets in each loop around the circumference.
Remember to stuff each body segment firmly while working the decreasing rounds.
Amigurumi Caterpillar Crafting the Caterpillar Head
The head gives your caterpillar its personality and expression:
- Using green yarn, create a magic ring and work 6 single crochets into the ring
- Increase in each stitch around (12 stitches)
- Work (1 single crochet, increase) 6 times around (18 stitches)
- Work (2 single crochets, increase) 6 times around (24 stitches)
- Work (3 single crochets, increase) 6 times around (30 stitches)
- Work (4 single crochets, increase) 6 times around (36 stitches)
- Work (5 single crochets, increase) 6 times around (42 stitches) 8-10. Work 3 rounds of 42 single crochets
For the yellow accent: 11. Change to yellow yarn and work 42 single crochets in the back loops only 12-13. Work 2 rounds of 42 single crochets
Continue decreasing to close the head: 14. Work (5 single crochets, decrease) 6 times around (36 stitches) 15. Work (4 single crochets, decrease) 6 times around (30 stitches) 16. Work (3 single crochets, decrease) 6 times around (24 stitches) 17. Work (2 single crochets, decrease) 6 times around (18 stitches) 18. Work (1 single crochet, decrease) 6 times around (12 stitches)
Close the hole, fasten off, and weave in the end. Stuff the head firmly before closing.
Amigurumi Caterpillar Creating Expressive Cheeks
The round cheeks add character to your caterpillar’s face:
- Using yellow yarn, create a magic ring and work 6 single crochets into the ring
- Increase in each stitch around (12 stitches)
- Work (1 single crochet, increase) 6 times around (18 stitches)
- Work 18 single crochets
Fasten off leaving a long tail for sewing. Make two identical cheeks.
For added detail, create small accent circles for the cheeks by making a magic ring with 5 or 6 single crochets. These will be sewn to the center of each cheek.
Amigurumi Caterpillar Assembly Instructions
Now that you’ve created all components, it’s time to assemble your caterpillar:
- Body Assembly:
- Arrange the five body segments in a row
- Using strong yarn in matching colors, sew the segments together securely
- Make sure to maintain proper alignment so the yellow edges all face the same direction
- Head Attachment:
- Position the head at one end of the body
- Sew securely to the first body segment
- Make sure the yellow portion of the head aligns with the yellow edges of the body segments
- Facial Features:
- Sew the cheeks onto the front of the head
- Attach the small accent circles to the center of each cheek
- Position and attach the half-bead eyes above the cheeks
- If desired, embroider a small smile using black yarn
- Horn Attachment:
- Position the horns at the top of the head
- Sew securely, angling them slightly forward or to the sides
- Leg Attachment:
- Distribute the legs evenly along the bottom of the body segments
- Attach two legs to each body segment
- You can sew them firmly in place or use a thread mount to make them movable
Amigurumi Caterpillar Creating a Thread Mount for Movable Legs
For legs that can be positioned and moved:
- Thread a needle with matching yarn
- Insert the needle through the body where you want to attach a leg
- Pass the needle through the top of the leg piece
- Return the needle back through the body close to the entry point
- Pull gently to create tension, then tie a secure knot
- This creates a flexible joint that allows the leg to move while staying attached
Understanding Round Progression in This Pattern
The round progression in this amigurumi caterpillar follows a mathematical pattern that creates perfectly shaped segments. Understanding each type of round helps you track your progress and maintain consistency across all parts:
Foundation Rounds (1-2)
These critical initial rounds establish your starting point:
- Round 1: The magic ring with 6 single crochets creates a solid base with no hole in the center
- Round 2: Working 6 increases (12 stitches total) forms a small flat circle
- Tension tip: Keep these foundation rounds especially tight to prevent stuffing from showing through
Expanding Rounds (3-7)
Each expanding round follows a precise mathematical pattern that creates a perfect dome shape:
- Round 3: (1sc, inc) repeated 6 times creates 18 stitches, increasing by 6
- Round 4: (2sc, inc) repeated 6 times creates 24 stitches, increasing by 6
- Round 5: (3sc, inc) repeated 6 times creates 30 stitches, increasing by 6
- Round 6: (4sc, inc) repeated 6 times creates 36 stitches, increasing by 6
- Round 7: (5sc, inc) repeated 6 times creates 42 stitches, increasing by 6
- Pattern recognition: Notice how each round adds one more single crochet before each increase
Building Rounds (8-12)
These straight rounds create the cylindrical height of each segment:
- Rounds 8-12: Five consecutive rounds of 42 single crochets with no increases or decreases
- Stitch markers: Essential during these rounds to track the beginning/end of each round
- Counting tip: Count your stitches frequently during these rounds to ensure you maintain 42 stitches
Accent Rounds (13)
This special transition round creates both color change and texture:
- Round 13: Switch to yellow yarn and work 42 single crochets in the back loops only
- Technical note: Working in back loops creates a visible ridge and leaves front loops available for the decorative frill
- Color change tip: Complete the last stitch of round 12 with green until two loops remain on hook, then yarn over with yellow to complete
Decorative Frill Addition
After completing the main segment:
- Attach yellow yarn to the exposed front loops from round 13
- Work two double crochets in each front loop around the entire circumference
- This creates the distinctive ruffled edge between segments
Shaping Rounds (14-18)
These decreasing rounds mirror the increasing rounds but in reverse order:
- Round 14: (5sc, dec) repeated 6 times creates 36 stitches, decreasing by 6
- Round 15: (4sc, dec) repeated 6 times creates 30 stitches, decreasing by 6
- Round 16: (3sc, dec) repeated 6 times creates 24 stitches, decreasing by 6
- Round 17: (2sc, dec) repeated 6 times creates 18 stitches, decreasing by 6
- Round 18: (1sc, dec) repeated 6 times creates 12 stitches, decreasing by 6
- Stuffing tip: Insert stuffing firmly before beginning these decreasing rounds
Round Counting Method
When working this pattern:
- Use a physical stitch marker (or piece of contrasting yarn) to mark the first stitch of each round
- Move the marker up at the beginning of each new round
- Count stitches after completing rounds 2, 7, 13, and 18 to verify you’re on track
- For body segments, maintain consistency by using the same counting method for all five pieces
This mathematical approach ensures symmetrical, well-formed pieces with professional results. Mastering these round types and their purposes helps you develop the skills to modify patterns or even design your own amigurumi in the future.
Color Transitions and Texture Techniques
This pattern incorporates several special techniques:
Color Changes
When changing from green to yellow, complete the last stitch of the green round until two loops remain on your hook, then yarn over with yellow to complete the stitch. This creates a clean color transition.
Back Loop Only Stitching
Working in the back loops only (BLO) for round 13 creates a visible ridge that becomes the seam between colors. This technique adds texture and visual interest while providing loops for the decorative frill.
Decorative Frills
The frills are created by working two double crochets in each front loop left free from the BLO round. This creates a ruffled edge that adds dimension and character.
Customization Ideas
Make your caterpillar unique with these creative variations:
- Color Choices: Create a rainbow caterpillar with each segment in a different color
- Size Variations: Use thicker yarn and a larger hook for a jumbo caterpillar, or thinner yarn and a smaller hook for a tiny version
- Segment Count: Add or reduce body segments to change the length
- Facial Expressions: Modify the placement of eyes and cheeks for different expressions
- Additional Details: Add small flowers, leaves, or a tiny hat for extra personality
- Texture Variations: Use textured yarn for some segments to create interesting tactile effects
Troubleshooting Common Issues
If you encounter problems while creating your caterpillar:
- Uneven Segments: Count stitches carefully in each round and use stitch markers to track the beginning of rounds
- Gaps in Fabric: Check your tension and adjust as needed—amigurumi typically requires tight stitches
- Difficulty with Magic Ring: Practice separately or substitute with a chain 2 and work stitches into the first chain
- Wobbly Head: Ensure the head is stuffed firmly and sewn securely to the first body segment
- Floppy Legs: Attach legs securely and position them evenly for balance
Check this out :Crochet Your Own Adorable Amigurumi Minion
Conclusion
Creating this amigurumi caterpillar combines several crochet techniques into one delightful project. The segmented design teaches valuable skills in creating three-dimensional forms, color transitions, and assembly methods that can be applied to many other amigurumi patterns.
Your finished caterpillar, with its vibrant colors and charming details, makes a perfect gift for children or a whimsical addition to your handmade collection. The repetitive nature of creating multiple identical parts—legs and body segments—provides excellent practice for developing consistent tension and stitch formation.
The skills developed in this project—including magic rings, increasing and decreasing in patterns, color changes, and special stitch techniques—build a strong foundation for tackling more complex amigurumi designs. Each caterpillar you create will have its own personality based on your tension, color choices, and the small variations that make handmade items so special.
Remember that amigurumi is both a craft and an art form—feel free to experiment with colors, proportions, and details to make each creation uniquely yours. Your handcrafted caterpillar represents not just a toy but a labor of love and creativity.
If you share photos of your finished caterpillar on social media, consider tagging the original pattern creator to show appreciation for their design. Happy crocheting!
