

Table of Contents
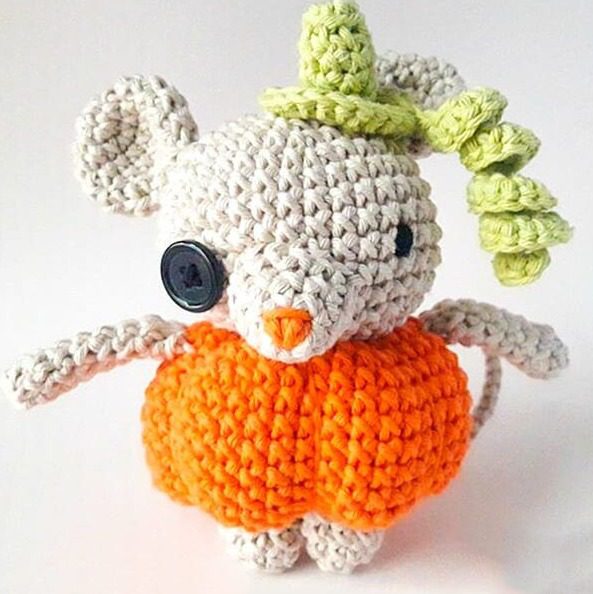
Halloween Zombie Pumpkin season calls for adorable yet spooky creations, and this Zombie Pumpkin Mouse amigurumi pattern delivers the perfect balance of cute and creepy. This unique character combines the charm of a little mouse with the festive appeal of a pumpkin and the playful spookiness of a zombie. Whether you’re looking to decorate your home for Halloween or create a special handmade gift, this crochet pattern is ideal for crafters of all skill levels.
Zombie Pumpkin Materials You’ll Need
Before starting your Zombie Pumpkin Mouse, gather these supplies:
- Worsted weight yarn in:
- Orange (for the pumpkin body)
- Gray or light brown (for the mouse head, ears, arms, legs, and tail)
- Black (for embroidery details)
- Green (optional for hat accent)
- Crochet hook (size recommended for your yarn, typically 3.5-4.5mm)
- Polyester fiberfill for stuffing
- Yarn needle for sewing and embroidery
- Scissors
- Safety eyes or buttons (optional)
- Stitch markers
Zombie Pumpkin Understanding the Terminology
This pattern uses standard amigurumi abbreviations:
- MR: Magic Ring – A technique to begin crocheting in rounds with no hole in the center
- sc: Single crochet – The basic stitch used throughout amigurumi
- inc: Increase – Two single crochets in one stitch (2sc in 1st)
- dec: Decrease – Two stitches worked together as one (invisible decrease recommended)
- sl st: Slip stitch – Used to join rounds or create flat surfaces
- ch: Chain – Creates a foundation for crocheting
Zombie Pumpkin Creating the Pumpkin Body
Start with orange yarn to create the pumpkin-shaped body:
- Round 1: Create a magic ring and work 6 sc into it (6 stitches)
- Round 2: Increase in each stitch around (12 stitches)
- Round 3: [1 sc, 1 inc] repeat 6 times (18 stitches)
- Round 4: [2 sc, 1 inc] repeat 6 times (24 stitches)
- Round 5: [3 sc, 1 inc] repeat 6 times (30 stitches)
- Round 6: [4 sc, 1 inc] repeat 6 times (36 stitches)
- Round 7: [5 sc, 1 inc] repeat 6 times (42 stitches)
- Rounds 8-13: Sc in each stitch around (42 stitches)
- Round 14: [5 sc, 1 dec] repeat 6 times (36 stitches)
- Round 15: [4 sc, 1 dec] repeat 6 times (30 stitches)
- Round 16: [3 sc, 1 dec] repeat 6 times (24 stitches)
- Round 17: [2 sc, 1 dec] repeat 6 times (18 stitches)
- Round 18: [1 sc, 1 dec] repeat 6 times (12 stitches)
- Round 19: Decrease 6 times (6 stitches)
Stuff the pumpkin body firmly and fasten off, leaving a long tail for shaping. To create the traditional pumpkin segments, use your yarn needle and the tail to create indentations by passing the needle through the center from top to bottom several times around the circumference.
Crafting the Mouse Head
Using gray or light brown yarn:
- Round 1: Create a magic ring and work 6 sc into it (6 stitches)
- Round 2: Increase in each stitch around (12 stitches)
- Round 3: [1 sc, 1 inc] repeat 6 times (18 stitches)
- Round 4: [2 sc, 1 inc] repeat 6 times (24 stitches)
- Round 5: [3 sc, 1 inc] repeat 6 times (30 stitches)
- Round 6: [4 sc, 1 inc] repeat 6 times (36 stitches)
- Rounds 7-11: Sc in each stitch around (36 stitches)
- Round 12: [4 sc, 1 dec] repeat 6 times (30 stitches)
- Round 13: [3 sc, 1 dec] repeat 6 times (24 stitches)
- Round 14: [2 sc, 1 dec] repeat 6 times (18 stitches)
Fasten off, leaving a long tail for attaching to the pumpkin body. Fill the head with stuffing before attaching.
Creating the Mouse Ears
Make two ears using gray or light brown yarn:
- Round 1: Create a magic ring and work 6 sc into it (6 stitches)
- Round 2: Increase in each stitch around (12 stitches)
- Round 3: [1 sc, 1 inc] repeat 6 times (18 stitches)
- Rounds 4-5: Sc in each stitch around (18 stitches)
- Round 6: [1 sc, 1 dec] repeat 6 times (12 stitches)
- Round 7: Decrease 6 times (6 stitches)
Fasten off, leaving a long tail for attaching to the head. The ears can be stuffed lightly or left flat for different effects.
Making the Snout
Using the same color as the head:
- Round 1: Create a magic ring and work 6 sc into it (6 stitches)
- Round 2: [1 sc, 1 inc] repeat 3 times (9 stitches)
- Round 3: [2 sc, 1 inc] repeat 3 times (12 stitches)
- Round 4: [3 sc, 1 inc] repeat 3 times (15 stitches)
Fasten off with a long tail for attaching to the face. Stuff lightly before attaching. Use black yarn to embroider a small nose and mouth on the snout.
Creating the Arms
Make two arms using the same color as the head:
- Round 1: Create a magic ring and work 5 sc into it (5 stitches)
- Rounds 2-8: Sc in each stitch around (5 stitches)
Fasten off with a long tail for attaching to the pumpkin. The arms can be stuffed lightly or left unstuffed for a floppier look.
Making the Legs
Make two legs using the same color as the head:
- Round 1: Create a magic ring and work 5 sc into it (5 stitches)
- Round 2: Increase in each stitch around (10 stitches)
- Rounds 3-5: Sc in each stitch around (10 stitches)
Fasten off with a long tail for attaching to the bottom of the pumpkin. Stuff lightly before attaching.
Creating the Tail
Using the same color as the head:
- Chain 20 stitches
- Starting from the second chain from the hook, work slip stitches all the way back to the beginning
Fasten off with a long tail for attaching to the back of the pumpkin.
Crafting the Zombie Hat
Using green or black yarn (or any color of your choice):
- Round 1: Create a magic ring and work 8 sc into it (8 stitches)
- Rounds 2-5: Sc in each stitch around (8 stitches)
- Round 6: Increase in each stitch around (16 stitches)
- Round 7: [1 sc, 1 inc] repeat 8 times (24 stitches)
After completing Round 7, chain 32 stitches to create a decorative edge. Work 2 sc in each chain stitch as you return to the hat brim, creating a ruffled or zig-zag effect. Fasten off with a long tail for attaching to the head.
Assembly Instructions
Now it’s time to bring your Zombie Pumpkin Mouse to life:
- Head Assembly:
- Attach the snout to the front center of the head
- Position and sew the ears to the top of the head
- Embroider eyes (or attach safety eyes/buttons) – consider making one eye different for a zombie effect
- Add any additional facial features like stitches or scars for a zombie look
- Body Assembly:
- Attach the head to the top of the pumpkin body
- Sew the arms to the sides of the pumpkin
- Attach the legs to the bottom of the pumpkin
- Secure the tail to the back of the pumpkin
- Place and attach the hat on top of the head
- Final Touches:
- Add any additional embroidery details like pumpkin vines or zombie stitches
- You can use black yarn to create a mouth on the pumpkin for a jack-o’-lantern effect
- Consider adding small embellishments like a tiny bow tie or patches
Creative Variations to Try
Make your Zombie Pumpkin Mouse unique with these fun variations:
- Color Choices:
- Use green yarn for a moldy zombie look
- Try white yarn for a ghost mouse variation
- Use purple for a spooky witch pumpkin theme
- Decorative Elements:
- Add a tiny broomstick for a witch theme
- Create miniature candy accessories for trick-or-treating
- Add a small cape for a vampire variation
- Embroider cobwebs on the pumpkin
- Size Variations:
- Use thicker yarn and a larger hook for a jumbo version
- Try thin yarn and a small hook for a tiny keychain version
Displaying Your Creation
Your completed Zombie Pumpkin Mouse makes a perfect:
- Halloween decoration for shelves or mantels
- Addition to a seasonal wreath
- Gift for horror enthusiasts or Halloween lovers
- Photography prop for seasonal photos
- Part of a handmade amigurumi Halloween collection
Caring for Your Amigurumi
To keep your Zombie Pumpkin Mouse looking its best:
- Display away from direct sunlight to prevent fading
- Dust gently with a soft brush
- For spot cleaning, use a damp cloth with mild soap if needed
- Allow to air dry completely if it becomes wet
- Store in a cool, dry place when not on display
Share Your Creation
Once you’ve completed your Zombie Pumpkin Mouse, share your creation with the crafting community! Tag your photos with @freeamigurumii on Instagram or Facebook to join fellow crafters who’ve also completed this spooky pattern.
Check this out :Crochet an Adorable Maru The Shiba Dog Amigurumi
Conclusion
The Zombie Pumpkin Mouse amigurumi represents the perfect blend of cute and creepy that makes Halloween crafting so enjoyable. This pattern allows for personal creativity while providing a clear structure to follow, making it suitable for crocheters of various skill levels.
What makes this project special is its versatility – you can adjust the “spook factor” to suit your preference, making it appropriate for Halloween enthusiasts of all ages. The combination of a cute mouse character with seasonal pumpkin elements creates a unique decoration that stands out from typical Halloween decor.
Whether you’re creating this amigurumi as a seasonal decoration for your own home, as a gift for a horror fan, or as part of building your crochet skills, the Zombie Pumpkin Mouse offers a fun and satisfying project. The techniques used – from creating the distinctive pumpkin shape to adding character through small details – provide valuable experience that will enhance your amigurumi crafting journey.
Happy crocheting, and may your Zombie Pumpkin Mouse bring a perfect touch of spooky charm to your Halloween celebrations!
