

Table of Contents
Amigurumi teddy bears hold a special place in the world of crochet crafts. Their huggable size, customizable features, and timeless appeal make them perfect projects for crocheters of all skill levels. This Teddy Bear comprehensive guide will walk you through creating an elegant amigurumi teddy bear complete with a fashionable wardrobe of mix-and-match outfits. Follow our detailed instructions to craft a charming companion that will delight children and collectors alike.
Selecting the Perfect Yarn for Your Amigurumi Bear
The secret to creating a luxurious teddy bear lies in choosing the right yarn. For this project, we recommend:
- For the bear’s body and head: Couture yarn – a sophisticated, super-soft yarn with a luxurious touch that perfectly mimics the plush texture of traditional teddy bears. This yarn is machine washable and made of 100% acrylic (50g/50m).
- For paws and feet: Soft Bamboo “double” weight yarn – creates a subtle contrast while maintaining a cohesive look.
- For the clothing: Bohème Velvet “fine” weight yarn in Nude, Sand, and Jeans Blue – provides the perfect drape and texture for miniature garments.
For a completed teddy bear standing 27 cm tall (about 10.5 inches), you’ll need approximately:
- 200g of Couture yarn
- 25g of Soft Bamboo “double” weight yarn
- 20-25g each of Nude, Sand, and Jeans Blue Bohème Velvet “fine” weight yarn
Essential Materials for Your Teddy Bear
In addition to your yarn selection, gather these supplies before beginning:
- Safety eyes (10mm)
- Decorative buttons for clothing
- Polyester fiberfill stuffing
- Crochet hooks: 3.0-4.0mm for the teddy bear and 2.0-3.0mm for the clothing
- Yarn needle for assembly
- Scissors
- Stitch markers (optional but helpful)
Understanding the Teddy Bear Terminology
Before diving into the pattern, familiarize yourself with these crochet terms:
- Magic ring: A technique to begin crocheting in the round with no hole in the center
- Chain stitch: The foundation stitch in crochet
- Turning chain: A chain stitch made before turning your work to begin a new row
- Slip stitch: Used to join rounds or create a flat joining stitch
- Double crochet: A basic crochet stitch (US terminology)
- Treble crochet: A taller stitch than double crochet (US terminology)
- Increase: Working two stitches into one stitch to expand your work
- Decrease: Working two or more stitches together to reduce width
Unless otherwise specified, this pattern works in continuous spiral rounds. When instructed to finish a section, join the round with a slip stitch, leave approximately 20cm (8 inches) of yarn, cut, and pull the yarn through the stitch to secure.
Creating Your Teddy Bear: Body and Head
Teddy Bear Body
Using Couture yarn and a 3.0-4.0mm hook:
Round 1: Create a magic ring and work 6 double crochets into it (6 stitches) Round 2: Increase in each stitch around (12 stitches) Round 3: Work 1 double crochet, then increase. Repeat around (18 stitches) Round 4: Work 2 double crochets, then increase. Repeat around (24 stitches) Round 5: Work 3 double crochets, then increase. Repeat around (30 stitches) Round 6: Work 4 double crochets, then increase. Repeat around (36 stitches) Round 7: Work 5 double crochets, then increase. Repeat around (42 stitches) Round 8: Work 6 double crochets, then increase. Repeat around (48 stitches) Rounds 9-12: Work 1 double crochet in each stitch around (48 stitches) Round 13: Work 6 double crochets, then decrease. Repeat around (42 stitches) Round 14: Work 1 double crochet in each stitch around (42 stitches) Round 15: Work 5 double crochets, then decrease. Repeat around (36 stitches) Round 16: Work 1 double crochet in each stitch around (36 stitches) Round 17: Work 4 double crochets, then decrease. Repeat around (30 stitches) Rounds 18-19: Work 1 double crochet in each stitch around (30 stitches) Round 20: Work 3 double crochets, then decrease. Repeat around (24 stitches) Round 21: Work 1 double crochet in each stitch around (24 stitches) Round 22: Work 2 double crochets, then decrease. Repeat around (18 stitches) Rounds 23-25: Work 1 double crochet in each stitch around (18 stitches)
Fill the body with stuffing as you work, ensuring a firm but squeezable result.
Teddy Bear Head
Using Couture yarn and a 3.0-4.0mm hook:
Round 1: Create a magic ring and work 6 double crochets into it (6 stitches) Round 2: Increase in each stitch around (12 stitches) Round 3: Work 1 double crochet, then increase. Repeat around (18 stitches) Round 4: Work 2 double crochets, then increase. Repeat around (24 stitches) Round 5: Work 3 double crochets, then increase. Repeat around (30 stitches) Round 6: Work 4 double crochets, then increase. Repeat around (36 stitches) Round 7: Work 5 double crochets, then increase. Repeat around (42 stitches) Round 8: Work 6 double crochets, then increase. Repeat around (48 stitches) Rounds 9-15: Work 1 double crochet in each stitch around (48 stitches) Round 16: Work 6 double crochets, then decrease. Repeat around (42 stitches) Round 17: Work 5 double crochets, then decrease. Repeat around (36 stitches) Round 18: Work 4 double crochets, then decrease. Repeat around (30 stitches) Round 19: Work 3 double crochets, then decrease. Repeat around (24 stitches) Round 20: Work 2 double crochets, then decrease. Repeat around (18 stitches)
Insert 10mm safety eyes between rounds 12 and 13, with 6 stitches between them.
Stuff the head firmly, then cut the yarn and pull through the stitches to close, leaving a small opening. To create depth around the eyes: thread a needle from the opening of the head (the part that will be sewn to the body) to one eye location, guide the thread around a stitch, and pull back. Tighten to create the eye deepening and secure with a knot. Repeat for the other eye. Close the remaining opening.
Teddy Bear Snout
Using Couture yarn and a 3.0-4.0mm hook:
Round 1: Create a magic ring and work 6 double crochets into it (6 stitches) Round 2: Increase in each stitch around (12 stitches) Round 3: Work 1 double crochet, then increase. Repeat around (18 stitches) Round 4: Work 2 double crochets, then increase. Repeat around (24 stitches) Rounds 5-7: Work 1 double crochet in each stitch around (24 stitches)
Fill the snout with stuffing and sew onto the head between rounds 14 and 19. Embroider a nose as shown in the reference images.
Teddy Bear Ears (Make 2)
Using Couture yarn and a 3.0-4.0mm hook:
Round 1: Create a magic ring and work 6 double crochets into it. Chain 1 and turn (6 stitches) Round 2: Increase in each stitch around. Chain 1 and turn (12 stitches) Round 3: Work 1 double crochet, then increase. Repeat around (18 stitches)
Sew the ears onto the head between rounds 4 and 10. Once all facial features are attached, sew the head securely to the body.
Crafting the Arms and Legs
Teddy Bear Arms (Make 2)
Begin with Soft Bamboo “double” weight yarn and a 3.0-4.0mm hook:
Round 1: Create a magic ring and work 6 double crochets into it (6 stitches) Round 2: Increase in each stitch around (12 stitches) Round 3: Work 1 double crochet, then increase. Repeat around (18 stitches) Round 4: Work 2 double crochets, then increase. Repeat around (24 stitches)
Switch to Couture yarn:
Rounds 5-6: Work 1 double crochet in each stitch around (24 stitches) Round 7: Work 2 double crochets, then decrease. Repeat around (18 stitches) Rounds 8-9: Work 1 double crochet in each stitch around (18 stitches) Round 10: Work 1 double crochet, then decrease. Repeat around (12 stitches) Rounds 11-22: Work 1 double crochet in each stitch around (12 stitches) Round 23: Decrease around (6 stitches)
Stuff the arms firmly and sew them to the bear’s body.
Teddy Bear Legs (Make 2)
Begin with Soft Bamboo “double” weight yarn and a 3.0-4.0mm hook:
Round 1: Chain 8. Work 2 double crochets in the second chain from the hook, 5 double crochets along the chain, 5 double crochets in the final chain, 5 double crochets along the opposite side of the chain, and 2 double crochets in the last chain (19 stitches) Round 2: Increase once, work 7 double crochets, increase 4 times, work 6 double crochets, increase once (25 stitches) Round 3: Work 1 double crochet in each stitch around (25 stitches)
Switch to Couture yarn:
Rounds 4-5: Work 1 double crochet in each stitch around (25 stitches) Round 6: Work 8 double crochets, decrease once, decrease three stitches together twice, decrease once, work 7 double crochets (19 stitches) Round 7: Work 6 double crochets, decrease 4 times, work 5 double crochets (15 stitches) Rounds 8-12: Work 1 double crochet in each stitch around (15 stitches) Round 13: Work 3 double crochets, increase once, work 7 double crochets, increase once, work 3 double crochets (17 stitches) Rounds 14-23: Work 1 double crochet in each stitch around (17 stitches) Round 24: Work 1 double crochet, decrease 5 times, finish with a decrease (7 stitches) Round 25: Decrease around (3-4 stitches)
Stuff the legs firmly and sew them to the bear’s body.
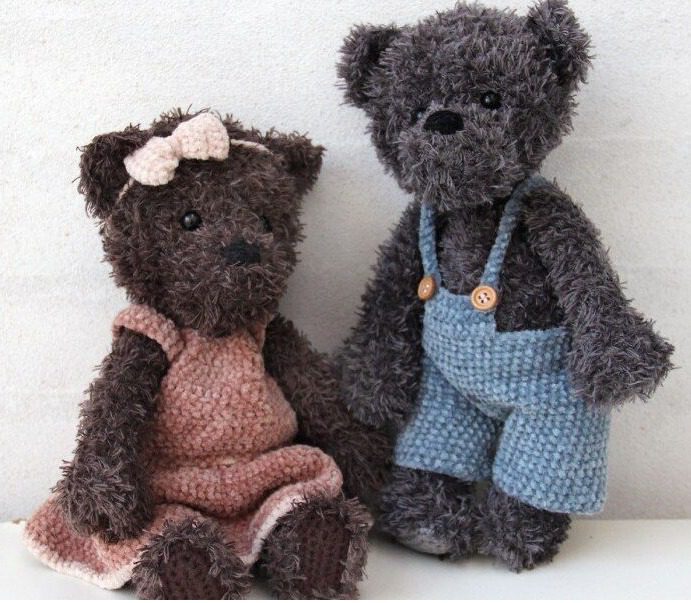
Teddy Bear Creating a Fashionable Wardrobe
Elegant Dress (Nude and Sand)
Using Bohème Velvet “fine” in Nude and a 2.0-3.0mm hook:
Row 1: Chain 37. Starting in the second chain from the hook, work 36 double crochets. Chain 3 and turn (36 stitches) Row 2: Work 1 treble crochet, increase trebles across. Chain 3 and turn (54 stitches) Row 3: Work 2 treble crochets, increase around. Chain 1 and turn (72 stitches) Row 4: Work 10 double crochets, chain 6 (for armhole), skip 16 stitches, work 20 double crochets, chain 6 (for second armhole), skip 16 stitches, work 10 double crochets. Chain 3 and turn (52 stitches plus chains) Rows 5-6: Work 52 treble crochets. Chain 3 and turn (52 stitches) Row 7: Work 10 treble crochets, increase once, work 5 treble crochets, increase once, work 9 treble crochets, increase once, work 9 treble crochets, increase once, work 5 treble crochets, increase once, work 9 treble crochets. Chain 3 and turn (57 stitches) Rows 8-10: Work 57 treble crochets. Chain 3 and turn (57 stitches) Row 11: Increase trebles across. Chain 3 and turn (114 stitches) Rows 12-14: Work 114 treble crochets. Chain 3 and turn (114 stitches) Row 15: Work 7 treble crochets, increase 14 times across the row, work 2 treble crochets. Chain 3 and turn (128 stitches) Rows 16-17: Work 128 treble crochets. Chain 3 and turn (128 stitches) Row 18: Work 8 treble crochets, increase 14 times across the row, work 2 treble crochets. Chain 1 and turn (142 stitches)
Switch to Bohème Velvet “fine” in Sand:
Row 19: Work 142 double crochets (142 stitches)
Sew buttons along one side of the back. The natural spaces between treble crochets create button holes.
Dress Belt (Sand)
Using Bohème Velvet “fine” in Sand: Chain 150, fasten off. Thread the belt through every second hole in the 10th row and tie in a bow at the back.
Hairband with Bow (Sand)
Using Bohème Velvet “fine” in Sand:
Hairband: Chain 150, fasten off.
Bow: Row 1: Chain 7 (7 chains) Rows 2-22: Starting in the second chain from the hook, work 6 double crochets. Chain 1 and turn (6 stitches)
Fold the ends toward each other and crochet them together. Wrap the tail of yarn around the middle of the bow and sew onto the hairband.
Stylish Jacket (Sand)
Using Bohème Velvet “fine” in Sand:
Row 1: Chain 37. Starting in the second chain from the hook, work 36 double crochets. Chain 1 and turn (36 stitches) Row 2: Work 1 double crochet, increase across. Chain 1 and turn (54 stitches) Row 3: Work 2 double crochets, increase across. Chain 1 and turn (72 stitches) Row 4: Work 10 double crochets, chain 10 (for armhole), skip 16 double crochets, work 20 double crochets, chain 10 (for second armhole), skip 16 double crochets, work 10 double crochets. Chain 1 and turn (60 stitches plus chains) Rows 5-14: Work 60 double crochets. Chain 1 and turn (60 stitches) Row 15: Work 9 double crochets, increase. Chain 1 and turn (66 stitches) Rows 16-19: Work 66 double crochets. Chain 1 and turn (66 stitches) Row 20: Work 66 double crochets (66 stitches)
For button holes along the side of the jacket: Row 21: Work 2 double crochets, chain 5 (creating a button hole), work 3 double crochets. Repeat 5 times and finish with a slip stitch.
Sew buttons on the opposite side, aligned with the button holes.
Jacket Sleeves (Make 2)
Starting from the 5th chain in the armholes from Row 4: Round 1: Work 5 double crochets on the chain, 16 double crochets along the arm opening, and 5 double crochets on the remaining chain (26 stitches) Rounds 2-19: Work 1 double crochet in each stitch around (26 stitches)
Denim Trousers (Jeans Blue)
Using Bohème Velvet “fine” in Jeans Blue:
First Leg: Round 1: Chain 30, join into a ring with a slip stitch (30 chains) Rounds 2-9: Work 1 double crochet in each stitch around (30 stitches) Fasten off the first leg.
Second Leg: Follow the same pattern as the first leg, but don’t fasten off.
Joining the Legs: Round 10: Chain 2, work 30 double crochets around the first leg, 2 double crochets on the chain, 30 double crochets around the second leg, and 2 double crochets on the other side of the chain (64 stitches) Rounds 11-14: Work 1 double crochet in each stitch around (64 stitches) Round 15: Work 29 double crochets, decrease 3 times, work 27 double crochets, increase twice (63 stitches) Round 16: Increase once, then work 62 double crochets (64 stitches) Rounds 17-18: Work 1 double crochet in each stitch around (64 stitches) Round 19: Work 15 double crochets, decrease twice, work 26 double crochets, decrease twice, work 15 double crochets (60 stitches) Rounds 20-21: Work 1 double crochet in each stitch around (60 stitches) Round 22: Work 28 double crochets, decrease once, work 29 double crochets, increase once (60 stitches) Rounds 23-24: Work 1 double crochet in each stitch around (60 stitches)
For the Suspenders and Front: Chain 40, turn work. Starting from the 6th chain from the hook (creating a button hole), work 34 double crochets, work 2 double crochets along the back of the trousers. Chain 40, turn work. Starting from the 6th chain from the hook (creating a button hole), work 34 double crochets, work 35 double crochets along the edge of the trousers. Chain 1 and turn.
Work 10 double crochets, chain 1 and turn. Repeat 4 times. Sew buttons at both corners of the trouser front to attach the suspenders.
Denim Jacket (Jeans Blue)
Using Bohème Velvet “fine” in Jeans Blue:
Row 1: Chain 37. Starting in the second chain from the hook, work 36 double crochets (36 stitches) Row 2: Work 1 double crochet, increase across. Chain 1 and turn (54 stitches) Row 3: Work 2 double crochets, increase across. Chain 1 and turn (72 stitches) Row 4: Work 10 double crochets, chain 10 (for armhole), skip 16 double crochets, work 20 double crochets, chain 10 (for second armhole), skip 16 double crochets, work 10 double crochets. Chain 1 and turn (60 stitches plus chains) Rows 5-12: Work 60 double crochets. Chain 1 and turn (60 stitches) Row 13: Work 9 double crochets, increase. Chain 1 and turn (66 stitches) Rows 14-17: Work 66 double crochets. Chain 1 and turn (66 stitches) Row 18: Work 66 double crochets (66 stitches)
For button holes along the side of the jacket: Row 19: Work 2 double crochets, chain 5 (creating a button hole), work 3 double crochets. Repeat 4 times and finish with a chain. Sew buttons on the opposite side, aligned with the button holes.
Denim Jacket Sleeves (Make 2)
Starting from the 5th chain in the armholes from Row 4: Round 1: Work 5 double crochets on the chain, 16 double crochets along the arm opening, and 5 double crochets on the remaining chain (26 stitches) Rounds 2-19: Work 1 double crochet in each stitch around (26 stitches)
Completing Your Amigurumi Bear
Once all components are crocheted, follow these assembly steps:
- If you haven’t already, attach the snout, eyes, and ears to the head, then securely sew the head to the body.
- Sew the arms and legs to the body, ensuring symmetrical placement.
- Try on the various clothing items and adjust fit as needed.
- For the dress outfit, add the hairband with bow for an extra stylish touch.
- Switch between the casual denim outfit and elegant dress to create different looks.
Caring for Your Amigurumi Creation
Your finished amigurumi teddy bear can be spot cleaned as needed. For more thorough cleaning, hand wash gently in cold water with mild detergent and allow to air dry completely. Store away from direct sunlight to prevent color fading.
Why Amigurumi Bears Make Perfect Gifts
This stylish teddy bear with its interchangeable wardrobe makes an exceptional gift for several reasons:
- The high-quality yarns create a luxuriously soft texture that’s irresistible to touch
- The detailed clothing pieces add play value and collectibility
- At approximately 27cm tall, it’s the perfect size for display or gentle play
- The classic teddy bear design appeals to all ages
- The handmade nature makes each bear unique and special
Whether you’re creating this bear for yourself, as a gift, or to sell at craft fairs, the attention to detail and quality construction will ensure it becomes a treasured companion for years to come.
Check this out :Crochet an Adorable Amigurumi Giraffe with Free Pattern
Conclusion
Creating an amigurumi teddy bear combines the joy of crochet with the satisfaction of bringing a character to life. By following this detailed pattern, you’ve crafted not just a stuffed toy, but a personality-filled friend with a fashionable wardrobe. The techniques learned in this project—from creating dimensional facial features to crafting miniature clothing—will enhance your overall crochet skills.
Remember that each handmade bear carries the unique touch of its creator. Small variations in tension, stuffing, or embellishment make your bear one-of-a-kind. Whether your bear will be cherished by a child, displayed in a collection, or gifted to someone special, it represents the care and creativity that only handcrafted items possess.
If you enjoyed making this teddy bear, consider exploring other amigurumi patterns to create companion animals or additional outfits for your bear. The possibilities for customization are endless, allowing you to express your creativity while bringing joy through the art of crochet.
Happy creating, and enjoy your beautiful amigurumi teddy bear!
