

Table of Contents
Creating amigurumi toys with plush yarn adds an irresistibly soft dimension to your handmade creations, and this Fluffy Penguin pattern showcases the perfect blend of simplicity and charm. With its rotund body, adorable facial features, and textured appearance, this penguin becomes an instant huggable companion. The pattern utilizes chunky or velvet-style yarn to achieve that plush, squeezable quality that appeals to crafters and recipients alike. Whether you’re creating this sweet penguin as a gift for a child, a decorative accent, or an addition to your handmade collection, this comprehensive guide will walk you through each step of the process.
Materials Needed for Your Fluffy Penguin
Before beginning your plush penguin project, gather these essential materials:
Fluffy Penguin Yarn Requirements
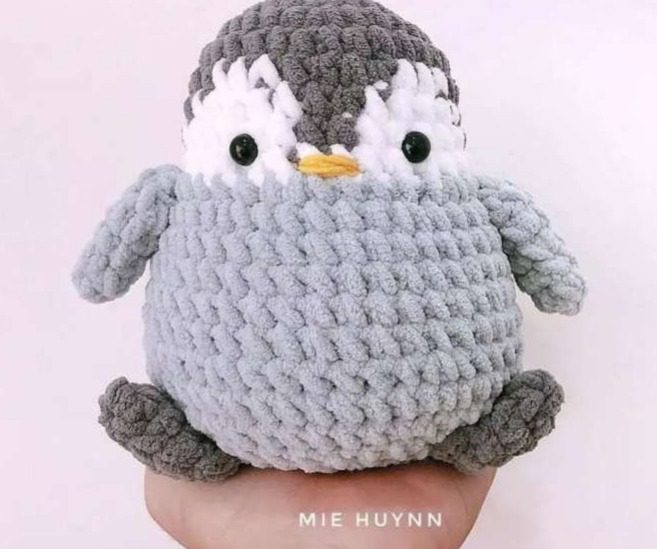
- Light gray chunky or velvet yarn for the main body
- Dark gray chunky or velvet yarn for the cap and feet
- White chunky or velvet yarn for the face markings
- Small amount of yellow or orange medium weight yarn for the beak
- Black yarn or embroidery floss for detail work (optional)
Fluffy Penguin Tools and Notions
- Crochet hook appropriate for your chunky yarn (typically 5.0-6.0mm)
- Polyester fiberfill for stuffing
- Yarn needle for assembly
- Stitch markers
- Safety eyes (12-15mm) or black yarn for embroidered eyes
- Scissors
- Pins for positioning pieces before attachment
The finished penguin will be approximately 20cm tall when completed with the recommended materials, though the size can vary depending on your specific yarn choice and tension.
Fluffy Penguin Understanding Plush Yarn Crochet
Working with plush or chunky yarn requires some adjustments to standard amigurumi techniques:
- Maintain looser tension than with standard cotton yarn
- Use stitch markers diligently as stitches can be harder to count
- Work in good lighting to better see your stitches
- Consider using a hook one size larger than recommended for the yarn if you find your work too tight
Creating the Fluffy Penguin Body
Start with light gray chunky yarn to form the main body structure, working from bottom to top:
Begin with a magic ring and work 6 single crochet stitches into it.
Round 1: Increase in each stitch around (12 stitches) Round 2: Single crochet in first stitch, increase in next stitch; repeat around (18 stitches) Round 3: Single crochet in first 2 stitches, increase in next stitch; repeat around (24 stitches) Round 4: Single crochet in first 3 stitches, increase in next stitch; repeat around (30 stitches) Round 5: Single crochet in first 4 stitches, increase in next stitch; repeat around (36 stitches) Round 6: Single crochet in first 5 stitches, increase in next stitch; repeat around (42 stitches)
Rounds 7-15: Single crochet in each stitch around (42 stitches)
Begin decreasing to shape the upper body: Round 16: Single crochet in first 5 stitches, decrease; repeat around (36 stitches) Round 17: Single crochet in first 4 stitches, decrease; repeat around (30 stitches) Round 18: Single crochet in first 3 stitches, decrease; repeat around (24 stitches) Round 19: Single crochet in first 2 stitches, decrease; repeat around (18 stitches)
Start stuffing the body firmly at this point.
Round 20: Single crochet in first stitch, decrease; repeat around (12 stitches) Round 21: Decrease around (6 stitches)
Fasten off, leaving a tail for closing. Weave through the remaining stitches, pull tight to close, and secure.
Fluffy Penguin Creating the Head and Body Cap
Using dark gray chunky yarn:
Begin with a magic ring and work 6 single crochet stitches into it. Round 1: Increase in each stitch around (12 stitches) Round 2: Single crochet in first stitch, increase in next stitch; repeat around (18 stitches) Round 3: Single crochet in first 2 stitches, increase in next stitch; repeat around (24 stitches) Round 4: Single crochet in first 3 stitches, increase in next stitch; repeat around (30 stitches) Round 5: Single crochet in each stitch around (30 stitches) Round 6: Single crochet in first 3 stitches, decrease; repeat around (24 stitches)
Fasten off, leaving a long tail for sewing to the body.
Creating the Wings
Make 2 identical wings using light gray chunky yarn:
Begin with a magic ring and work 6 single crochet stitches into it. Round 1: Increase in each stitch around (12 stitches) Round 2: Single crochet in each stitch around (12 stitches) Rounds 3-5: Single crochet in each stitch around (12 stitches) Round 6: Single crochet in first 4 stitches, decrease, single crochet in last 4 stitches (10 stitches)
Fasten off, leaving yarn for attaching to the body. Do not stuff the wings; they should remain flat.
Creating the Feet
Make 2 identical feet using dark gray chunky yarn:
Begin with a magic ring and work 6 single crochet stitches into it. Round 1: Increase in each stitch around (12 stitches) Round 2: Single crochet in first stitch, increase in next stitch; repeat around (18 stitches) Round 3: Single crochet in each stitch around (18 stitches)
Flatten the circle and work through both layers to close: Row 1: Single crochet across the diameter of the circle (9 stitches)
Fasten off, leaving yarn for attachment to the body.
Creating the Facial Features
For the white eye patches:
Using white chunky yarn, make 2 identical pieces: Begin with a magic ring and work 6 single crochet stitches into it. Round 1: Increase in each stitch around (12 stitches) Round 2: Single crochet in first stitch, increase in next stitch; repeat around (18 stitches)
Fasten off, leaving yarn for attaching to the face.
For the beak:
Using yellow or orange medium weight yarn: Chain 4 stitches. Row 1: Single crochet in second chain from hook and across (3 stitches) Row 2: Chain 1, turn, decrease, single crochet in last stitch (2 stitches) Row 3: Chain 1, turn, decrease (1 stitch)
Fasten off, leaving yarn for attaching to the face.
Assembly Instructions
- Position and sew the dark gray cap to the top of the body.
- Attach the white eye patches to the face area, keeping them symmetrical.
- Sew or attach safety eyes in the center of each white patch.
- Position and attach the beak centered between the eyes.
- Sew the wings to the sides of the body, approximately at the midpoint.
- Attach the feet to the lower front of the body, ensuring the penguin can sit stably.
Finishing Touches
- Check that all parts are securely attached.
- Adjust stuffing if needed to create the desired shape and firmness.
- Use a brush or your fingers to fluff the yarn, enhancing the plush texture.
- Consider adding small details with embroidery such as eyebrows or accent stitches if desired.
Check this out :Crochet a Winter Penguin Amigurumi Toy
Conclusion
Your Fluffy Penguin amigurumi showcases the wonderful texture and dimension that plush yarn brings to crochet projects. The simplified design elements allow the luxurious yarn to take center stage, creating a toy that’s as delightful to touch as it is to behold. The contrasting gray tones, paired with the bright beak and expressive eyes, create a character full of personality that appeals to craft enthusiasts and penguin lovers alike.
This pattern demonstrates how choosing the right yarn can transform a relatively simple design into something extraordinary. The chunky texture creates a professional-looking finished project that belies the straightforward techniques used to create it. Even beginners who have mastered basic crochet stitches can achieve impressive results with this accessible pattern.
Whether displayed on a shelf, added to a child’s toy collection, or given as a thoughtful handmade gift, your plush penguin brings warmth and charm to any setting. The satisfaction of creating something by hand—transforming simple materials into a character full of personality—adds special meaning to this finished piece.
As you complete your Fluffy Penguin, take pride in creating a unique handcrafted treasure that combines the timeless appeal of amigurumi with the contemporary luxury of plush yarn. This charming penguin is sure to become a favorite piece in your collection or a beloved gift that will be treasured for years to come.
