

Table of Contents
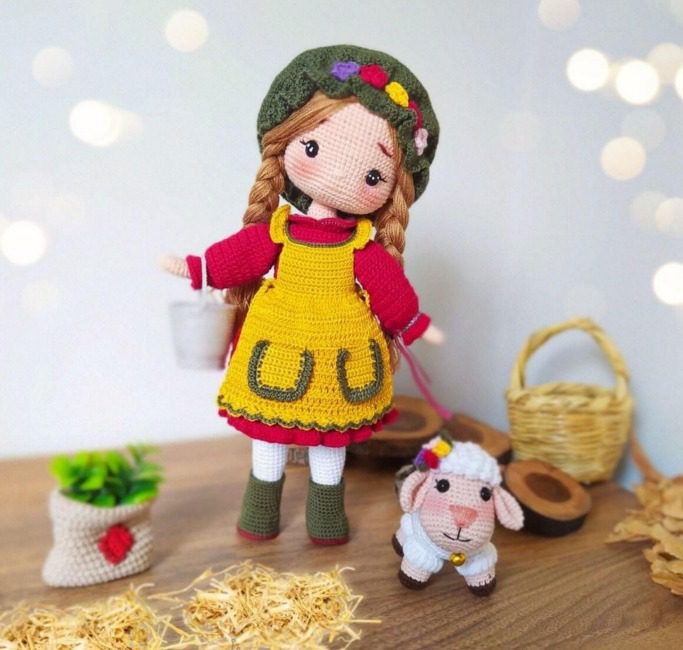
Creating handmade crochet dolls brings joy to crafters worldwide. The art of amigurumi—the Japanese craft of crocheting small stuffed toys—has gained immense popularity for its charming results and accessible techniques. This comprehensive guide walks you through creating a delightful shepherdess doll with her companion lamb, perfect for gifting or displaying in your home.
Understanding Amigurumi Shepherdess and Lamb
Before diving into our pattern, let’s familiarize ourselves with the essential crochet terminology you’ll encounter:
Magic ring: The foundation of most amigurumi projects, creating a tight center with no hole Chain stitch: Basic stitch forming the foundation for many crochet projects Single crochet decrease: Combining two stitches into one to reduce stitch count Half double crochet: A stitch slightly taller than single crochet Double crochet: Creates height in your project Front loop only: Working through only the front loop for texture Back loop only: Working through only the back loop for texture Increase: Adding stitches to expand your work Repeat instructions: Following the same sequence multiple times
Materials Needed for Your Shepherdess and Lamb
Quality materials make a significant difference in your finished project. Gather these supplies:
- Gazzal Baby Cotton yarn in these colors:
- Skin tone (#3469)
- White (#3432)
- Café au lait (#3424)
- Camouflage (#3463)
- Medium shade (#3447)
- Alize Cotton Gold in cherry red (#390)
- Nako Bonbon Crystal (#98226) for decorative elements
- Two small buttons
- 1.5mm crochet hook
- 7mm safety eyes for the lamb
- 10mm safety eyes for the doll
- 1.5mm electrical wire (1 meter) for structure
- Stuffing material
- Tapestry needle for assembly
Shepherdess and Lamb Creating the Body
The shepherdess doll begins with constructing the body frame, which provides structure and posability to your finished creation.
Shepherdess and Lamb Creating the Arms
Start by preparing the wire for the arms with a length of approximately 35cm. Position the wire carefully before beginning to crochet around it.
Round 1: Create a magic ring with 6 stitches Round 2: Increase to 12 stitches evenly around (6 increases) Round 3: Work 12 stitches in one round Round 4: Increase to 14 stitches with 2 increases placed strategically Round 5-6: Work 14 stitches for 2 rounds Round 7: Work 12 stitches with 1 decrease at beginning and end Round 8: Work 13 stitches Round 9: Decrease with pattern (4x1A)*3 for 15 stitches Round 10: Work 15 stitches Round 11: Increase to 16 stitches with one increase Round 12: Work 16 stitches Round 13-14: Work 17 stitches with increase at beginning
Repeat for the second arm, ensuring symmetry in your work. Insert the wire through each arm for structure and posability.
Shepherdess and Lamb Creating the Legs and Body
For the legs, begin with white yarn for the socks:
Round 1: Chain 7, create a foundation with 15 stitches Round 2: Increase to 22 stitches with strategic placement Round 3: Shape the foot with pattern 1x1v 5x1v (1x1v)*3 5x1v 1x1v for 29 stitches Round 4-5: Work 29 stitches Round 6: Decrease with pattern 7x1A(1x1A)*4 8x for 24 stitches Round 7: Continue with pattern 6x 4A 10x for 20 stitches Round 8-9: Work 18 stitches with decreases
After completing both legs, join them together to form the body:
Round 42: Position the legs side by side Round 43: Connect with joining stitches, ch 3, sc in next 46 stitches forming 58 total Round 44-49: Work 58 stitches for 6 rounds Round 50: Shape with pattern 23x 2A 25x 2A 2x for 54 stitches Round 51-54: Continue with decreases to shape the waist Round 56: Change to skin-tone yarn, move stitch marker forward 10 stitches Round 57: Work pattern (6x1A)*6 for 42 stitches
Crafting the Shepherdess Face and Hair
The face details bring your doll to life. Using skin-tone yarn:
Round 1: Create a magic ring with 6 stitches Round 2: Increase to 12 stitches evenly Round 3: Increase to 18 stitches Round 4: Increase to 24 stitches Round 5: Increase to 30 stitches Round 6: Increase to 36 stitches Round 7: Increase to 42 stitches Round 8-9: Work 42 stitches for 2 rounds Round 10: Decrease to 39 stitches Round 11: Work 39 stitches Round 12: Decrease to 36 stitches Round 13: Work 36 stitches Round 14-15: Decrease to 33 stitches and work pattern Round 16-20: Continue decreasing gradually to shape the head Round 21: Work decreases with pattern (6x7v)*6 for 48 stitches Round 22-24: Work 48 stitches for 3 rounds Round 25-31: Create decreases to close the head
For the hair, use caramel-colored yarn:
Round 75: Attach yarn at the crown of the head and work 11 stitches Round 76-77: Create stitches that will form the base for braids Round 78-82: Shape the hair with strategic increases and decreases Round 83-86: Work 16 stitches to finish hair base Round 87-92: Complete the hair with final shaping
Designing the Shepherdess Outfit
The charming outfit includes a red dress with a yellow pinafore:
Shepherdess and Lamb Red Dress
Round 1: Using cherry red yarn, start with chain 30, skip 1, sc in 29 stitches Round 2: Work pattern (1cc1v)*9 for 27 stitches Round 3: Work 27 stitches Round 4-5: Work 45 stitches with increases Round 6-9: Continue with straight rounds of 45 stitches Round 10-13: Work with increases for the skirt Round 14-17: Complete dress with 45 stitches per round Round 18: Work pattern (v CC)*45 for 90 stitches Round 19: Work 90 stitches Round 29: Work pattern (vcc)*90 for 180 stitches Round 30: Complete with 180 stitches
Yellow Pinafore
Round 1: Create a foundation chain of 66 stitches Round 2: Work back and forth to form the front panel with 18 stitches Round 3: Work 18 stitches Round 13: Work 18 stitches Round 14: Work 18 stitches Round 22: Create 40 chain stitches for straps Round 23: Connect to bottom with sc, chain 1, 4 dc, 2 chain stitches Round 24-26: Create pocket with 36 double crochet stitches Round 36: Create design elements with sc, dc cluster pattern Round 37: Finish with shell stitch border
Shepherdess and Lamb Companion
The adorable lamb companion starts with white yarn:
Round 1: Create a magic ring with 6 stitches for the body Round 2: Increase to 12 stitches Round 3: Increase to 18 stitches Round 4: Increase to 24 stitches Round 5: Increase to 30 stitches Round 6-7: Work 36 stitches for 2 rounds Round 8-9: Work 42 stitches for 2 rounds Round 10: Work with pattern (12xA)’ 3 for 39 stitches Round 11: Work 39 stitches Round 12-15: Continue with decreases to shape the body Round 16-20: Work with pattern to create texture for wool Round 21-31: Complete body with decreasing pattern
For the lamb legs: Round 1: Create magic ring with 6 stitches Round 2: Increase to 12 stitches Round 3: Work pattern (1x1v)*6 for 18 stitches Round 4: Work 18 stitches Round 5: Work 18 stitches Round 6-8: Complete with 18 stitches per round
For the lamb head: Round 1: Magic ring with 6 stitches Round 2: Increase to 12 stitches Round 3: Increase to 18 stitches Round 4: Increase to 24 stitches Round 5-6: Work 30 stitches for 2 rounds Round 7-9: Continue with 42 stitches Round 10-12: Begin decreases to shape the head
Shepherdess and Lamb Creating the Accessories
For the basket: Round 1: Magic ring with 6 stitches Round 2: Increase to 12 stitches Round 3: Increase to 18 stitches Round 4: Increase to 24 stitches Round 5: Work 24 stitches Round 6: Work 26 stitches Round 7-9: Work with front loop only for texture Round 10-12: Complete with decrease rounds
For the flowers: Round 1: Magic ring and work pattern (2Ldc1cc)*4 to create 4 petals
For the green hat: Round 1: Create appropriate size ring and increase to fit doll’s head Round 2-5: Work in rounds adding decorative elements Round 6-9: Complete with decorative flower attachments
Final Assembly and Decorative Elements
Bring your creation to life with these finishing touches:
- Attach the head to the body securely
- Position and sew arms to the upper body
- Add the green hat with flower decorations
- Attach the lamb beside the shepherdess
- Position the basket at her side
- Add small decorative elements as desired
- Create and attach decorative flowers to the hat
- Embroider additional facial details as needed
Check this out :Crochet a Rock Star Amigurumi Doll
Conclusion
Completing this shepherdess and lamb amigurumi set showcases your dedication to the craft of crochet. The intricate details—from the shepherdess’s expressive face and braided hair to the lamb’s textured wool and sweet expression—create a charming pair that will delight viewers and demonstrate your skill.
This project incorporates various crochet techniques, from basic increases and decreases to more advanced shaping and assembly. The addition of wire armature allows for posable arms and legs, giving your creation more character and play value. The coordinated outfit with its bright colors and thoughtful details completes the pastoral theme.
Whether you’re making this set for yourself, as a gift, or even to sell at craft fairs, the results are sure to impress. The combination of the shepherdess with her lamb companion tells a story that resonates with nostalgic charm and showcases the beauty of handmade crafts.
Remember to share photos of your finished work online with proper tags to inspire others in the amigurumi community. With patience and attention to detail, you’ve created not just a doll, but a piece of art that captures the essence of countryside charm and the timeless appeal of handcrafted toys.
