Table of Contents
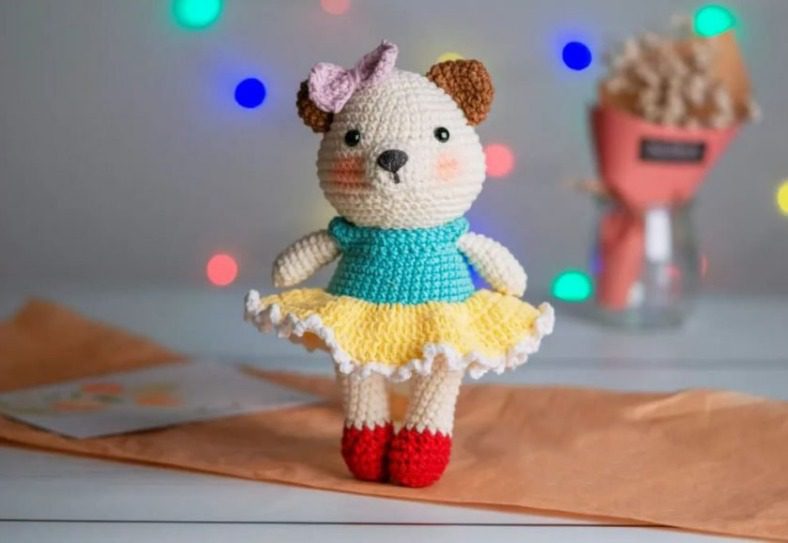
Creating Polar Bear handmade toys brings a special kind of joy, both in the making process and in seeing the finished result. Amigurumi, the Japanese art of crocheting small stuffed animals, has captured the hearts of crafters worldwide with its adorable results and accessible techniques. This comprehensive guide will walk you through creating a charming polar bear amigurumi, complete with a sweet purple bow accent and festive red boots.
This polar bear design combines simplicity with character, making it perfect for both beginners looking to expand their amigurumi skills and experienced crocheters seeking a delightful project. The finished bear stands approximately 6-8 inches tall, with a sweet expression, cuddly proportions, and distinctive details that bring this arctic friend to life. Let’s begin this rewarding crochet journey together.
Essential Materials
Before beginning your polar bear amigurumi project, gather these supplies:
- Cream-colored yarn for the head, body, and arms
- Brown yarn for the ears
- Red yarn for the boots
- Purple yarn for the bow
- Appropriate size crochet hook (typically 3.0-3.5mm)
- Fiberfill stuffing
- Safety eyes (6-8mm recommended)
- Black embroidery thread for the nose
- Pink blush or embroidery thread for cheeks
- Yarn needle for assembly
- Scissors
- Stitch markers (optional but helpful)
Understanding Crochet Terminology
For a smooth crocheting experience, familiarize yourself with these essential techniques used throughout the pattern:
- Magic Ring: A technique to begin crocheting in the round without leaving a hole
- Single Crochet: The basic stitch used throughout most of this pattern
- Increase: Working two single crochets in one stitch to expand the piece
- Decrease: Invisibly combining two stitches into one to reduce the circumference
- Back Loop Only: Working through only the back loop of each stitch for texture
- Front Loop Only: Working through only the front loop of each stitch for texture
- Chain: Creating a foundation of linked stitches
- Slip Stitch: Used to join rounds or move positions
Creating the Polar Bear’s Head
The head forms the foundation of your bear’s personality:
Round 1: Create a magic ring and work 6 single crochets into it (6 stitches total) Round 2: Work an increase in each stitch around (12 stitches total) Round 3: Work “1 single crochet, increase” repeated 6 times (18 stitches total) Round 4: Work “2 single crochets, increase” repeated 6 times (24 stitches total) Round 5: Work “3 single crochets, increase” repeated 6 times (30 stitches total) Round 6: Work “4 single crochets, increase” repeated 6 times (36 stitches total) Round 7: Work 36 single crochets around (36 stitches total) Round 8: Work “8 single crochets, increase” repeated 4 times (40 stitches total) Round 9: Work 40 single crochets around (40 stitches total) Round 10: Work 8 single crochets, increase once, 22 single crochets, increase once, 8 single crochets (42 stitches total) Round 11: Work 8 single crochets, increase once, 24 single crochets, increase once, 8 single crochets (44 stitches total) Round 12: Work 11 single crochets, “1 single crochet, increase” repeated 11 times, 11 single crochets (55 stitches total) Rounds 13-16: Work 55 single crochets for four complete rounds (55 stitches in each round) Round 17: Work 11 single crochets, “1 single crochet, decrease” repeated 11 times, 11 single crochets (44 stitches total) Round 18: Work 44 single crochets around (44 stitches total) Round 19: Work “9 single crochets, decrease” repeated 4 times (40 stitches total) Round 20: Work “3 single crochets, decrease” repeated 8 times (32 stitches total) Round 21: Work “1 single crochet, decrease, 1 single crochet” repeated 8 times (24 stitches total) Round 22: Work “1 single crochet, decrease” repeated 8 times (16 stitches total)
Fasten off, leaving a long tail for sewing if needed. Position the safety eyes between Rounds 10 and 11, approximately 10 stitches apart. Stuff the head firmly with fiberfill before closing completely.
Crafting the Muzzle
The muzzle gives your polar bear its distinctive facial structure:
Round 1: Using cream yarn, create a magic ring and work 6 single crochets into it (6 stitches total) Round 2: Work an increase in each stitch around (12 stitches total) Round 3: Work “1 single crochet, increase” repeated 6 times (18 stitches total) Round 4: Working in back loops only, work 18 single crochets around (18 stitches total)
Fasten off, leaving a long tail for sewing. Attach the muzzle to the center of the face, positioning it between Rounds 13-16. Use black embroidery thread to create a small triangular nose in the center of the muzzle.
Creating the Ears
The small rounded ears add character to your polar bear:
Using brown yarn: Round 1: Create a magic ring and work 6 single crochets into it (6 stitches total) Round 2: Work an increase in each stitch around (12 stitches total) Round 3: Work “3 single crochets, increase” repeated 3 times (15 stitches total) Round 4: Work “4 single crochets, increase” repeated 3 times (18 stitches total) Round 5: Work 18 single crochets around (18 stitches total)
Do not stuff the ears. Fasten off, leaving a long tail for sewing. Fold each ear in half and sew the edges together. Attach the ears to the head between Rounds 4 and 10, positioning them symmetrically on top of the head.
Adding Facial Details
Complete your polar bear’s sweet expression:
- Apply pink blush to the cheeks using fabric paint, chalk, or by embroidering small pink circles
- Ensure the black nose is centered on the muzzle
- If desired, add small white highlights to the eyes using white embroidery thread
Forming the Legs
The legs will support your polar bear and feature festive red boots:
Using red yarn: Round 1: Create a magic ring and work 6 single crochets into it (6 stitches total) Round 2: Work an increase in each stitch around (12 stitches total) Round 3: Work “1 single crochet, increase” repeated 6 times (18 stitches total) Round 4: Working in back loops only, work 18 single crochets around (18 stitches total) Round 5: Work 18 single crochets around (18 stitches total) Round 6: Work 6 single crochets, 3 decreases, 6 single crochets (15 stitches total) Round 7: Work 4 single crochets, 3 decreases, 5 single crochets (12 stitches total)
Switch to cream yarn: Rounds 8-13: Work 12 single crochets for six complete rounds (12 stitches in each round)
For the first leg, fasten off and secure the end. For the second leg, complete through Round 13 but do not fasten off—you’ll continue directly to the body.
Constructing the Body
The body connects the legs and forms the core of your polar bear:
Continue working with cream yarn after completing the second leg: Round 1: Work 5 more single crochets on the second leg, chain 3, join with a slip stitch through both loops of the 10th stitch on the first leg, work 12 single crochets around the first leg, 3 single crochets along the chain bridge, work 7 single crochets on the second leg (30 stitches total) Round 2: Work “4 single crochets, increase” repeated 6 times (36 stitches total) Round 3: Work “5 single crochets, increase” repeated 6 times (42 stitches total) Rounds 4-9: Work 42 single crochets for six complete rounds (42 stitches in each round) Round 10: Work “5 single crochets, decrease” repeated 6 times (36 stitches total) Round 11: Work 36 single crochets around (36 stitches total) Round 12: Work “4 single crochets, decrease” repeated 6 times (30 stitches total) Rounds 13-14: Work 30 single crochets for two complete rounds (30 stitches in each round) Round 15: Work “3 single crochets, decrease” repeated 6 times (24 stitches total) Round 16: Work “1 single crochet, decrease” repeated 8 times (16 stitches total)
Fasten off, leaving a long tail for sewing. Stuff the body firmly with fiberfill before closing completely. Sew the body to the head, ensuring proper alignment.
Creating the Arms
The arms add to your polar bear’s huggable quality:
Using cream yarn: Round 1: Create a magic ring and work 5 single crochets into it (5 stitches total) Round 2: Work an increase in each stitch around (10 stitches total) Rounds 3-12: Work 10 single crochets for ten complete rounds (10 stitches in each round)
Stuff the arms lightly with fiberfill. Fasten off, leaving a long tail for sewing. Flatten the top opening of each arm and sew the edges together. Attach the arms to the body between Rounds 15 and 16, positioning them on the sides.
Crafting the Decorative Bow
The purple bow adds a sweet accent to your polar bear:
Using purple yarn: Chain 11 Row 1: Starting in second chain from hook, work 10 single crochets, chain 1, turn (10 stitches) Rows 2-5: Work 10 single crochets across, chain 1, turn (10 stitches per row)
Fasten off, leaving a long tail for assembly. Pinch the center of the rectangle and wrap yarn around the middle several times to create the bow shape. Secure the wrapped yarn and sew the completed bow to the head, typically positioned on top or to one side.
Final Assembly and Details
With all components ready, complete your polar bear amigurumi:
- Verify that the head is securely attached to the body
- Check that all limbs and features are properly positioned
- Add any final embroidered details as desired
- Ensure the bow is securely attached
- Fluff the stuffing as needed for optimal shape
Customizing Your Polar Bear
While following the pattern creates a classic polar bear, consider these creative variations:
- Change the bow color for different seasonal themes
- Add accessories like a tiny scarf or hat
- Embroider additional details like paw pads
- Create a family of bears in different sizes
- Use variegated yarn for subtle color variation
- Add a small accessory like a fish or snowflake
- Embroider a heart or other design on the body
Displaying Your Amigurumi
Your finished polar bear amigurumi can be showcased in various ways:
- Standing upright on a shelf or display case
- As part of a winter-themed collection
- In a child’s room as a decorative toy
- On a desktop as a cheerful companion
- As part of a seasonal or holiday arrangement
- In a gift basket with other handmade items
Caring for Your Creation
To keep your polar bear amigurumi looking its best:
- Spot clean with mild soap and water as needed
- Allow to air dry completely if washing becomes necessary
- Brush gently with a soft toothbrush to restore fluffiness
- Display away from direct sunlight to prevent color fading
- Store in a clean, dry place when not being displayed
Perfect Gift Ideas
Your handmade polar bear amigurumi makes an excellent gift for:
- Winter holidays or birthday celebrations
- Arctic animal enthusiasts
- Nursery or playroom décor
- Collectors of handmade toys
- Friends who appreciate handcrafted gifts
- Winter-themed gift exchanges

Check this out :Crochet Bunny Amigurumi Pattern
Conclusion
Congratulations on completing your polar bear amigurumi! This charming creation combines simple crochet techniques with thoughtful details to create a character full of personality. The combination of the sweet expression, brown ears, and festive red boots makes this polar bear an irresistible addition to any collection.
Whether made as a gift or kept for yourself, this polar bear brings joy through both the creation process and as a finished piece. The skills you’ve practiced—working in rounds, color changing, and assembly—will serve you well in future crochet projects.
Remember that each handmade creation has its own unique character, making your polar bear truly one-of-a-kind. Enjoy the process of bringing this arctic friend to life, and consider creating companion pieces in your future crochet adventures.
Your completed polar bear stands as a testament to your crafting skills and will delight all who see it. With proper care, this handmade treasure can become a keepsake to be enjoyed for years to come.


Leave a Reply