

Table of Contents
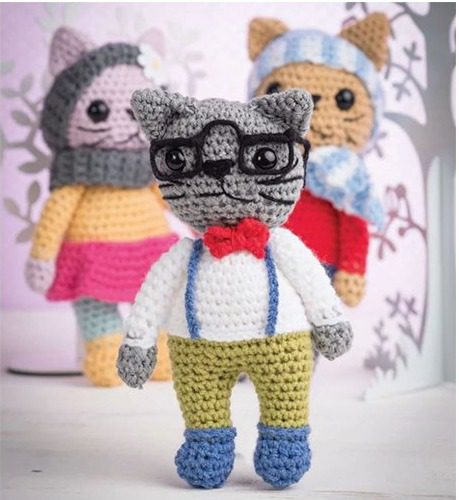
Create Amigurumi Cats three charming character cats with this detailed amigurumi pattern. Tom, Sally, and Richard each have their own unique personality and style, complete with adorable accessories and outfits. Standing at approximately 20cm tall, these cats work up relatively quickly and make perfect gifts or delightful additions to your amigurumi collection.
Materials Needed for Your Amigurumi Cats
To create these character cats, you will need:
- DK weight yarn in the following colors:
- Light brown (for Tom’s head)
- Grey (for Richard’s head)
- Pink (for Sally’s head)
- Red (for accessories)
- Yellow (for Sally’s outfit)
- White (for Richard’s outfit)
- Blue (for Tom’s outfit)
- Mint (for Sally’s pants)
- Lime (for Richard’s pants)
- Pale blue (for Tom’s hat)
- Bright pink (for Sally’s skirt)
- 3.5mm crochet hook
- 12mm (½in) safety toy eyes
- Black embroidery thread
- Yarn needle
- Toy stuffing
- Optional for Sally: Fabric glue and a flower motif, button, or small decorative item
- Optional for Richard: Jewelry wire for glasses
Understanding Amigurumi Cats
The finished cats measure approximately 20cm tall by 10cm wide (8in x 4in). All three cats share the same basic body pattern but have different colored heads, outfits, and accessories that give them each a unique personality.
When making these cats for young children, consider embroidering the eyes rather than using safety eyes, and avoid small accessories like the glasses.
This pattern uses continuous spiral rounds (the amigurumi method), where you work without joining rounds with slip stitches. Using stitch markers to track the beginning of each round is highly recommended.
Creating the Cat Head and Body
Begin with your chosen head color yarn (brown for Tom, pink for Sally, or grey for Richard):
- Create a magic ring.
- Round 1: Work 6 double crochets into the ring. You will have 6 stitches.
- Round 2: Work 2 double crochets in each stitch around. You will have 12 stitches.
- Round 3: Work [1 double crochet in the first stitch, 2 double crochets in the next stitch] repeated to the end. You will have 18 stitches.
- Round 4: Work [1 double crochet in the first 2 stitches, 2 double crochets in the next stitch] repeated to the end. You will have 24 stitches.
- Round 5: Work [1 double crochet in the first 3 stitches, 2 double crochets in the next stitch] repeated to the end. You will have 30 stitches.
- Round 6: Work [1 double crochet in the first 9 stitches, 2 double crochets in the next stitch] repeated to the end. You will have 33 stitches.
- Round 7: Work [1 double crochet in the first 10 stitches, 2 double crochets in the next stitch] repeated to the end. You will have 36 stitches.
- Round 8: Work [1 double crochet in the first 11 stitches, 2 double crochets in the next stitch] repeated to the end. You will have 39 stitches.
- Round 9: Work [1 double crochet in the first 12 stitches, 2 double crochets in the next stitch] repeated to the end. You will have 42 stitches.
- Rounds 10-12: Work 1 double crochet in each stitch to the end, maintaining 42 stitches. Mark round 10 with a stitch marker for eye placement.
- Round 13: Work [decrease over next 2 stitches, 1 double crochet in next 5 stitches] repeated to the end. You will have 36 stitches.
- Round 14: Work [decrease over next 2 stitches, 1 double crochet in next 4 stitches] repeated to the end. You will have 30 stitches.
- Round 15: Work [decrease over next 2 stitches, 1 double crochet in next 3 stitches] repeated to the end. You will have 24 stitches.
- Round 16: Work [decrease over next 2 stitches, 1 double crochet in next 2 stitches] repeated to the end. You will have 18 stitches.
Insert the toy eyes now. They should be placed on the marked round (round 10), 8 stitches apart.
- Round 17: Work [decrease over next 2 stitches, 1 double crochet in next stitch] repeated to the end. You will have 12 stitches.
Stuff the head firmly at this point.
Now change to the jumper (sweater) yarn color:
- Red for Tom
- Yellow for Sally
- White for Richard
- Round 18: Work 1 double crochet in each stitch to the end, maintaining 12 stitches. Work an uncounted round of slip stitches to create a clean color transition.
- Round 19: Work [1 double crochet in the first 3 stitches, 2 double crochets in the next stitch] repeated to the end. You will have 15 stitches.
- Round 20: Work [1 double crochet in the first 4 stitches, 2 double crochets in the next stitch] repeated to the end. You will have 18 stitches.
- Round 21: Work [1 double crochet in the first 5 stitches, 2 double crochets in the next stitch] repeated to the end. You will have 21 stitches.
- Round 22: Work [1 double crochet in the first 6 stitches, 2 double crochets in the next stitch] repeated to the end. You will have 24 stitches.
- Round 23: Work [1 double crochet in the first 7 stitches, 2 double crochets in the next stitch] repeated to the end. You will have 27 stitches.
- Round 24: Work [1 double crochet in the first 8 stitches, 2 double crochets in the next stitch] repeated to the end. You will have 30 stitches.
- Round 25: Work [1 double crochet in the first 9 stitches, 2 double crochets in the next stitch] repeated to the end. You will have 33 stitches.
- Round 26: Work [1 double crochet in the first 10 stitches, 2 double crochets in the next stitch] repeated to the end. You will have 36 stitches.
- Rounds 27-28: Work 1 double crochet in each stitch to the end, maintaining 36 stitches. Work an uncounted round of slip stitches to create a clean color transition.
Now change to the trouser (pants) yarn color:
- Blue for Tom
- Mint for Sally
- Lime for Richard
- Round 29: Work 1 double crochet in each stitch to the end, maintaining 36 stitches.
- Round 30: Work [decrease over next 2 stitches, 1 double crochet in next 7 stitches] repeated to the end. You will have 32 stitches.
- Round 31: Work [decrease over next 2 stitches, 1 double crochet in next 6 stitches] repeated to the end. You will have 28 stitches.
- Round 32: Work [decrease over next 2 stitches, 1 double crochet in next 5 stitches] repeated to the end. You will have 24 stitches.
Stuff the body firmly at this point.
Now it’s time to split the work to create the legs. Place a pin or stitch marker through the stitch on the last row that is at the center front of your cat. To find this easily, lay your cat on a hard surface facing forward and flatten slightly. Find the middle point between the eyes with your pin and then run it straight down the body of the cat, attaching it to the stitch on the last worked row.
Amigurumi Cats Creating the First Leg
- Round 33: Work 1 double crochet in each stitch, skipping the marked stitch and the next 11 stitches. You will have 12 stitches.
- Round 34: Decrease over next 2 stitches, then work 1 double crochet in each stitch to the end. You will have 11 stitches.
- Rounds 35-36: Work 1 double crochet in each stitch to the end, maintaining 11 stitches.
- Round 37: Decrease over next 2 stitches, then work 1 double crochet in each stitch to the end. You will have 10 stitches.
- Round 38: Work 1 double crochet in each stitch to the end, maintaining 10 stitches.
Now change to the boot color:
- Grey for Tom
- Yellow for Sally
- Blue for Richard
Work an uncounted round of slip stitches to create a clean color transition. Mark the center front of the boot with a pin.
- Round 39: Work 1 double crochet in each stitch until you reach one stitch before the pin. In the next stitch, work [1 double crochet, 2 half treble crochets]. Work 1 half treble crochet in the next stitch (remove pin before working). In the next stitch, work [2 half treble crochets, 1 double crochet]. Work 1 double crochet in each remaining stitch to the end. You will have 14 stitches.
- Round 40: Work 1 double crochet in each stitch to the end, maintaining 14 stitches.
- Round 41: Work [decrease over next 2 stitches, 1 double crochet in next 5 stitches] repeated to the end. You will have 12 stitches.
Stuff the leg firmly at this point.
- Round 42: Decrease over next 2 stitches repeated to the end. You will have 6 stitches.
- Fasten off, leaving a long tail.
Amigurumi Cats Creating the Second Leg
- Rejoin yarn to any stitch at the back of the body on round 32.
- Round 33: Work 1 double crochet in each stitch. You will have 12 stitches.
- Rounds 34-42: Work exactly as for the first leg.
- Fasten off, leaving a long tail.
Using a yarn needle, weave the yarn through the last 6 stitches and pull tight to close. Weave in yarn ends and cut off any remaining yarn.
Amigurumi Cats Adding Facial Details
Use black embroidery thread to create the face details. Embroider the nose, mouth, and whiskers, using the photo as a guide. Use long stitches to form the mouth and whiskers and shorter stitches to make the nose.
Amigurumi Cats Creating the Arms
Make two identical arms:
- Start with the same yarn used for the head (brown for Tom, pink for Sally, or grey for Richard) and create a magic ring.
- Round 1: Work 6 double crochets in the magic ring. You will have 6 stitches.
- Round 2: Work [1 double crochet in the first stitch, 2 double crochets in the next stitch] repeated to the end. You will have 9 stitches.
- Round 3: Work 1 double crochet into each stitch to the end, maintaining 9 stitches.
- Round 4: Work [decrease over next 2 stitches, 1 double crochet in next stitch] repeated to the end. You will have 6 stitches.
Change to the jumper (sweater) yarn color:
- Red for Tom
- Yellow for Sally
- White for Richard
- Rounds 5-14: Work 1 double crochet into each stitch to the end, maintaining 6 stitches.
- Fasten off, leaving a long tail.
Stuff the arms lightly and sew them in place on the sides of the body.
Amigurumi Cats Creating the Ears
Make two identical ears:
- Start with the same yarn used for the head (brown for Tom, pink for Sally, or grey for Richard) and create a magic ring.
- Round 1: Work 4 double crochets in the magic ring. You will have 4 stitches.
- Round 2: Work [1 double crochet in the first stitch, 2 double crochets in the next stitch] repeated to the end. You will have 6 stitches.
- Round 3: Work [1 double crochet in the first 2 stitches, 2 double crochets in the next stitch] repeated to the end. You will have 8 stitches.
- Round 4: Work [1 double crochet in the first 3 stitches, 2 double crochets in the next stitch] repeated to the end. You will have 10 stitches.
- Round 5: Work [1 double crochet in the first 4 stitches, 2 double crochets in the next stitch] repeated to the end. You will have 12 stitches.
- Round 6: Work [1 double crochet in the first 5 stitches, 2 double crochets in the next stitch] repeated to the end. You will have 14 stitches.
- Fasten off, leaving a long tail.
Sew the ears in place on the head. For Tom, wait until after you’ve made his hat before attaching the ears.
Amigurumi Cats Creating Accessories for Each Cat
Tom’s Hat
Using pale blue yarn:
- Create a magic ring.
- Round 1: Work 6 double crochets in the magic ring. You will have 6 stitches.
- Round 2: Work 2 double crochets into each stitch to the end. You will have 12 stitches.
- Round 3: Work [1 double crochet in the first stitch, 2 double crochets in the next stitch] repeated to the end. You will have 18 stitches.
- Round 4: Work [1 double crochet in the first 2 stitches, 2 double crochets in the next stitch] repeated to the end. You will have 24 stitches.
- Round 5: Work [1 double crochet in the first 3 stitches, 2 double crochets in the next stitch] repeated to the end. You will have 30 stitches.
- Round 6: Work [1 double crochet in the first 9 stitches, 2 double crochets in the next stitch] repeated to the end. You will have 33 stitches.
- Round 7: Work [1 double crochet in the first 10 stitches, 2 double crochets in the next stitch] repeated to the end. You will have 36 stitches.
- Round 8: Work [1 double crochet in the first 11 stitches, 2 double crochets in the next stitch] repeated to the end. You will have 39 stitches.
- Round 9: Work [1 double crochet in the first 12 stitches, 2 double crochets in the next stitch] repeated to the end. You will have 42 stitches.
- Fasten off, leaving a long tail.
Hat Brim
Note: This is not worked in the round, so chain 1 and turn at the beginning of each row.
Using blue yarn:
- Chain 5.
- Row 1: Work 1 double crochet in 2nd chain from hook, then 1 double crochet in each stitch to the end. You will have 4 stitches.
- Row 2: Chain 1, turn, work 1 double crochet in each stitch. You will have 4 stitches. Change to white yarn.
- Repeat row 2 thirty-eight more times, alternating 2 rows of white then 2 rows of blue to form stripes.
- Fasten off, leaving a long tail.
Use the photo as a guide and sew the brim in place around the bottom edge of the hat.
Tom’s Scarf
Note: This is not worked in the round, so chain 1 and turn at the beginning of each row.
Using blue yarn:
- Chain 5.
- Row 1: Work 1 double crochet in 2nd chain from hook, then 1 double crochet in each stitch to the end. You will have 4 stitches.
- Row 2: Chain 1, turn, work 1 double crochet in each stitch. You will have 4 stitches. Change to white yarn.
- Repeat row 2 until the scarf measures 25cm (10in), alternating 2 rows of white then 2 rows of blue to form stripes.
- Fasten off.
Weave in any loose ends and tie the scarf around the cat’s neck.
Amigurumi Cats Sally’s Skirt
Using bright pink yarn:
- Chain 36.
- Join with a slip stitch to form a loop (being careful not to twist the chain). You will have 36 stitches.
- Round 1: Work [1 double crochet in the first 11 chain stitches, 2 double crochets in the next] repeated to the end. You will have 39 stitches.
- Round 2: Work [1 double crochet in the first 12 stitches, 2 double crochets in the next stitch] repeated to the end. You will have 42 stitches.
- Round 3: Work [1 double crochet in the first 13 stitches, 2 double crochets in the next stitch] repeated to the end. You will have 45 stitches.
- Round 4: Work [1 double crochet in the first 14 stitches, 2 double crochets in the next stitch] repeated to the end. You will have 48 stitches.
- Round 5: Work [1 double crochet in the first 15 stitches, 2 double crochets in the next stitch] repeated to the end. You will have 51 stitches.
- Round 6: Work [1 double crochet in the first 16 stitches, 2 double crochets in the next stitch] repeated to the end. You will have 54 stitches.
- Fasten off, leaving a long tail.
Weave in any loose ends and sew the skirt in place at the bottom edge of the jumper.
Amigurumi Cats Sally’s Headband
Note: This is not worked in the round, so chain 1 and turn at the beginning of each row.
Using grey yarn:
- Chain 7.
- Row 1: Work 1 double crochet in 2nd chain from hook, then 1 double crochet in each stitch to the end. You will have 6 stitches.
- Row 2: Chain 1, turn, work 1 double crochet in each stitch. You will have 6 stitches.
- Repeat row 2 until the headband measures around the head.
- Fasten off, leaving a long tail.
Place the headband around the head and sew the ends together. Glue a flower motif in place for decoration.
Amigurumi Cats Sally’s Neck Cowl
Note: This is not worked in the round, so chain 1 and turn at the beginning of each row.
Using grey yarn:
- Chain 5.
- Row 1: Work 1 double crochet in 2nd chain from hook, then 1 double crochet in each stitch to the end. You will have 4 stitches.
- Row 2: Chain 1, turn, work 1 double crochet in each stitch. You will have 4 stitches.
- Repeat row 2 until the cowl measures 35cm (14in).
- Fasten off, leaving a long tail.
Sew the ends together, wrap around the neck, and secure in place.
Amigurumi Cats Richard’s Bow Tie
Note: This is not worked in the round, so chain 1 and turn at the beginning of each row.
Using red yarn:
- Chain 5.
- Row 1: Work 1 double crochet in 2nd chain from hook, then 1 double crochet in each stitch to the end. You will have 4 stitches.
- Rows 2-4: Chain 1, turn, work 1 double crochet in each stitch. You will have 4 stitches.
- Fasten off, leaving a long tail.
Wrap the yarn around the center of the square a few times and pull tight. Sew in place on the neck.
Amigurumi Cats Richard’s Braces (Suspenders)
Make 2: Using blue yarn:
- Chain 22.
- Fasten off, leaving a long tail.
Sew in place on either side of the body.
Richard’s Glasses
- Use bendable jewelry wire and twist together to form the glasses shape.
- Use glue to secure black yarn to one end of the wire and wrap around until all the wire is covered.
- Glue the yarn end in place and cut off any excess.
Finishing Your Amigurumi Cats
Once all parts are completed and attached, take a moment to check that everything is secure:
- Make sure the head and body are firmly stuffed.
- Check that the eyes are secure.
- Verify that all accessories are properly attached.
- Make any adjustments to positioning of ears, arms, or accessories.
- Ensure that all yarn ends are woven in and secure.
Tips for Perfect Amigurumi Cats
- Use stitch markers to keep track of your rounds.
- Stuff firmly but not overly tight for the best shape.
- When changing colors, try to make the transition as neat as possible.
- For a cleaner finish, use invisible decrease techniques.
- Take time to position and sew the parts together carefully.
- If making these for small children, embroider the eyes instead of using safety eyes and avoid small accessories.
Customizing Your Amigurumi Cats
These cat patterns offer many opportunities for personalization:
- Try different color combinations for the outfits.
- Create seasonal versions with holiday-themed accessories.
- Add additional accessories like tiny bags or hats.
- Embroider different facial expressions for varied personalities.
- Scale the pattern up or down by changing yarn weight and hook size.

Check this out : Crochet an Elegant Lady Flamingo Amigurumi Pattern
Conclusion
Your trio of amigurumi cats is now complete! Each character has its own unique style and personality – Tom with his casual hat and scarf, Sally with her pretty skirt and accessories, and Richard with his dapper bow tie and suspenders.
Standing at approximately 20cm tall, these cats make wonderful gifts, additions to an amigurumi collection, or charming decorations. The relatively simple construction makes them a perfect project for intermediate crocheters looking to practice shaping and accessory making.
With this detailed pattern, you’ve created three adorable character cats with distinctive personalities that showcase your crochet skills. Enjoy your charming creations!
