

Table of Contents
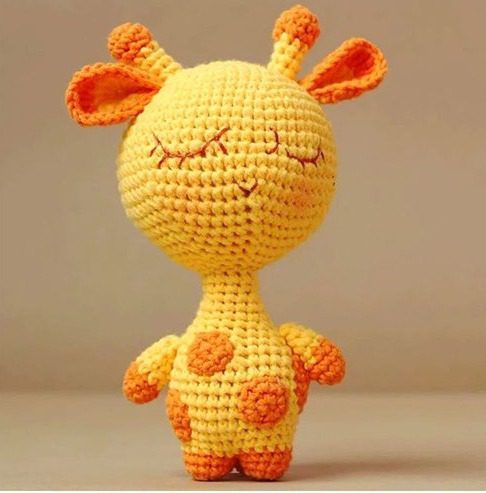
Crafting Amigurumi Giraffe an adorable amigurumi giraffe is a delightful project that brings joy to creators and recipients alike. This comprehensive pattern guide walks you through every step of creating your own charming giraffe plush toy using simple crochet techniques. Whether you’re a seasoned amigurumi enthusiast or just starting your crochet journey, this pattern includes all the details you need for success.
Essential Materials for Your Amigurumi Giraffe
Before beginning your giraffe project, gather these supplies:
Amigurumi Giraffe Yarn Selection
For the perfect giraffe, you’ll need:
- Orange yarn (YarnArt Jeans 23 or similar, 50g/160m) for legs, horns, ear accents, and spots
- Yellow yarn (YarnArt Jeans 35 or similar, 50g/160m) for the body, head, and base ear color
- Brown yarn (YarnArt Jeans 71 or similar, 50g/160m) for the scarf
Amigurumi Giraffe Tools and Notions
- Crochet hook (2-2.5mm size)
- Knitting needles (3.5-4mm size) for the scarf
- One wooden button for scarf closure
- Brown and pink embroidery thread for facial features
- Tapestry needles for assembly and embroidery
- Pins for positioning pieces during assembly
- Stitch markers to keep track of your rounds
- Scissors for trimming yarn
Understanding Amigurumi Giraffe Terminology
This pattern uses standard US crochet terms throughout:
- Magic Ring (MR): Creates a tight center circle to begin your work
- Single Crochet (SC): The main stitch used throughout this pattern
- Increase (Inc): Work two single crochets in the same stitch to add stitches
- Decrease (Dec): Combine two stitches into one to reduce stitches
- Half Double Crochet (HDC): A stitch taller than single crochet
- Slip Stitch (SlSt): Used for joining or creating subtle texture
- Double Crochet (DC): Creates height in your work
- Treble Crochet (TR): The tallest basic stitch in this pattern
- Back Loop Only (BLO): Working through only the back loop of a stitch
- Front Loop Only (FLO): Working through only the front loop of a stitch
Creating Your Amigurumi Giraffe Step by Step
Amigurumi Giraffe Crafting the Legs
Begin by making two identical legs using orange yarn:
Round 1: Create a magic ring and work 6 single crochets into it (6 stitches) Round 2: Work [1 single crochet, increase] 3 times (9 stitches) Round 3: Work [2 single crochets, increase] 3 times (12 stitches) Round 4: Work [3 single crochets, increase] 3 times (15 stitches)
After completing the first leg, cut the yarn leaving a tail. For the second leg, follow the same pattern but keep your yarn attached after finishing. Join the two legs by working 15 single crochets across each leg for a total of 30 stitches. This creates the foundation for the giraffe’s body.
Amigurumi Giraffe Building the Body
Switch to yellow yarn and continue working from the joined legs:
Round 1: Work [4 single crochets, increase] 6 times (36 stitches) Rounds 2-7: Work 36 single crochets for 6 complete rounds (36 stitches) Round 8: Work [4 single crochets, decrease] 6 times (30 stitches) Round 9: Work 30 single crochets around (30 stitches) Round 10: Work [3 single crochets, decrease] 6 times (24 stitches) Round 11: Work 24 single crochets around (24 stitches) Round 12: Work [2 single crochets, decrease] 6 times (18 stitches) Rounds 13-16: Work 18 single crochets for 4 complete rounds (18 stitches)
Leave a long yarn tail for sewing later. Before closing completely, fill the body with stuffing for a plump, huggable shape.
Amigurumi Giraffe Forming the Arms
Create two identical arms, starting with orange yarn:
Round 1: Create a magic ring and work 6 single crochets into it (6 stitches) Round 2: Work [1 single crochet, increase] 3 times, then switch to yellow yarn (9 stitches) Rounds 3-7: Work 9 single crochets for 5 complete rounds (9 stitches) Round 8: Decrease once, then work 7 single crochets (8 stitches) Round 9: Decrease once, then work 6 single crochets (7 stitches) Round 10: Decrease once, then work 5 single crochets (6 stitches)
Leave a long tail of yarn, add a small amount of stuffing, then sew the edges together to close each arm.
Amigurumi Giraffe Shaping the Head
The head is the largest component and gives your giraffe its distinctive character:
Round 1: Create a magic ring and work 6 single crochets into it (6 stitches) Round 2: Increase in each stitch around (12 stitches) Round 3: Work [1 single crochet, increase] 6 times (18 stitches) Round 4: Work [2 single crochets, increase] 6 times (24 stitches) Round 5: Work [3 single crochets, increase] 6 times (30 stitches) Round 6: Work [4 single crochets, increase] 6 times (36 stitches) Round 7: Work [5 single crochets, increase] 6 times (42 stitches) Round 8: Work [6 single crochets, increase] 6 times (48 stitches) Round 9: Work [7 single crochets, increase] 6 times (54 stitches) Round 10: Work 54 single crochets around (54 stitches) Round 11: Work [8 single crochets, increase] 6 times (60 stitches) Rounds 12-19: Work 60 single crochets for 8 complete rounds (60 stitches) Round 20: Work [8 single crochets, decrease] 6 times (54 stitches) Round 21: Work 54 single crochets around (54 stitches) Round 22: Work [7 single crochets, decrease] 6 times (48 stitches) Round 23: Work [6 single crochets, decrease] 6 times (42 stitches) Round 24: Work [5 single crochets, decrease] 6 times (36 stitches) Round 25: Work [4 single crochets, decrease] 6 times (30 stitches) Round 26: Work [3 single crochets, decrease] 6 times (24 stitches) Round 27: Work [2 single crochets, decrease] 6 times (18 stitches)
Leave a long tail for attaching the head to the body. Stuff the head firmly before closing.
Amigurumi Giraffe Creating Distinctive Ears
Make two identical ears using yellow yarn with orange accents:
Round 1: Create a magic ring and work 6 single crochets into it (6 stitches) Round 2: Work the following sequence: (1 single crochet, 2 half double crochets), (3 double crochets), (3 treble crochets) twice, (3 double crochets), (2 half double crochets, 1 single crochet), then switch to orange yarn (18 stitches) Round 3: Work 3 single crochets, 2 half double crochets, 2 double crochets, 8 treble crochets (2 treble crochets repeated 4 times), 2 double crochets, 2 half double crochets, 3 single crochets (22 stitches)
Leave a long tail, fold each ear in half, and sew the edges together to create the distinctive giraffe ear shape.
Adding Horns
Create two identical horns using orange yarn with yellow accents:
Round 1: Create a magic ring and work 6 single crochets into it (6 stitches) Round 2: Increase in each stitch around (12 stitches) Round 3: Work 12 single crochets around (12 stitches) Round 4: Work 6 decreases, then switch to yellow yarn (6 stitches) Rounds 5-8: Work 6 single crochets for 4 complete rounds (6 stitches)
Leave a long tail for attaching the horns to the head. Add a small amount of stuffing before sewing.
Finishing the Tail
The tail adds balance and authenticity to your giraffe:
Step 1: Using yellow yarn, chain 6 stitches Step 2: Starting from the second stitch from the hook, work 5 single crochets Step 3: Switch to orange yarn, chain 5 stitches Step 4: Join with a slip stitch to the first chain to create a tuft at the end
Leave enough yarn to attach the tail to the back of the body.
Adding Distinctive Spots
Create spots of varying sizes using orange yarn:
- 2 small spots: Work 6 single crochets into a magic ring
- 2 medium spots: Work 8 single crochets into a magic ring
- 1 large spot: Work 9 single crochets into a magic ring
Use a tapestry needle to sew these spots onto the body in a natural, random pattern.
Knitting the Scarf
Using brown yarn and knitting needles: Row 1: Cast on 6 stitches (6 stitches) Row 2: Knit 6 stitches (6 stitches) Row 3: Purl 6 stitches (6 stitches)
Repeat Rows 2 and 3 until your scarf reaches approximately 13cm in length. Cast off, break the yarn, and weave in the remaining yarn. Use a tapestry needle to attach the wooden button to one end of the scarf.
Assembly and Finishing Touches
Now that you’ve created all the components, it’s time to bring your giraffe to life:
- Position the head: Place the head on top of the body, using pins to hold it in position before sewing. Use the long tail from the head to sew it securely to the body.
- Attach the arms: Position the arms on either side of the body, slightly toward the front. Sew them in place using the long tails you left.
- Add the ears: Attach the folded ears to the top sides of the head. Ensure they are symmetrically placed for a balanced look.
- Position the horns: Sew the horns to the top of the head between the ears.
- Attach the tail: Sew the tail to the back of the body, positioning it appropriately.
- Apply the spots: Sew the orange spots onto the body and neck in a pleasing, natural pattern.
- Add facial features: Use brown embroidery thread to carefully stitch the eyes and mouth. Add pink cheeks with pink embroidery thread for a friendly expression.
- Wrap the scarf: Position the scarf around the giraffe’s neck and secure with the button.
Tips for Perfect Results
- Maintain consistent tension throughout your work for a professional finish
- Count stitches at the end of each round to avoid mistakes
- Use stitch markers to track the beginning of rounds
- Stuff firmly but not too tightly, especially in smaller parts
- Take time with facial embroidery as it defines your giraffe’s personality
- Position spots asymmetrically for a natural appearance
Creative Variations
Make your giraffe unique with these creative options:
- Experiment with different color combinations for a fantasy-inspired giraffe
- Add additional accessories like a tiny hat or backpack
- Scale the pattern up or down by changing hook size and yarn weight
- Create a family by varying the size using the same basic pattern
- Add embroidered eyelashes or different facial expressions
Care Instructions
To keep your handcrafted giraffe looking its best:
- Spot clean with a damp cloth and mild soap as needed
- Allow to air dry completely
- Avoid machine washing or drying
- Store away from direct sunlight to prevent color fading
- Gently reshape if needed after cleaning
Completing Your Amigurumi Journey
Congratulations on creating your amigurumi giraffe! This project combines multiple crochet techniques and skills, showcasing your crafting abilities and patience. The satisfaction of seeing all the individual components come together into a charming, three-dimensional character is one of the greatest rewards in amigurumi crafting.
Troubleshooting Common Challenges
If you encountered any difficulties while making your giraffe, remember that practice leads to improvement:
- Uneven stitches: This is normal, especially for beginners. Each project will help you develop more consistent tension.
- Visible stuffing: If you can see stuffing through your stitches, try using a smaller hook size for your next project or working your stitches more tightly.
- Assembly difficulties: Take your time positioning pieces before sewing. Using pins or clips to hold components in place can make a significant difference.
- Embroidery challenges: Facial features can be intimidating. Practice on scrap fabric first, and remember that simple features often work best.
- Color transitions: If you noticed yarn color changes showing through, try alternative joining methods in future projects.
The Joy of Gifting Handmade Treasures
Handcrafted amigurumi giraffes make exceptional gifts that carry meaning beyond store-bought items. Whether creating for a child’s birthday, a baby shower, or simply to brighten someone’s day, your handmade giraffe represents hours of attention and care.
Consider including a small card explaining that the giraffe was handmade especially for the recipient, mentioning the materials used and care instructions. This personal touch enhances the gift’s significance and helps the recipient understand its value.
Building Your Amigurumi Skills
This giraffe pattern incorporates several techniques that will benefit you in future projects:
- Working with color changes
- Creating and joining multiple components
- Shaping through strategic increases and decreases
- Embroidering facial features
- Knitting a simple accessory
Each amigurumi project you complete builds upon these foundational skills. Consider keeping notes about what worked well and what you might do differently next time. This reflection accelerates your growth as a crafter.
Joining the Amigurumi Community
The amigurumi crafting community is welcoming and supportive. Consider sharing photos of your completed giraffe on social media platforms, craft forums, or in local crafting groups. Not only will you receive encouragement and feedback, but you’ll also inspire others who might be hesitant to try this craft.
Many makers find that connecting with fellow enthusiasts enhances their enjoyment of the hobby. You might discover new patterns, techniques, or yarn recommendations through these interactions.
Displaying and Preserving Your Creation
Your handcrafted giraffe deserves to be showcased beautifully. Consider these display options:
- On a shelf with other handmade or collected toys
- In a child’s room as both decoration and plaything
- In a crafting space to inspire future projects
- As part of a seasonal or themed display in your home
To preserve your work, keep it away from direct sunlight, which can fade the yarn colors over time. For heirloom-quality preservation, store in an acid-free box when not displayed.
Check this out :Crochet a Charming Joker Goat Amigurumi with Scarf
The Therapeutic Benefits of Amigurumi
Beyond creating a charming toy, the process of making amigurumi offers numerous benefits:
- The repetitive nature of crochet can be meditative and stress-reducing
- Completing a complex project builds confidence and satisfaction
- Creating something beautiful provides a sense of accomplishment
- Handcrafting items connects you to generations of makers throughout history
These benefits make amigurumi more than just a hobby—it’s a practice that nurtures wellbeing while producing tangible results.
As you look at your completed giraffe, take a moment to appreciate not just the finished product, but the journey of creation. Each stitch represents your time, creativity, and developing skill. Whether this is your first amigurumi or your fiftieth, each project offers opportunities for learning and joy.
Your amigurumi giraffe stands as testament to the beautiful things that can emerge from simple materials, basic tools, and human creativity. May it bring smiles to all who see it, and satisfaction to you as its creator.
Happy crocheting, and may this be just one of many delightful amigurumi adventures!
