

Table of Contents
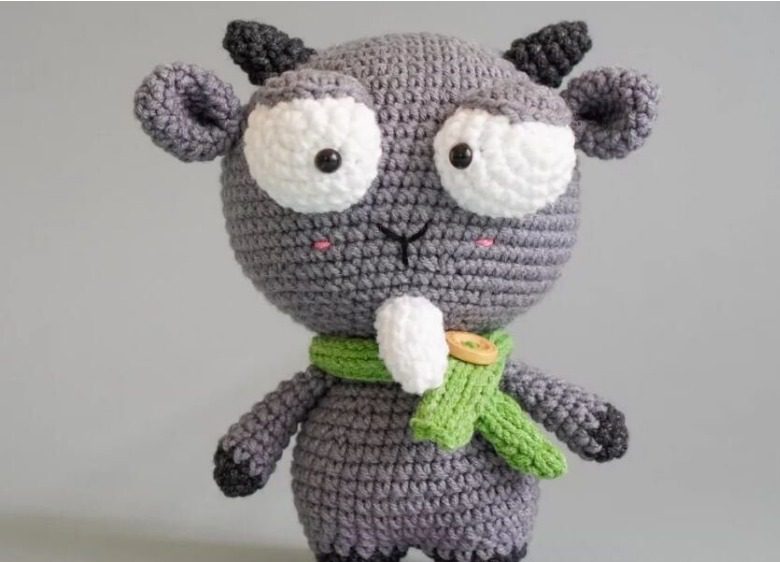
Create Goat Amigurumi an adorable amigurumi goat with personality and style using this detailed pattern. Joker the Goat features cute horns, expressive eyes with eyelids, a playful beard, and a cozy knitted scarf with a wooden button. This charming character will make a wonderful gift, addition to your amigurumi collection, or delightful decoration for your home.
Materials Needed for Your Joker Goat Amigurumi
To create this cute goat, you will need:
- Yarn Colors:
- Grey (A): Alize Cotton Gold 87 or similar (100g, 330m)
- Black (B): YarnArt Jeans 53 or similar (50g, 160m)
- White (C): YarnArt Jeans 62 or similar (50g, 160m)
- Green (D): YarnArt Jeans 69 or similar (50g, 160m)
- Other Materials:
- Crochet hook size 2-2.5mm
- Knitting needles size 3.5-4mm
- 1 wooden button
- 1 pair of safety eyes 6mm
- Tapestry needles
- Pins
- Stitch markers
- Scissors
- Stuffing for amigurumi
- Black embroidery thread
- Pink embroidery thread (optional, for cheeks)
Understanding Goat Amigurumi Terminology
This pattern Goat Amigurumi uses US crochet terms and is worked in continuous spirals unless specified otherwise. Here’s what the abbreviations mean:
- Magic Ring: Creates a tight center to start your work
- Chain: The most basic crochet stitch
- Single Crochet: The main stitch used throughout this pattern
- Single Crochet Increase: Working two single crochets in the same stitch
- Single Crochet Decrease: Combining two stitches into one to reduce count
- Half Double Crochet: A stitch taller than single crochet but shorter than double crochet
- Slip Stitch: A very short stitch used to join or move across work
- Double Crochet: A taller stitch used in some sections
- Treble Crochet: An even taller stitch used occasionally
- Back Loop Only: Working through only the back loop of each stitch
- Front Loop Only: Working through only the front loop of each stitch
Goat Amigurumi Creating the Legs and Body
Legs (Make 2 using Black Yarn)
- Round 1: Create a magic ring and work 6 single crochets into it. Pull the yarn tail to close the ring tightly.
- Round 2: Work 1 single crochet, then increase in the same stitch (2 single crochets in one stitch). Repeat this pattern two more times around the circle. You will have 9 stitches total.
- Round 3: Work 2 single crochets in separate stitches, then increase in the next stitch. Repeat this pattern two more times. You will have 12 stitches total.
- Round 4: Work 3 single crochets in separate stitches, then increase in the next stitch. Repeat this pattern two more times. You will have 15 stitches total.
For the first leg, fasten off and cut the yarn, leaving a small tail to weave in later. For the second leg, complete through Round 4 but do not cut the yarn – you’ll use this working yarn to connect the legs.
Connecting the legs: Take the first leg (the one where you cut the yarn) and position it next to your current working leg. Insert your hook into any stitch on the first leg and work a single crochet, using the working yarn from the second leg. Continue working 14 more single crochets around the first leg. Then work 15 single crochets around the second leg. You will have joined the legs with 30 stitches total.
Body (Using Grey Yarn)
After connecting the legs, change to grey yarn by making a slip knot with the new color and drawing it through the last stitch. Continue working in rounds:
- Round 1: Work 4 single crochets in separate stitches, then increase in the next stitch (2 single crochets in one stitch). Repeat this pattern five more times around. You will have expanded from 30 to 36 stitches total.
- Round 2: Work 1 single crochet in each stitch around the entire round. You will have 36 stitches.
- Round 3: Work 1 single crochet in each stitch around the entire round. Maintain 36 stitches.
- Round 4: Work 1 single crochet in each stitch around the entire round. Maintain 36 stitches.
- Round 5: Work 1 single crochet in each stitch around the entire round. Maintain 36 stitches.
- Round 6: Work 1 single crochet in each stitch around the entire round. Maintain 36 stitches.
- Round 7: Work 1 single crochet in each stitch around the entire round. Maintain 36 stitches.
- Round 8: Work 4 single crochets in separate stitches, then decrease (combining two stitches into one single crochet). Repeat this pattern five more times around. You will have decreased from 36 to 30 stitches.
- Round 9: Work 1 single crochet in each stitch around the entire round. Maintain 30 stitches.
- Round 10: Work 3 single crochets in separate stitches, then decrease. Repeat this pattern five more times around. You will have 24 stitches.
- Round 11: Work 1 single crochet in each stitch around the entire round. Maintain 24 stitches.
- Round 12: Work 2 single crochets in separate stitches, then decrease. Repeat this pattern five more times around. You will have 18 stitches.
- Round 13: Work 1 single crochet in each stitch around the entire round. Maintain 18 stitches.
Fasten off, leaving a long tail of approximately 10-12 inches for sewing later. Before cutting the yarn, use a crochet hook or your fingers to gently but firmly stuff the body, making sure to work the stuffing into all areas for an even appearance.
Goat Amigurumi Crafting the Head and Facial Features
Head (Using Grey Yarn)
- Round 1: Create a magic ring and work 6 single crochets into it. Pull the yarn tail to close the ring tightly.
- Round 2: Work an increase in each stitch around (2 single crochets in each stitch). You will have expanded from 6 to 12 stitches.
- Round 3: Work 1 single crochet in one stitch, then increase in the next stitch. Repeat this pattern all the way around. You will have 18 stitches total.
- Round 4: Work 2 single crochets in separate stitches, then increase in the next stitch. Repeat this pattern all the way around. You will have 24 stitches total.
- Round 5: Work 3 single crochets in separate stitches, then increase in the next stitch. Repeat this pattern all the way around. You will have 30 stitches total.
- Round 6: Work 4 single crochets in separate stitches, then increase in the next stitch. Repeat this pattern all the way around. You will have 36 stitches total.
- Round 7: Work 5 single crochets in separate stitches, then increase in the next stitch. Repeat this pattern all the way around. You will have 42 stitches total.
- Round 8: Work 6 single crochets in separate stitches, then increase in the next stitch. Repeat this pattern all the way around. You will have 48 stitches total.
- Round 9: Work 7 single crochets in separate stitches, then increase in the next stitch. Repeat this pattern all the way around. You will have 54 stitches total.
- Round 10: Work 1 single crochet in each stitch around the entire round. Maintain 54 stitches.
- Round 11: Work 8 single crochets in separate stitches, then increase in the next stitch. Repeat this pattern all the way around. You will have 60 stitches total.
- Round 12: Work 1 single crochet in each stitch around the entire round. Maintain 60 stitches.
- Round 13: Work 1 single crochet in each stitch around the entire round. Maintain 60 stitches.
- Round 14: Work 1 single crochet in each stitch around the entire round. Maintain 60 stitches.
- Round 15: Work 1 single crochet in each stitch around the entire round. Maintain 60 stitches.
- Round 16: Work 1 single crochet in each stitch around the entire round. Maintain 60 stitches.
- Round 17: Work 1 single crochet in each stitch around the entire round. Maintain 60 stitches.
- Round 18: Work 1 single crochet in each stitch around the entire round. Maintain 60 stitches.
- Round 19: Work 1 single crochet in each stitch around the entire round. Maintain 60 stitches.
- Round 20: Work 8 single crochets in separate stitches, then decrease (combining two stitches into one single crochet). Repeat this pattern all the way around. You will have decreased from 60 to 54 stitches.
- Round 21: Work 1 single crochet in each stitch around the entire round. Maintain 54 stitches.
- Round 22: Work 7 single crochets in separate stitches, then decrease. Repeat this pattern all the way around. You will have 48 stitches total.
- Round 23: Work 6 single crochets in separate stitches, then decrease. Repeat this pattern all the way around. You will have 42 stitches total.
- Round 24: Work 5 single crochets in separate stitches, then decrease. Repeat this pattern all the way around. You will have 36 stitches total.
- Round 25: Work 4 single crochets in separate stitches, then decrease. Repeat this pattern all the way around. You will have 30 stitches total.
- Round 26: Work 3 single crochets in separate stitches, then decrease. Repeat this pattern all the way around. You will have 24 stitches total.
- Round 27: Work 2 single crochets in separate stitches, then decrease. Repeat this pattern all the way around. You will have 18 stitches total.
Fasten off, leaving a long tail of approximately 10-12 inches for sewing later. At this point, begin firmly stuffing the head, working from the narrow opening and making sure to push stuffing into all areas of the head for a smooth, even appearance. The stuffing should be firm but not so tight that it distorts the stitches.
Goat Amigurumi Ears (Make 2 using Grey Yarn)
- Create a magic ring and work 6 single crochets into it.
- Round 2: Work [1 single crochet, increase] 3 times. You will have 9 stitches.
- Round 3: Work [2 single crochets, increase] 3 times. You will have 12 stitches.
- Round 4: Work [3 single crochets, increase] 3 times. You will have 15 stitches.
- Rounds 5-8: Work 15 single crochets for 4 rounds.
Break the yarn, leaving a long tail for sewing. Fold each ear in half and sew the edges together to create the ear shape.
Arms (Make 2 starting with Black Yarn)
- Create a magic ring and work 6 single crochets into it.
- Round 2: Work [1 single crochet, increase] 3 times, then change to grey yarn. You will have 9 stitches.
- Rounds 3-7: Work 9 single crochets for 5 rounds.
- Round 8: Decrease once, then work 7 single crochets. You will have 8 stitches.
- Round 9: Decrease once, then work 6 single crochets. You will have 7 stitches.
- Round 10: Decrease once, then work 5 single crochets. You will have 6 stitches.
Break the yarn, leaving a long tail. Stuff the arms lightly and sew the edges together.
Horns (Make 2 using Black Yarn)
- Create a magic ring and work 3 single crochets into it.
- Round 2: Increase in each stitch. You will have 6 stitches.
- Round 3: Work 6 single crochets.
- Round 4: Work [1 single crochet, increase] 3 times. You will have 9 stitches.
- Round 5: Work 9 single crochets.
Break the yarn, leaving a long tail for sewing later.
Goat Amigurumi White Eye Bases (Make 2 using White Yarn)
- Create a magic ring and work 6 single crochets into it.
- Round 2: Increase in each stitch. You will have 12 stitches.
- Round 3: Work [1 single crochet, increase] 6 times. You will have 18 stitches.
- Round 4: Work [2 single crochets, increase] 6 times. You will have 24 stitches.
- Round 5: Work 24 single crochets.
- Round 6: Work [2 single crochets, decrease] 6 times. You will have 18 stitches.
Break the yarn, leaving a long tail for sewing. Attach safety eyes to the white bases and stuff lightly.
Goat Amigurumi Eyelids (Make 2 using Grey Yarn)
- Chain 8 stitches.
- Starting from the second chain from the hook, work:
- 1 single crochet
- 1 half double crochet
- 1 double crochet
- 2 double crochets in the same stitch
- 1 double crochet
- 1 half double crochet
- 1 single crochet
Break the yarn, leaving a long tail for sewing later.
Beard (Using White Yarn)
- Create a magic ring and work 3 single crochets into it.
- Round 2: Increase in each stitch. You will have 6 stitches.
- Round 3: Work [1 single crochet, increase] 3 times. You will have 9 stitches.
- Rounds 4-6: Work 9 single crochets for 3 rounds.
Break the yarn, leaving a long tail for sewing later.
Goat Amigurumi Creating the Knitted Scarf
Using green yarn and knitting needles size 3.5-4mm:
- Cast on 6 stitches.
- Row 1: Knit all 6 stitches.
- Row 2: Purl all 6 stitches.
- Repeat rows 1 and 2 until the scarf measures 15cm (about 6 inches) in length.
- Cast off, break the yarn, and hide any remaining yarn tails.
- Use a tapestry needle to attach the wooden button to the scarf.
Goat Amigurumi Assembling Your Joker Goat
- Sew the head to the body.
- Attach the eyes to the face. Position the white eye bases, then secure the safety eyes through them.
- Sew the eyelids to the top part of the eyes.
- Use black embroidery thread to embroider a nose on the front of the face.
- Attach the beard below the nose.
- Sew the ears to the sides of the head, positioning them between rounds 11 and 17.
- Attach the horns to the top of the head.
- Sew the arms to the sides of the body.
- If desired, add pink embroidery thread to create small circles for cheeks.
- Wrap the scarf around the goat’s neck and secure with a few stitches if needed.
Goat Amigurumi Tips for a Perfect Joker Goat
- Keep your tension consistent throughout the project for a uniform look.
- Stuff the head and body firmly, but the limbs more lightly to maintain the correct proportions.
- Use pins to position all parts before sewing them in place.
- When embroidering the nose, keep the stitches small and neat for a clean appearance.
- For the eyes, make sure they are positioned evenly on both sides of the face.
- When attaching the eyelids, position them slightly curved to give the goat a friendly expression.
- If making this for young children, embroider the eyes instead of using safety eyes.
Goat Amigurumi Customizing Your Joker Goat
This charming goat pattern offers many opportunities for personalization:
- Try different color combinations for the body, scarf, and accessories.
- Create seasonal versions with holiday-themed scarves.
- Add small accessories like a tiny hat or bow tie.
- Embroider different facial expressions for varied personalities.
- Scale the pattern up or down by changing yarn weight and hook size.
- Create a family of goats in different sizes and colors.
Check this out :Crochet Adorable Amigurumi Cats with Outfits
Conclusion
Your adorable Joker the Goat amigurumi with its charming scarf is now complete! This delightful character combines cute features with personality, making it a wonderful project for amigurumi enthusiasts of all levels.
Whether displayed on a shelf, given as a gift, or used as a playtime companion, this goat is sure to bring smiles with its expressive face and cozy scarf. The combination of crochet and knitting techniques makes this project both fun and satisfying, allowing you to practice different crafting skills.
With this detailed pattern, you’ve created a unique character with charm and personality that showcases your fiber crafting skills. Enjoy your adorable Joker the Goat amigurumi!
