

Table of Contents
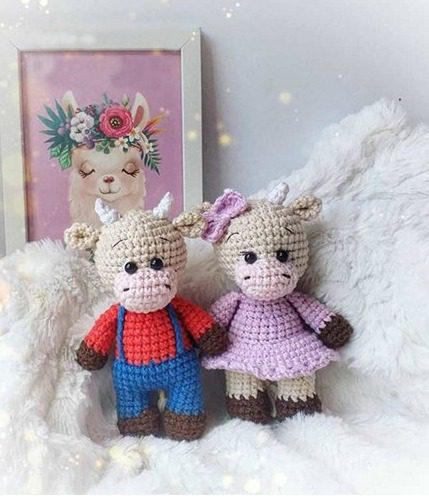
Create Cow Couple a charming pair of bovine companions with this comprehensive amigurumi pattern. This guide walks you through crafting an adorable bull and cow couple, perfect for gifts, decorations, or starting your farmyard amigurumi collection. With their sweet expressions and customizable outfits, these characters bring warmth and personality to any space.
Introduction to Bull and Cow Amigurumi
Amigurumi—the Japanese art of crocheting small stuffed creatures—offers endless possibilities for creating cute characters. This pattern presents a delightful bull and cow couple that showcases classic amigurumi techniques while allowing for personalization through color choices and clothing details. Whether you’re creating a matching pair or designing each with unique characteristics, this pattern provides the foundation for crafting these lovable farm animals.
Essential Materials for Your Amigurumi Bull and Cow
Before beginning your project, gather these materials:
- YarnArt Jeans or similar medium weight yarn in:
- Brown (for the head, hands, and legs)
- Color of your choice for the bull’s “sweater” (blue, green, etc.)
- Color of your choice for the cow’s “dress” (pink, purple, etc.)
- Color for pants/body (typically denim blue or black)
- 2.0mm crochet hook (size 2)
- Black beads for eyes (safety eyes can be substituted)
- Black embroidery floss for eyebrows and details
- Polyester fiberfill stuffing
- Yarn needle for assembly
- Scissors
- Stitch markers
Understanding Cow Couple Terminology
Familiarize yourself with these abbreviations used throughout the pattern:
- KA – Amigurumi ring (magic ring): A technique to start crocheting in the round
- VP – Air loop (chain stitch): Creates a series of linked stitches
- sbn/sc – Single crochet: The fundamental stitch for amigurumi
- inc – Increase: Creating two stitches in one stitch
- dec – Decrease: Combining two stitches into one
- back wall – Working in the back loops only
Cow Couple Crafting the Bull and Cow Head
The head forms the foundation of your amigurumi characters. This pattern creates the same head structure for both the bull and cow:
- Create a magic ring and work 6 single crochets into the ring (6 stitches)
- Increase in each stitch around (12 stitches)
- Work (1 single crochet, increase) 6 times around (18 stitches)
- Work 1 single crochet, increase, (2 single crochets, increase) 5 times, 1 single crochet (24 stitches)
- Work (3 single crochets, increase) 6 times around (30 stitches)
- Work 2 single crochets, increase, (4 single crochets, increase) 5 times, 2 single crochets (36 stitches) 7-12. Work 6 rounds of 36 single crochets
Begin decreasing to shape the face: 13. Work 2 single crochets, decrease, (4 single crochets, decrease) 5 times, 2 single crochets (30 stitches) 14. Work (3 single crochets, decrease) 6 times around (24 stitches) 15. Work 1 single crochet, decrease, (2 single crochets, decrease) 5 times, 1 single crochet (18 stitches) 16. Work (1 single crochet, decrease) 6 times around (12 stitches)
Stuff the head firmly before closing. For the bull, you’ll add horns later; for the cow, you might use smaller horns or omit them depending on your preference.
Cow Couple Creating the Hands
Make two identical hands for each character:
- Using brown yarn, create a magic ring and work 6 single crochets into the ring (6 stitches)
- Increase in each stitch around (12 stitches)
- Work 12 single crochets in the back loops only
- Work (2 single crochets, decrease) 3 times (9 stitches)
Change to the sweater/dress color (blue for bull, pink for cow, or colors of your choice): 5-8. Work 4 rounds of 9 single crochets 9. Decrease once, 7 single crochets (8 stitches) 10-11. Work 2 rounds of 8 single crochets
Stuff lightly, focusing on the brown portion (hooves). Fold the part in half and join with 3 single crochets through both layers to close.
Cow Couple Crafting the Legs and Body
The legs connect directly to the body in this design, creating a seamless lower half:
Start with brown yarn for the first leg:
- Create a magic ring and work 6 single crochets into the ring (6 stitches)
- Increase in each stitch around (12 stitches)
- Work (1 single crochet, increase) 6 times around (18 stitches)
- Work 18 single crochets in the back loops only
- Work 18 single crochets
- Work (1 single crochet, decrease) 6 times (12 stitches)
Change to pants/body color: 7-10. Work 4 rounds of 12 single crochets
Cut the yarn after completing the first leg.
For the second leg: Follow steps 1-10 for the first leg, but do not cut the yarn after step 10.
Join the legs to form the body: 11. Chain 3 from the second leg. Join to the first leg and continue: 12 single crochets on first leg, 3 single crochets along the chain, 12 single crochets on second leg, 3 single crochets along the opposite side of the chain (30 stitches total) 12-15. Work 4 rounds of 30 single crochets
Change to sweater/dress color: 16. Work (3 single crochets, decrease) 6 times (24 stitches) 17. Work 24 single crochets
For the cow, work this row in the back loops only to create a ridge for the “dress.”
18-20. Work 3 rounds of 24 single crochets 21. Work (2 single crochets, decrease) 6 times (18 stitches) 22. Work 18 single crochets 23. Attach hands: 3 single crochets, 3 single crochets joining through the hand, 6 single crochets, 3 single crochets joining through the second hand, 3 single crochets (18 stitches) 24. Work (1 single crochet, decrease) 6 times (12 stitches)
Stuff the body firmly before closing. Join the head to the body by sewing around the opening.
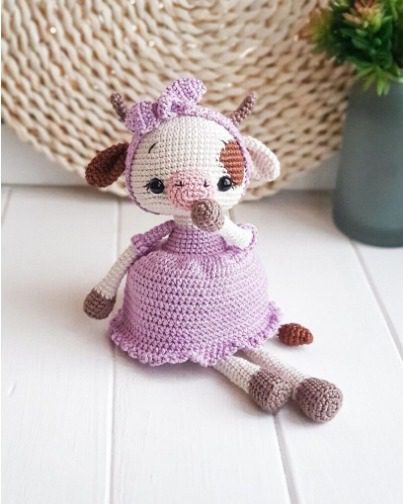
Cow Couple Creating the Muzzle
The muzzle gives your bull and cow their distinctive facial features:
- Chain 6. Starting from the second chain from the hook: work 4 single crochets, 3 single crochets in one loop, turn and work along opposite side of chain: 3 single crochets, 2 single crochets in the last loop (12 stitches)
- Work increase, 3 single crochets, 3 increases, 3 single crochets, 2 increases (18 stitches)
- Work 1 single crochet, increase, 3 single crochets, (1 single crochet, increase) 3 times, 3 single crochets, (1 single crochet, increase) 2 times (24 stitches)
- Work 24 single crochets
Stuff lightly and sew to the front of the face.
Cow Couple Forming the Bull Horns
Create two identical horns:
- Create a magic ring and work 4 single crochets into the ring (4 stitches)
- Work increase, 1 single crochet, increase, 1 single crochet (6 stitches)
- Work 6 single crochets
For the cow, you can make smaller horns or omit them entirely.
Cow Couple Crafting the Ears
Make two identical ears for each character:
- Create a magic ring and work 6 single crochets into the ring (6 stitches)
- Increase in each stitch around (12 stitches) 3-4. Work 2 rounds of 12 single crochets
Fold the ear in half, then in half again (creating a quarter circle) and join with 3 single crochets through all layers to close.
Cow Couple Assembly Instructions
Now that you’ve created all components, it’s time to assemble your bull and cow:
- Head and Body:
- Stuff the head and body firmly
- Sew the head to the body at the neck opening
- Make sure the head is positioned with the face forward
- Facial Features:
- Sew the muzzle to the center front of the face
- Attach black bead eyes (or safety eyes) above the muzzle
- Embroider eyebrows with black floss for expression
- Add nostrils with small stitches of black floss on the muzzle
- Horns and Ears:
- For the bull: Position the horns on top of the head, angled slightly outward
- For the cow: Use smaller horns or omit them
- Attach the ears to the sides of the head
- Final Details:
- For the cow: If you worked row 17 in back loops only, you can add decorative stitches around the “dress” edge
- Add any additional details like spots, patches, or accessories
- Check all parts for secure attachment
Understanding Round Progression in This Pattern
This pattern uses a systematic approach to shaping that creates professional-looking results:
Increasing Rounds (Head: 1-6, Hands: 1-2, Legs: 1-3)
These rounds follow a mathematical sequence where each round adds a specific number of stitches:
- Round 1: Begin with 6 stitches in a magic ring
- Round 2: Double the stitches to 12 (increase in each stitch)
- Round 3: Reach 18 stitches using a (1 sc, inc) pattern
- Round 4: Special pattern to reach 24 stitches
- Round 5: Reach 30 stitches using a (3 sc, inc) pattern
- Round 6: Special pattern to reach 36 stitches
Straight Rounds (Head: 7-12, Hands: 5-8, Body: 12-15)
These rounds maintain the same stitch count to create height:
- For the head: Six consecutive rounds of 36 stitches create the rounded shape
- For the hands: Four rounds of consistent stitches form the sleeve portion
- For the body: Four rounds of 30 stitches create the torso height
Decreasing Rounds (Head: 13-16, Hands: 4, 9, Body: 16, 21, 24)
These rounds systematically reduce stitches to shape and close forms:
- For the head: Rounds 13-16 gradually decrease from 36 to 12 stitches
- For the hands: Strategic decreases shape the arm and wrist
- For the body: Decreases at the chest and neck create the tapered form
Cow Couple Special Technique Rounds
Certain rounds use specific techniques for structural or decorative purposes:
- Back loop only stitches (legs round 4, cow’s dress round 17) create visible ridges
- Joining rounds (leg/body connection round 11, hand attachment round 23) connect separate pieces
- Chain bridge technique (round 11) creates the space between legs
Cow Couple Customization Ideas
Make your bull and cow unique with these creative variations:
Cow Couple Color Choices
- Traditional: Brown bull with blue sweater, cream-colored cow with pink dress
- Colorful: Bright, non-traditional colors for a playful look
- Matching: Coordinating outfits for a unified couple appearance
- Patterned: Add spots to the cow using surface crochet or embroidery
Cow Couple Size Variations
- Adjust yarn weight and hook size to create different sized couples
- Make one larger than the other for a parent-child appearance
Cow Couple Outfit Modifications
- Add decorative buttons to the sweater or dress
- Create different necklines by modifying round 17-18
- Add a small collar or bow tie
Cow Couple Accessory Additions
- Create tiny hats or flower crowns
- Add small crocheted hearts between them
- Make miniature accessories like milk buckets or bells
Troubleshooting Common Issues
If you encounter problems during your project:
Uneven Stitches
- Use stitch markers to track round beginnings
- Count stitches frequently
- Maintain consistent tension
Gaps Between Parts
- Use matching yarn for sewing parts together
- Sew with smaller, closer stitches
- Pre-stuff parts firmly before joining
Difficulty with Magic Ring
- Practice separately or substitute with a chain 2 and work into the first chain
- Pull the magic ring tight before proceeding to the second round
Unstable Standing
- Make sure the bottom of each leg is flat
- Stuff the legs firmly, especially at the bottom
- Add a small weight to the bottom of each foot
Check this out :Adorable Amigurumi Frog Crochet Pattern
Conclusion
Creating this amigurumi bull and cow couple is both enjoyable and rewarding. The pattern combines fundamental amigurumi techniques with thoughtful details to produce charming characters with personality and charm. As you work through the pattern, you’ll develop valuable skills in three-dimensional shaping, color changes, and assembly methods.
Your finished bull and cow make perfect companions for each other, delightful decorations, thoughtful gifts, or the beginning of an amigurumi farm collection. The basic structure allows for endless customization, making each creation uniquely yours.
The skills developed in this project—including magic rings, strategic increases and decreases, seamless color changes, and joining techniques—build a strong foundation for tackling more complex amigurumi designs. Each bull and cow pair you create will have its own distinctive character based on your yarn choices, tension, and creative decisions.
Remember that amigurumi is both a craft and an expression of creativity—feel free to experiment with colors, accessories, and details to make your bull and cow reflect your personal style. Your handcrafted animals represent not just toys but labors of love that bring joy to everyone who sees them.
If you share photos of your finished bull and cow on social media, consider tagging the original pattern creator to show appreciation for their design. Happy crocheting!
