


Table of Contents
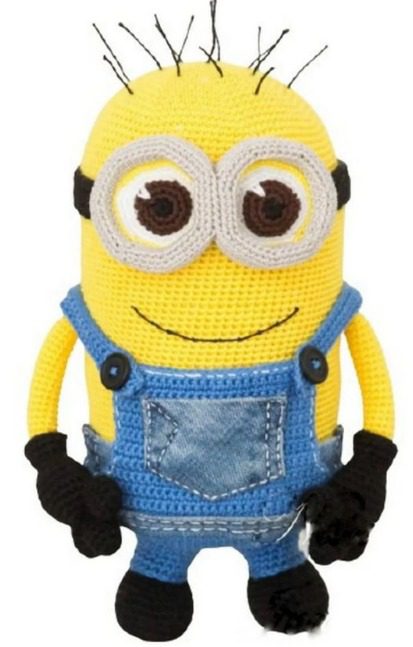
Creating Amigurumi Minion your own amigurumi minion is a delightful project that brings these beloved characters to life through the art of crochet. This comprehensive guide walks you through each stage of crafting your very own minion, from the distinctive yellow body to the charming overalls and expressive eyes that give these characters their memorable appearance.
Introduction to Amigurumi Minion Crochet
The cheerful, energetic minions have captured hearts worldwide with their playful antics. Now you can create your own minion companion using basic crochet techniques and readily available materials. This pattern is suitable for crafters with intermediate skills who are familiar with standard crochet stitches and techniques.
Amigurumi Minion Materials You’ll Need
Before Amigurumi Minion beginning your amigurumi minion project, gather these materials:
- Yellow yarn (recommended: ALIZE DIVA silk effect 100gr/350m)
- Blue yarn for overalls (recommended: RED HEART MIAMI 50g/120m)
- Black yarn for legs (recommended: RED HEART Lisa 50g/125m)
- Light gray yarn for glasses (recommended: Catania Fine 50g/165m)
- White yarn for eyes (same as yellow or similar weight)
- Brown yarn for pupils (same as yellow or similar weight)
- Crochet hook appropriate for your yarn weight
- Fiberfill stuffing
- Yarn needle
- Scissors
- Stitch markers
Understanding Amigurumi Minion Terminology
Throughout this pattern, you’ll encounter these common crochet terms:
- SC – Single crochet: The fundamental stitch for amigurumi projects
- INC – Increase: Creating two stitches in one stitch to expand your work
- DEC – Decrease: Combining two stitches into one to reduce your work
- CH – Chain: Creating a series of linked stitches
Amigurumi Minion Crafting the Minion Body
The body forms the foundation of your minion and requires the most yarn. Using your yellow yarn:
- Create 2 chains, then work 7 single crochets into the second chain from your hook (7 stitches total)
- Work an increase in each stitch around (14 stitches)
- Work (1 single crochet, increase) 7 times around (21 stitches)
- Work (2 single crochets, increase) 7 times around (28 stitches)
- Work (3 single crochets, increase) 7 times around (35 stitches)
- Work (4 single crochets, increase) 7 times around (42 stitches)
- Work (5 single crochets, increase) 7 times around (49 stitches)
- Work (6 single crochets, increase) 7 times around (56 stitches)
- Work (7 single crochets, increase) 7 times around (63 stitches)
- Work (8 single crochets, increase) 7 times around (70 stitches)
- Work (9 single crochets, increase) 7 times around (77 stitches)
- Work (10 single crochets, increase) 7 times around (84 stitches)
- Work (11 single crochets, increase) 7 times around (91 stitches)
- Work 49 rows of single crochet without any increases or decreases (91 stitches per row). Each row should consist of 91 single crochets worked continuously in the round. This forms the cylindrical portion of your minion’s body.
For rows 14 through 62, maintain consistent tension as you work 91 single crochets in each round. Using a stitch marker to track the beginning of each round is highly recommended for this section. This extended portion creates the characteristic tall, cylindrical shape that makes minions so recognizable.
Now we’ll begin decreasing to close the body:
- Work (11 single crochets, decrease) 7 times around (84 stitches)
- Work (10 single crochets, decrease) 7 times around (77 stitches)
- Work (9 single crochets, decrease) 7 times around (70 stitches)
- Work (8 single crochets, decrease) 7 times around (63 stitches)
- Work (7 single crochets, decrease) 7 times around (56 stitches)
- Work (6 single crochets, decrease) 7 times around (49 stitches)
- Work (5 single crochets, decrease) 7 times around (42 stitches)
- Work (4 single crochets, decrease) 7 times around (35 stitches)
- Work (3 single crochets, decrease) 7 times around (28 stitches)
- Work (2 single crochets, decrease) 7 times around (21 stitches)
- Work (1 single crochet, decrease) 7 times around (14 stitches)
- Work decreases across all stitches (7 stitches)
Fasten off and weave in your end.
Amigurumi Minion Creating the Minion Overalls
The iconic blue overalls give minions their distinctive appearance. Using your blue yarn:
- Create 2 chains, then work 7 single crochets into the second chain from your hook (7 stitches total)
- Work an increase in each stitch around (14 stitches)
- Work (1 single crochet, increase) 7 times around (21 stitches)
- Work (2 single crochets, increase) 7 times around (28 stitches)
- Work (3 single crochets, increase) 7 times around (35 stitches)
- Work (4 single crochets, increase) 7 times around (42 stitches)
- Work (5 single crochets, increase) 7 times around (49 stitches)
- Work (6 single crochets, increase) 7 times around (56 stitches)
- Work (7 single crochets, increase) 7 times around (63 stitches)
- Work (8 single crochets, increase) 7 times around (70 stitches)
- Work (9 single crochets, increase) 7 times around (77 stitches)
- Work (10 single crochets, increase) 7 times around (84 stitches)
- Work (11 single crochets, increase) 7 times around (91 stitches)
- Work 11 rows of single crochet without changes (91 stitches per row)
For the front portion of the overalls: 25. Work 13 single crochets, turn your work and crochet back 26 stitches 26. Turn your work again and crochet 13 more rows without changes Fasten off and weave in your end.
For the front panel:
- Chain 44 plus 1 chain for turning
- Work 44 single crochets
- Work 44 single crochets
- Work 4 single crochets
- Work 6 slip stitches, 32 single crochets, leaving 6 loops unworked
- Work 1 decrease, 28 single crochets, 1 decrease
- Work 1 decrease, 26 single crochets, 1 decrease
- Work 1 decrease, 24 single crochets, 1 decrease 9-21. Work 14 rows of 24 single crochets
For the straps:
- Chain 35 plus 1 chain for turning
- Work 35 single crochets
- Work 30 single crochets, 3 slip stitches, 3 single crochets
- Work 3 single crochets, chain 3, work 30 single crochets
- Work 35 single crochets Finish with a denim-style edge.
Amigurumi Minion Crafting the Minion Legs
Create two identical legs using black yarn:
- Chain 8
- In the second chain from hook, increase, work 5 single crochets, work 3 stitches in one stitch, work 5 single crochets on the back, work 1 single crochet in the last stitch (16 stitches)
- Work 2 increases, 5 single crochets, 3 increases, 5 single crochets, 1 increase (22 stitches)
- Work (1 single crochet, increase) twice, 5 single crochets, (1 single crochet, increase) 3 times, 5 single crochets, 1 single crochet, increase (28 stitches)
- Work (2 single crochets, increase) twice, 5 single crochets, (2 single crochets, increase) 3 times, 5 single crochets, 2 single crochets, increase (34 stitches)
- Work 34 single crochets in the back loops only
- Work 34 single crochets
- Work 34 single crochets
- Work 8 single crochets, 5 single crochets, (2 single crochets, decrease) 3 times, 5 single crochets, 4 single crochets (31 stitches)
- Work 8 single crochets, 5 single crochets, (1 single crochet, decrease) 3 times, 5 single crochets, 4 single crochets (28 stitches)
- Work 8 single crochets, 5 single crochets, (2 single crochets, decrease) 3 times, 5 single crochets, 4 single crochets (31 stitches)
- Work 2 single crochets, decrease, 9 single crochets, 3 decreases, 9 single crochets (24 stitches)
- Work (2 single crochets, decrease) 6 times (18 stitches)
Switch to blue yarn: 14. Work 3 rows of 18 single crochets 15. Work (2 single crochets, increase) 6 times (24 stitches) 16. Work (3 single crochets, increase) 6 times (30 stitches) 17. Work 30 single crochets, leave a tail for sewing, and fasten off.
Amigurumi Minion Creating the Minion Eyes and Glasses
Make two identical eye pieces using light gray yarn:
- Create 2 chains, then work 7 single crochets into the second chain from your hook (7 stitches)
- Work an increase in each stitch around (14 stitches)
- Work (1 single crochet, increase) 7 times around (21 stitches)
- Work (2 single crochets, increase) 7 times around (28 stitches)
- Work (3 single crochets, increase) 7 times around (35 stitches)
- Work (4 single crochets, increase) 7 times around (42 stitches)
- Work 42 single crochets in the front loops only
- Work 42 single crochets
- Work 42 single crochets
- Work 42 single crochets
- Work (5 single crochets, increase) 7 times in the back loops only (49 stitches)
- Work (6 single crochets, increase) 7 times around (56 stitches)
- Work 56 single crochets in the back loops only
- Work 56 single crochets
- Work 56 single crochets
- Work 56 single crochets
- Work 56 single crochets Leave a tail for sewing and fasten off.
For the inner circle of each eye, use yellow yarn and sew around the inner part. Sew one sector of both parts together to form the glasses frame.
Amigurumi Minion Creating the Eye Pupils
For the white part of each eye (make two):
- Using white yarn, create 2 chains, then work 7 single crochets into the second chain (7 stitches)
- Work an increase in each stitch around (14 stitches)
- Work (1 single crochet, increase) 7 times around (21 stitches)
- Work (2 single crochets, increase) 7 times around (28 stitches)
- Work (3 single crochets, increase) 7 times around (35 stitches)
- Work (4 single crochets, increase) 7 times around (42 stitches) Leave a tail for sewing and fasten off.
For the brown/black part of each pupil (make two):
- Using black yarn, create 2 chains, then work 7 single crochets into the second chain (7 stitches)
- Switch to brown yarn, work an increase in each stitch around (14 stitches)
- Work (1 single crochet, increase) 7 times around (21 stitches)
- Work (2 single crochets, increase) 7 times around (28 stitches) Leave a tail for sewing and fasten off.
Amigurumi Minion Creating the Minion Hands
For each hand:
- Start with black yarn and crochet in rounds, beginning with 6 stitches and increasing to approximately 30 stitches for the palm
- Decrease to about 18 stitches to form the wrist
- Crochet flat cuffs working in the front loops only, making increases to keep the palm flat
- For the transition to the arm, switch to yellow yarn and work in the back loops at the narrowest part of the wrist
- Continue with yellow yarn until you reach your desired arm length
- Sew or fold the arm in half lengthwise
For fingers (create separately and attach):
- Start with 6 stitches and increase to approximately 18 stitches
- Decrease back down while maintaining length
- Work about 12 rows straight to create elongated fingers
- Sew the finished fingers to the palm
Assembly Instructions
- Stuff the body firmly before closing completely
- Attach the overalls to the body, positioning them slightly below the middle
- Attach the legs to the bottom of the body
- Position and sew the glasses/eyes to the upper portion of the body
- Insert the white part of the eye into each eye frame
- Place the brown/black pupil in the center of each white eye
- Attach the arms to the sides of the body
- Add any final details or adjustments to perfect your minion’s expression
Finishing Touches
Your amigurumi minion is now complete! Take a moment to adjust the positioning of all parts and add any personal touches you’d like. Feel free to customize your minion with additional accessories like a scarf, hat, or tools to give it unique personality.
If you share photos of your finished minion on social media, consider tagging the original pattern creator to show appreciation for their design.
Tips for Successful Amigurumi
- Maintain consistent tension throughout your project for even results
- Use stitch markers to keep track of your rounds
- Stuff firmly but not excessively for the best shape
- Take breaks during longer sections to avoid hand fatigue
- Sew parts securely to ensure durability, especially for toys that will be played with
Enjoy your handcrafted amigurumi minion, a charming companion crafted with your own creativity and skill!
Understanding Round Progression in Amigurumi
When working on complex amigurumi projects like this minion, understanding how rounds build upon each other is essential for success:
- Foundation rounds (1-13): These establish the expanding base of your minion, increasing from just 7 stitches to 91 stitches. Each round follows a mathematical pattern where increases are evenly distributed to create a smooth, circular shape.
- Body rounds (14-62): These straight rounds create the height of your minion. Working 49 rows without increases or decreases requires patience but builds the essential cylindrical shape. Use stitch markers to track your progress through these identical rounds.
- Decreasing rounds (63-74): These mirror the increasing rounds but in reverse, systematically reducing your stitch count to close the shape. The careful distribution of decreases maintains the spherical shape of the top.
- Detail rounds: For components like eyes, overall straps, and limbs, pay special attention to the transition rounds where you switch between increasing, maintaining, and decreasing stitch counts.
Check this out :Crochet an Adorable Bunny Lotta Amigurumi
Conclusion
Creating an amigurumi minion is both challenging and rewarding. This pattern combines several techniques that build your crochet skills: working in continuous rounds, increasing and decreasing with precision, attaching separate components, and creating three-dimensional structures.
Your finished minion will stand approximately 8-10 inches tall, depending on your yarn weight and tension. The pattern’s versatility allows for customization—consider creating variations like minions with different hair styles, clothing options, or accessories to build your own unique minion collection.
The techniques learned in this project transfer well to other amigurumi designs, particularly character-based patterns. The mathematical precision of the increasing and decreasing patterns can be applied to many different amigurumi shapes and sizes.
With your completed minion, you now have a delightful handmade creation that showcases your crochet abilities—perfect as a gift, decoration, or cherished collectible. The small details like the distinctive overalls, expressive eyes, and playful proportions all come together to create an instantly recognizable character that brings joy to crafters and minion fans alike.
Remember that amigurumi is as much art as it is craft—each minion will have its own unique personality based on your individual stitching style, tension, and creative decisions along the way!
