

Table of Contents
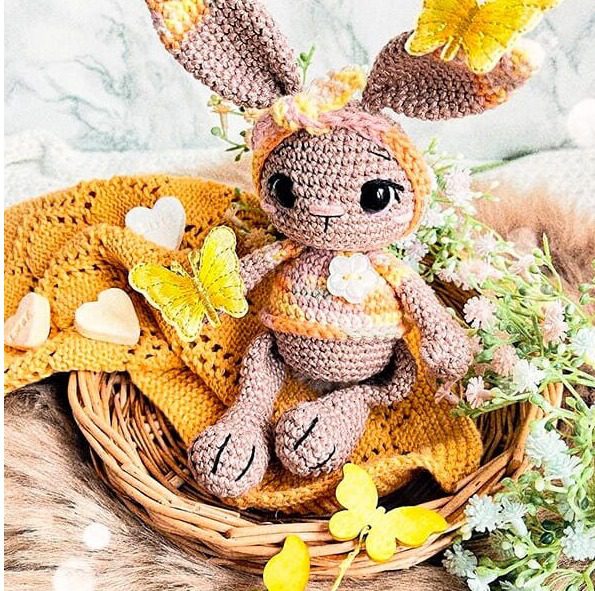
Create Bunny Lotta a charming bunny amigurumi with this comprehensive pattern for Bunny Lotta. Standing at approximately 18 centimeters tall, this sweet rabbit features a stylish sweater, floppy ears, and an adorable expression that will captivate hearts. Perfect for spring decorations, Easter celebrations, or as a thoughtful handmade gift, this intermediate-level project introduces color changes, embroidery details, and professional finishing techniques to create a polished, huggable friend.
Understanding Bunny Amigurumi Design
Bunnies make perfect subjects for amigurumi with their distinctive features—floppy ears, round faces, and cute button noses. This Lotta Bunny design combines the classic rabbit silhouette with charming fashion elements like a colorful sweater, creating a character with personality and style. The pattern uses strategic shaping techniques to achieve the rounded head, chubby cheeks, and proportional body that make this bunny so irresistible.
Essential Materials for Your Bunny Project
Before beginning your Bunny Lotta amigurumi, gather these supplies:
Bunny Lotta Yarn Selection
- Main Color: Light brown cotton yarn (such as Scheepjes Catona or Schachenmayr Catania – 125m/50g) – You’ll need approximately 35g
- Sweater: Ricorumi Print DK (001 Pink Yellow) or any variegated cotton yarn
- Tail: White fluffy yarn (such as Scheepjes Furry Tales) for the bunny tail
Bunny Lotta Tools and Notions
- Hooks: 2.5mm crochet hook for the main project and 3.0mm hook for the fluffy tail
- Eyes: 10mm safety eyes
- Embroidery Materials: White/black/purple waste yarn for the eye details, pink yarn for cheeks and nose, black embroidery thread for facial features
- Notions: Scissors, darning needle, embroidery needle (for adding tension to the eyes), stitch markers or pins
- Stuffing: Polyester fiberfill
- Optional: Small button for the sweater
Understanding Bunny Lotta Terminology
This pattern uses standard crochet abbreviations:
- MR – Magic Ring
- Rnd – Round
- sc – Single crochet
- sl st – Slip stitch
- ch – Chain
- inc – Increase (2 single crochets in one stitch)
- dec – Decrease (single crochet 2 stitches together)
- FLO – Front loops only
- BLO – Back loops only
- hdc – Half double crochet
- bs – Bobble stitch (4 double crochets chained off together)
- hs – Hook size
Creating Bunny Lotta Head
The head forms the foundation of your bunny’s personality:
Round 1: Using light brown yarn, create 6 single crochets in a magic ring (6 stitches) Round 2: Increase in each stitch around (12 stitches) Round 3: Work [1 single crochet, increase] 6 times (18 stitches) Round 4: Work [2 single crochets, increase] 6 times (24 stitches) Round 5: Work [3 single crochets, increase] 6 times (30 stitches) Round 6: Work 30 single crochets (30 stitches) Round 7: Work [4 single crochets, increase] 6 times (36 stitches) Rounds 8-9: Work 36 single crochets for 2 rounds (36 stitches) Round 10: Work [5 single crochets, increase] 6 times (42 stitches) Round 11: Work 42 single crochets (42 stitches) Round 12: Work [6 single crochets, increase] 6 times (48 stitches) Rounds 13-14: Work 48 single crochets for 2 rounds (48 stitches) Round 15: Work [6 single crochets, decrease] 6 times (42 stitches)
At this point, insert the safety eyes between rounds 11 and 12, with 7 visible stitches between them.
Round 16: Work [5 single crochets, decrease] 6 times (36 stitches) Round 17: Work [4 single crochets, decrease] 6 times (30 stitches) Round 18: Work [3 single crochets, decrease] 6 times (24 stitches) Round 19: Decrease 12 times (12 stitches) Round 20: Working in front loops only, make 12 single crochets (12 stitches)
Begin stuffing the head firmly with fiberfill. Start stuffing after round 18 and before beginning the body. The head should be stuffed firmly, with a bit more fiberfill in the cheeks to create a slightly wider bottom area. Now is also the time to add tension to the eyes to create a cuter expression.
Do not cut the yarn, as you’ll continue with the body.
Bunny Lotta Forming the Body with Sweater Detail
The body continues directly from the head, with a color change for the sweater:
Round 21: Change to Ricorumi Print DK yarn, increase 12 times (24 stitches) Rounds 22-23: Work 24 single crochets for 2 rounds (24 stitches) Round 24: Work [3 single crochets, increase] 6 times (30 stitches) Round 25: Work [4 single crochets, increase] 6 times (36 stitches) Rounds 26-28: Work 36 single crochets for 3 rounds (36 stitches) Round 29: Change to brown yarn, work 36 single crochets in back loops only (36 stitches) Rounds 30-32: Work 36 single crochets for 3 rounds (36 stitches) Round 33: Work [4 single crochets, decrease] 6 times (30 stitches) Round 34: Work [3 single crochets, decrease] 6 times (24 stitches) Round 35: Work [2 single crochets, decrease] 6 times (18 stitches) Round 36: Work [1 single crochet, decrease] 6 times (12 stitches) Round 37: Decrease 6 times (6 stitches)
Stuff the body firmly with fiberfill, starting around round 35. Pull the yarn through the front loops of the remaining 6 stitches and secure it.
Bunny Lotta Creating the Sweater Cuffs
Turn the body upside down and, using the Ricorumi Print DK yarn, work one single crochet in each of the 36 front loops from round 29. Finish with a slip stitch, tie the ends of the yarns together, and hide them in the body.
Bunny Lotta Crafting the Floppy Ears
Make two identical ears:
Round 1: Using Ricorumi Print DK yarn, create 6 single crochets in a magic ring (6 stitches) Round 2: Work 6 single crochets (6 stitches) Round 3: Work [1 single crochet, increase] 3 times (9 stitches) Round 4: Work [2 single crochets, increase] 3 times (12 stitches) Round 5: Work [3 single crochets, increase] 3 times (15 stitches) Round 6: Work [4 single crochets, increase] 3 times (18 stitches) Rounds 7-8: Work 18 single crochets for 2 rounds (18 stitches) Round 9: Change to brown yarn, work 18 single crochets (18 stitches) Rounds 10-14: Continue with 18 single crochets for 5 more rounds (18 stitches) Round 15: Work [4 single crochets, decrease] 3 times (15 stitches) Round 16: Work [3 single crochets, decrease] 3 times (12 stitches) Round 17: Work [2 single crochets, decrease] 3 times (9 stitches) Round 18: Work [1 single crochet, decrease] 3 times (6 stitches)
Close the opening with 3 single crochets. Pull the yarn through the last stitch and leave a long tail for sewing the ears to the head later.
The ears are not stuffed. To create a natural fold, fold the bottom part of each ear in half and sew the folded sections together with a few stitches to form a small wrinkle.
Bunny Lotta Creating the Arms
Make two identical arms:
Round 1: Using brown yarn, create 6 single crochets in a magic ring (6 stitches) Round 2: Increase in each stitch around (12 stitches) Rounds 3-4: Work 12 single crochets for 2 rounds (12 stitches) Round 5: Work 1 bobble stitch, then 11 single crochets (12 stitches) Round 6: Work [2 single crochets, decrease] 3 times (9 stitches)
Add a small amount of stuffing to the bottom part of each arm.
Rounds 7-11: Work 9 single crochets for 5 rounds (9 stitches)
Work 3 more single crochets and then change to Ricorumi Print DK yarn. This shifts the beginning of the round.
Rounds 12-15: Work 9 single crochets for 4 rounds (9 stitches)
The top parts of the arms are not stuffed. Work 1 more single crochet (the edge should align with the thumb), then close the opening with 4 single crochets. Pull the yarn through the last stitch and leave a long tail for sewing the arms to the body later.
Forming the Legs
Make two identical legs:
Round 1: Using brown yarn, create 6 single crochets in a magic ring (6 stitches) Round 2: Increase in each stitch around (12 stitches) Round 3: Work [1 single crochet, increase] 6 times (18 stitches) Round 4: Work [2 single crochets, increase] 6 times (24 stitches) Rounds 5-6: Work 24 single crochets for 2 rounds (24 stitches) Round 7: Work 6 single crochets, decrease 6 times, 6 single crochets (18 stitches) Round 8: Work 6 single crochets, decrease 3 times, 6 single crochets (15 stitches) Round 9: Work 15 single crochets (15 stitches) Round 10: Work [3 single crochets, decrease] 3 times (12 stitches) Rounds 11-12: Work 12 single crochets for 2 rounds (12 stitches)
Stuff the bottom part of the legs with fiberfill.
Round 13: Work [2 single crochets, decrease] 3 times (9 stitches) Rounds 14-15: Work 9 single crochets for 2 rounds (9 stitches) Round 16: Work [2 single crochets, increase] 3 times (12 stitches) Round 17: Work [3 single crochets, increase] 3 times (15 stitches) Round 18: Work [4 single crochets, increase] 3 times (18 stitches) Rounds 19-20: Work 18 single crochets for 2 rounds (18 stitches) Round 21: Work [1 single crochet, decrease] 6 times (12 stitches) Round 22: Decrease 6 times (6 stitches)
The top parts of the legs are not stuffed. Pull the yarn through the front loops of the remaining 6 stitches and close the hole. Leave a long tail for sewing the legs to the body later.
Using thin black embroidery thread, add detail to the paws by embroidering 3 lines to divide each paw into 4 toes.
Creating the Fluffy Tail
Using Scheepjes Furry Tales white yarn and a 3.0mm hook:
Round 1: Create 6 single crochets in a magic ring (6 stitches) Round 2: Increase in each stitch around (12 stitches) Round 3: Work 12 single crochets (12 stitches)
Finish the round with a slip stitch and hide the yarn inside the tail. Later, you’ll sew it to the body using cotton thread.
Alternatively, you can use a small white pompom for the tail.
Making the Headband
Using Ricorumi Print DK yarn, chain 61 stitches. Starting in the second chain from the hook, work 1 slip stitch, 59 single crochets, and 1 slip stitch. Cut the yarn, tie the ends together, and secure them.
Adding Facial Details
The facial embroidery brings your bunny to life:
- Eyes: Create eye rims using white cotton yarn. Add a small accent in colored yarn (such as purple). Create eyelids using black cotton yarn and add lashes with thin black embroidery thread.
- Nose: Embroider the nose with pink cotton yarn in round 13, spanning about 3 stitches. Add detail to the nose using thin black embroidery thread.
- Eyebrows: Using thin black embroidery thread, create slightly angled eyebrows in round 8. The distance between them should be about 6 stitches.
- Cheeks: Optionally, embroider pink cheeks under the eyes (approximately 2 stitches wide).
Final Assembly
- Ears: Sew the ears to the left and right sides of the head between rounds 3 and 4.
- Arms: Attach the arms to the sides of the body, just below the head.
- Tail: Sew the fluffy bunny tail (or pompom) to the center back of the sweater.
- Legs: Attach the legs to the left and right sides of the body, just below the sweater.
- Button: If desired, sew a small button to the front of the sweater as a decorative touch.
Shaping and Posing Tips
- Head Shaping: When stuffing the head, add extra fiberfill to the cheek areas to create a slightly wider bottom face, enhancing the cute expression.
- Eye Tension: Use an embroidery needle to add tension to the safety eyes, adjusting them to create the perfect expression.
- Ear Positioning: The folded area of the ears creates dimension and character. Position them at a slight angle for a more natural look.
- Leg Placement: Attach the legs so the bunny can sit upright with good balance.
Creative Variations
Once you’ve mastered the basic pattern, consider these creative adaptations:
- Color Changes: Try different color combinations for the sweater and main body
- Sweater Designs: Add stripes, hearts, or other simple patterns to the sweater
- Accessory Additions: Create tiny accessories like a carrot, flower, or miniature basket
- Seasonal Variations: Make Easter bunnies with pastel sweaters or holiday-themed variations
- Size Adjustments: Scale the pattern up or down by changing hook size and yarn weight
Why Bunny Amigurumi Make Perfect Gifts
These adorable bunny amigurumi make meaningful gifts for several reasons:
- Seasonal Appeal: Perfect for spring celebrations and Easter gifts
- Handmade Value: Each stitch represents time and care invested in a personal gift
- Child-Friendly Design: The simple features and secure components make them suitable for children
- Display Potential: Makes a charming addition to home décor, especially in spring
- Customizable: Can be made in colors to match the recipient’s preferences
Display Ideas for Your Bunny Lotta
- Position on a shelf with spring decorations or Easter arrangements
- Create a woodland scene with other forest-themed amigurumi
- Display in a child’s room as a decorative accent
- Arrange in a small basket with faux flowers for a seasonal centerpiece
- Use as a whimsical bookend with a companion bunny
Check this out :Fox Amigurumi Crochet Pattern
Conclusion
Creating this adorable Bunny Lotta amigurumi allows you to combine basic crochet techniques with charming details that bring your character to life. The combination of the sweet facial expression, stylish sweater, and floppy ears creates a personality-filled bunny that’s perfect for gifting or displaying in your home.
Whether you’re making this bunny for yourself, as a gift, or as a seasonal decoration, the process of creating each tiny stitch contributes to a character-filled finished project that’s sure to bring smiles. Happy crocheting, and may your Bunny Lotta bring joy to your home or the home of a lucky recipient!
