

Table of Contents
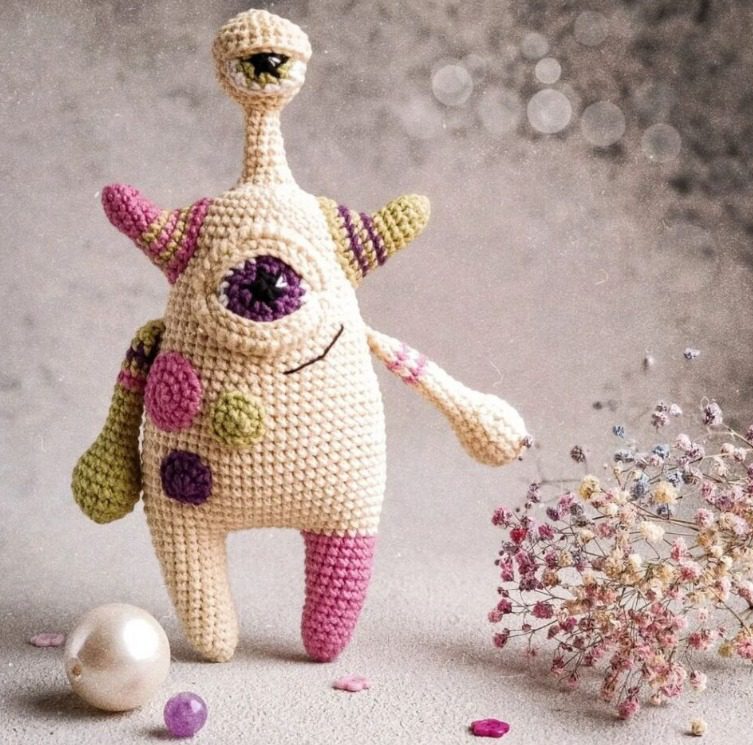
Crocheting Kido the Monster adorable stuffed creatures has become increasingly popular among crafting enthusiasts worldwide. Amigurumi, the Japanese art of crocheting small stuffed toys, offers endless possibilities for creating charming companions. Today, we’re excited to share a complete tutorial for making Kido the Monster, a delightful amigurumi creation that will bring joy to crafters of all skill levels.
What Makes Kido the Monster Special
Kido the Monster stands approximately 12 centimeters tall from toes to head and features a colorful, whimsical design that appeals to both children and adults. With its vibrant color combinations and friendly expression, this little monster is perfect for gifting, decorating, or adding to your growing amigurumi collection.
Essential Materials for Your Amigurumi Monster
Before beginning your crochet journey with Kido, gather these supplies:
- YarnArt Jeans in Yellow (color 58)
- YarnArt Jeans in Pink (color 36)
- YarnArt Jeans in Scarlet (color 18)
- YarnArt Jeans in Red (color 26)
- 2mm crochet hook
- One pair of 10.5mm safety eyes
- Polyester fiberfill for stuffing
- Yarn needle for assembly
- Stitch markers
Understanding Crochet Terminology
For clarity throughout this pattern, we’ll be using the following abbreviations:
- Chain (ch): The foundation of most crochet projects
- Stitch/Stitches (sts): Individual crochet units
- Slip stitch (sl st): Used to join rounds or create a flat joining seam
- Single crochet (sc): The most common stitch in amigurumi projects
- Increase (inc): Working two single crochets in one stitch to add width
- Decrease (dec): Combining two stitches into one to reduce width
- Double crochet (dc): A taller stitch used for texture details
- Half double crochet (hdc): A medium-height stitch between sc and dc
- Front loop only (FLO): Working through only the front loop of a stitch
- Back loop only (BLO): Working through only the back loop of a stitch
- Magic ring (MR): A technique for starting crochet in the round
Creating Kido the Monster Step by Step
This pattern has been designed with beginner to intermediate crocheters in mind. The difficulty level is relatively low, making it accessible for those still developing their amigurumi skills.
Crafting the Legs
You’ll need to make two identical legs for your monster:
Using yellow yarn:
- Round 1: Create 6 single crochets in a magic ring (6 stitches total)
- Round 2: Increase in each stitch around (12 stitches total)
- Round 3: Work a pattern of 1 single crochet followed by 1 increase, repeated throughout the round (18 stitches total)
- Rounds 4-6: Maintain 18 single crochets for each round
Finish the first leg by cutting and securing the yarn. For the second leg, follow the same instructions but leave the yarn attached to continue working on the body section.
Forming the Body
Continue with the yellow yarn and your 2mm hook:
- Round 7: Work 18 single crochets around the second leg, create a chain of 6 stitches to bridge between the legs, join with the first leg and work 18 single crochets around it, complete 6 single crochets in the 6-chain bridge you created (48 stitches total)
- Round 8: Work 48 single crochets (48 stitches total)
- Round 9: Switch to red yarn and work in back loops only, creating 48 single crochets. As a decorative detail, use red yarn to insert 1 single crochet in round 8’s front loops, then work 48 slip stitches.
Continue the body pattern:
- Rounds 10-11: 48 single crochets in red yarn (48 stitches total)
- Round 12: Switch to white yarn, 48 single crochets (48 stitches total)
- Rounds 13-15: Switch back to red yarn, 48 single crochets (48 stitches total)
- Round 16: Change to scarlet yarn and work in back loops only with 48 single crochets. Create a decorative yellow accent by inserting single crochets in round 15’s front loops, with a pattern of 3 double crochets, skip 1 stitch, single crochet, repeating to the end.
Shape the upper body:
- Rounds 17-21: 48 single crochets in scarlet yarn (48 stitches total)
- Round 22: Create a decrease pattern of 3 sc, 1 decrease, 3 sc, repeated 6 times (42 stitches total)
- Round 23: 42 single crochets (42 stitches total)
- Round 24: Work 5 sc followed by 1 decrease, repeated 6 times (36 stitches total)
- Round 25: 36 single crochets (36 stitches total)
- Round 26: Pattern of 2 sc, 1 decrease, 2 sc, repeated 6 times (30 stitches total)
- Round 27: Work 3 sc followed by 1 decrease, repeated 6 times (24 stitches total)
- Round 28: Pattern of 1 sc, 1 decrease, 1 sc, repeated 6 times (18 stitches total)
At this point, place the safety eyes between rounds 21 and 22, positioning them approximately 12 stitches apart.
Complete the head:
- Round 29: Alternate 1 sc with 1 decrease, repeated 6 times (12 stitches total)
- Begin stuffing the body firmly with fiberfill
- Round 30: Work 6 decreases to close the opening (6 stitches total)
Use a yarn needle to secure the opening tightly. Add personality by embroidering a nose between rounds 21 and 22.
Adding Arms
Make two identical arms using scarlet yarn:
- Round 1: Create 6 single crochets in a magic ring (6 stitches total)
- Rounds 2-6: Maintain 6 single crochets for each round (6 stitches total)
- Fasten off, leaving enough yarn for attaching
You can lightly stuff the arms if desired, though they look cute unstuffed as well. Attach the arms between rounds 14 and 15 of the body.
Creating Ears
Make two identical ears using pink yarn:
- Round 1: In a magic ring, work this sequence: 1 single crochet, 2 half double crochets, 3 double crochets, 2 half double crochets, 1 single crochet
- Fasten off and attach the ears to round 26 of the body
Finishing Touches
After completing all components, take a moment to adjust the stuffing and shape your monster to your liking. You might want to add additional embellishments like felt hearts, tiny buttons (non-functional and securely attached if the toy is for a child), or other personal touches to make your Kido unique.
Showcase Your Creation
Once your amigurumi monster is complete, consider sharing your creation on social media. Many crafters enjoy seeing different color variations and personal interpretations of the same pattern. If you share your finished Kido online, you can tag the original pattern creator to showcase your work.
Expand Your Amigurumi Collection
If you enjoyed creating Kido the Monster, you might want to explore other amigurumi patterns. The world of amigurumi includes countless creatures from polar bears and monkeys to more fantastical beings like unicorns and dragons. Each new project helps develop your crochet skills while resulting in charming handmade toys.
Troubleshooting Common Amigurumi Challenges
While working on your monster, you might encounter some common challenges:
- Visible gaps: If you notice holes in your work, you might be crocheting too loosely. Try using a smaller hook or tensioning your yarn more tightly.
- Uneven stitches: Practice maintains consistency in your tension throughout the project.
- Difficulty with the magic ring: If the magic ring technique is challenging, you can substitute with a chain 2 and work your stitches into the first chain.
- Attaching parts: Use pins to position arms, ears, and other elements before sewing them permanently.
Caring for Your Amigurumi Creation
To keep your finished monster looking its best:
- Spot clean with mild soap and water
- Allow to air dry completely
- Store away from direct sunlight to prevent fading
- If giving to a very young child, consider adding extra security to attached elements like eyes
Creating Kido the Monster is not just about following a pattern—it’s about enjoying the process of bringing a character to life through your crochet hook. Whether you’re making it for yourself or as a heartfelt gift, this amigurumi monster is sure to bring smiles to all who encounter it.
Check this out :Crochet Cow Amigurumi with Accessories
Conclusion: Your Handcrafted Amigurumi Journey
Creating Kido the Monster is more than just following a set of instructions—it’s an enjoyable journey into the world of amigurumi. Each round you complete brings this charming character closer to life, showcasing your crochet skills and creativity. The beauty of amigurumi lies not only in the finished product but in the meditative process of working each stitch with care and attention.
As you become more comfortable with the techniques used in this pattern, you’ll likely find yourself experimenting with different color combinations, adding unique embellishments, or even modifying parts of the design to create your own monster variations. This is the true joy of amigurumi—the endless possibilities for personalization while working within a framework.
Remember that each handmade creation carries a piece of its maker. Your Kido the Monster will have its own personality, slightly different from any other crocheted using the same pattern. Embrace any little imperfections, as they add character and make your creation truly one-of-a-kind.
Whether you’re making this adorable monster for yourself, as a gift, or to sell at craft fairs, the satisfaction of completing a project from start to finish is unmatched. And when you see the delight on someone’s face when they receive your handmade creation, you’ll understand why so many crafters find amigurumi to be such a rewarding hobby.
So gather your supplies, prepare your favorite crochet spot, perhaps put on some music or an audiobook, and enjoy the process of creating Kido the Monster, stitch by stitch and round by round. Your amigurumi adventure awaits!
Happy crocheting!
