

Table of Contents
Amigurumi giraffes are among the most charming crochet projects for both beginners and experienced crafters. Their Amigurumi Giraffe long necks, spotted bodies, and gentle expressions make them irresistible handmade toys that delight children and adults alike. This comprehensive guide offers a complete free amigurumi giraffe pattern with detailed instructions to create your own cuddly companion.
What You Need for Your Amigurumi Giraffe
Before starting your amigurumi giraffe project, gather these essential materials:
- 2 skeins of yellow cotton yarn (Rainbow Cotton 8/4, color 056 Curry or similar)
- 1 skein of green cotton yarn (Rainbow Cotton 8/4, color 021 Army Green or similar)
- 1 skein of brown cotton yarn (Mayflower Cotton 8/4, color 1432 or similar)
- Crochet hook size 2.5 mm
- Small amounts of black yarn for the graduation cap
- Small amount of dark red yarn for the tassel
- Small amount of white yarn for the eyes and rucksack detailing
- Metal wire for structure
- Safety eyes (5 mm)
- Fiberfill stuffing
- Yarn needle
Understanding Amigurumi Giraffe Terminology
This pattern uses standard crochet abbreviations:
- Magic ring: Creates a tight center circle to begin crocheting in rounds
- Chain: Basic foundation stitch
- Single crochet: The most common stitch used throughout this pattern
- Slip stitch: Used to join rounds or make flat connections
- Half double crochet: Slightly taller than single crochet
- Double crochet: Twice as tall as single crochet
- Increase: Making two stitches in the same spot to widen the piece
- Decrease: Combining two stitches into one to narrow the piece
Creating Your Amigurumi Giraffe Step by Step
Amigurumi Giraffe The Head
The giraffe head begins with brown yarn, establishing the characteristic face coloring before transitioning to the yellow body:
Round 1: Create 6 single crochets in a magic ring Round 2: Increase in each stitch (12 stitches) Round 3: Single crochet in one stitch, increase in the next stitch, repeat around (18 stitches) Round 4: Work 2 single crochets, increase in the next stitch, repeat around (24 stitches) Round 5: Work 3 single crochets, increase in the next stitch, repeat around (30 stitches) Round 6: Work 2 single crochets, increase, work 4 single crochets and increase five times, work 2 single crochets (36 stitches) Round 7: Work 5 single crochets, increase in the next stitch, repeat around (42 stitches) Round 8: Work 3 single crochets, increase, work 6 single crochets and increase five times, work 3 single crochets (48 stitches) Round 9: Work 7 single crochets, increase in the next stitch, repeat around (54 stitches) Round 10: Work 4 single crochets, increase, work 8 single crochets and increase five times, work 4 single crochets (60 stitches) Rounds 11-15: Single crochet in each stitch around (60 stitches)
Switch to yellow yarn at this point.
Rounds 16-19: Single crochet in each stitch around (60 stitches) Round 20: Work 8 single crochets, decrease, repeat around (54 stitches) Rounds 21-23: Single crochet in each stitch around (54 stitches) Round 24: Work 7 single crochets, decrease, repeat around (48 stitches) Rounds 25-27: Single crochet in each stitch around (48 stitches) Round 28: Work 6 single crochets, decrease, repeat around (42 stitches) Rounds 29-31: Single crochet in each stitch around (42 stitches) Round 32: Work 5 single crochets, decrease, repeat around (36 stitches) Rounds 33-34: Single crochet in each stitch around (36 stitches)
Place safety eyes between rounds 21-22 with 7 stitches between them. Create small white circles to surround each safety eye, which gives your giraffe a lively expression.
Round 35: Work 4 single crochets, decrease, repeat around (30 stitches) Round 36: Work 3 single crochets, decrease, repeat around (24 stitches) Round 37: Work 2 single crochets, decrease, repeat around (18 stitches) Round 38: Work 1 single crochet, decrease, repeat around (12 stitches) Round 39: Work 2 single crochets, decrease, repeat three times (9 stitches)
Fasten off, leaving a tail long enough to close the opening by gathering the remaining stitches.
Amigurumi Giraffe The Arms
Each arm starts with brown yarn for the hands before transitioning to yellow for the upper limbs:
Round 1: Create 6 single crochets in a magic ring Round 2: Increase in each stitch (12 stitches) Round 3: Single crochet in one stitch, increase in the next stitch, repeat around (18 stitches) Rounds 4-6: Single crochet in each stitch around (18 stitches) Round 7: Single crochet in one stitch, decrease, repeat around (12 stitches) Rounds 8-9: Single crochet in each stitch around (12 stitches)
Switch to yellow yarn at this point. Stuff the hand firmly and the rest lightly as you work.
Rounds 10-24: Single crochet in each stitch around (12 stitches) Round 25: Single crochet in one stitch, increase in the next stitch, repeat around (18 stitches) Rounds 26-29: Single crochet in each stitch around (18 stitches) Round 30: Single crochet in one stitch, decrease, repeat around (12 stitches) Rounds 31-45: Single crochet in each stitch around (12 stitches)
Fasten off, leaving a tail long enough for attaching to the body.
The Body
The giraffe body is worked entirely in yellow yarn:
Round 1: Create 6 single crochets in a magic ring Round 2: Increase in each stitch (12 stitches) Round 3: Single crochet in one stitch, increase in the next stitch, repeat around (18 stitches) Round 4: Work 2 single crochets, increase in the next stitch, repeat around (24 stitches) Round 5: Work 3 single crochets, increase in the next stitch, repeat around (30 stitches) Round 6: Work 4 single crochets, increase in the next stitch, repeat around (36 stitches) Round 7: Work 5 single crochets, increase in the next stitch, repeat around (42 stitches) Round 8: Work 6 single crochets, increase in the next stitch, repeat around (48 stitches) Round 9: Work 7 single crochets, increase in the next stitch, repeat around (54 stitches) Round 10: Work 8 single crochets, increase in the next stitch, repeat around (60 stitches) Round 11: Work 9 single crochets, increase in the next stitch, repeat around (66 stitches) Round 12: Work 10 single crochets, increase in the next stitch, repeat around (72 stitches) Rounds 13-24: Single crochet in each stitch around (72 stitches) Round 25: Work 10 single crochets, decrease, repeat around (66 stitches) Rounds 26-28: Single crochet in each stitch around (66 stitches) Round 29: Work 9 single crochets, decrease, repeat around (60 stitches) Rounds 30-31: Single crochet in each stitch around (60 stitches) Round 32: Work 8 single crochets, decrease, repeat around (54 stitches) Rounds 33-34: Single crochet in each stitch around (54 stitches) Round 35: Work 7 single crochets, decrease, repeat around (48 stitches) Rounds 36-37: Single crochet in each stitch around (48 stitches) Round 38: Work 6 single crochets, decrease, repeat around (42 stitches) Round 39: Single crochet in each stitch around (42 stitches) Round 40: Work 5 single crochets, decrease, repeat around (36 stitches) Round 41: Single crochet in each stitch around (36 stitches) Round 42: Work 4 single crochets, decrease, repeat around (30 stitches) Rounds 43-44: Single crochet in each stitch around (30 stitches) Round 45: Work 3 single crochets, decrease, repeat around (24 stitches) Rounds 46-48: Single crochet in each stitch around (24 stitches)
Round 49: Attach arms to body with 6 single crochets through underside of first arm, 9 single crochets on body, 6 single crochets through underside of second arm, 3 single crochets on body (24 stitches) Rounds 50-57: Single crochet in each stitch around (24 stitches) Round 58: Work 6 single crochets, decrease, repeat three times (21 stitches) Rounds 59-64: Single crochet in each stitch around (21 stitches) Round 65: Work 18 single crochets Round 66: Work 1 single crochet, 3 half double crochets, 3 double crochets, 3 half double crochets, 2 single crochets
The upper neck area should be shaped with half double crochets and double crochets creating the proper structure. Insert folded metal wire into the body to stabilize the neck.
Distinctive Features
Horns
Create two small brown horns beginning with 6 single crochets in a magic ring. Shape them by increasing to 15 stitches before decreasing to 9 stitches for the horn shaft. Stuff firmly for structure.
Ears
The giraffe’s characteristic yellow ears start with 3 single crochets in a magic ring, expanding to 18 stitches. Work even rounds before decreasing to form the ear shape. Leave these unstuffed for a natural droop.
Legs
Each leg begins with brown yarn for the foot, transitioning to yellow for the leg. Start with 6 single crochets in a magic ring, increase to 18 stitches for the foot, then decrease to form the ankle. Switch to yellow yarn and continue with the leg structure, including a wider area for the hip joint. The upper portion remains unstuffed to allow for proper positioning.
Spots
Create various sizes of brown spots to give your giraffe its characteristic pattern. Make two of each size: large (18 stitches), medium (18 stitches but fewer rounds), and small (12 stitches). These will be attached to both the front and back of the body.
Tail
The tail begins with brown yarn for the tuft, starting with 5 single crochets in a magic ring and gradually increasing to 15 stitches. After shaping the tuft, decrease and switch to yellow yarn for the tail length. Stuff only the tuft portion.
Adding Character with Accessories
Graduation Cap
Create a square base from two identical pieces of black yarn worked in rows. Add a round piece on top and join with a dark red tassel through the center, giving your giraffe a scholarly appearance.
Rucksack
The detailed backpack is worked in green yarn with front and back panels, side pockets, a front pocket, and straps. Add a small white circular logo with a red star embroidered in the center for a finishing touch.
Assembling Your Amigurumi Giraffe
Attach all components with careful placement:
- Sew the horns to the head between rounds 30-33, with 2 stitches between them
- Position the ears on round 33, three stitches away from the horns
- Embroider expressive eyebrows using brown yarn
- Join the head to the body, ensuring proper alignment and stuffing firmly between the head and neck
- Distribute the spots evenly on both the front and back of the body
- Attach the legs to rounds 7-17 of the body
- Sew the tail to the center back
- Position the graduation cap between rounds 35-36 of the head
Caring for Your Amigurumi Creation
Your handmade amigurumi giraffe can be spot cleaned with a damp cloth. For more thorough cleaning, hand wash gently in cold water with mild detergent and air dry completely before handling. Store away from direct sunlight to prevent color fading.
Why Amigurumi Giraffes Make Perfect Handmade Gifts
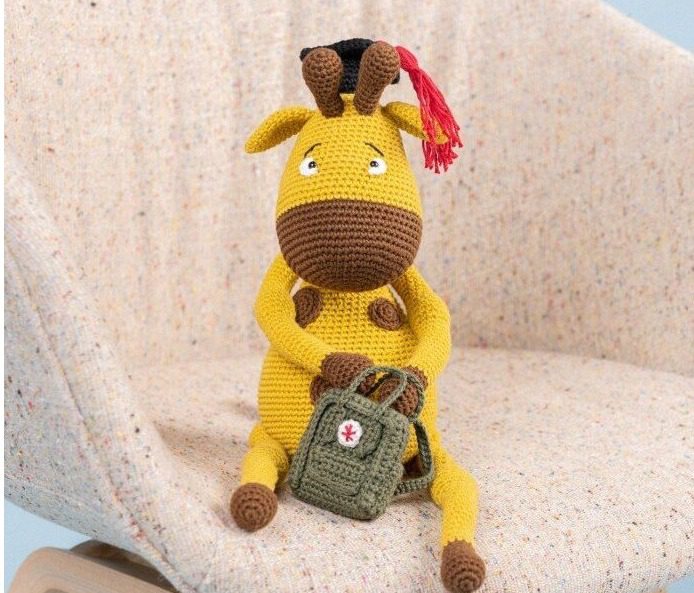
Amigurumi giraffes combine the charm of handcrafted toys with the whimsy of these beloved safari animals. Their long necks and spotted patterns make them instantly recognizable, while the added accessories like the graduation cap and rucksack add personality and character.
These crocheted companions make thoughtful gifts for:
- Baby showers and nursery decor
- Children’s birthdays
- Graduation celebrations
- Animal lovers of any age
- Home office desk companions
Creating an amigurumi giraffe allows you to personalize colors, add unique details, and craft a one-of-a-kind treasure that will be cherished for years to come.
Check this out :Elegant Girl Doll Amigurumi with Double Bun Hairstyle and Layered Dress
Conclusion
Congratulations on completing your adorable amigurumi giraffe! This charming crochet project combines technical skill with creative expression, resulting in a huggable toy with personality and charm. The graduation cap and backpack add unique character to your creation, making it not just a stuffed animal but a whimsical companion with a story.
The pattern’s combination of different yarn colors, strategic shaping techniques, and careful assembly creates a realistic yet cute interpretation of one of nature’s most beloved creatures. Your finished giraffe stands approximately 28 cm (11.2 inches) tall when sitting, making it the perfect size for display or playtime.
Remember that each amigurumi creation is unique, reflecting your personal crochet style and choices. Small variations in tension, stuffing firmness, or embellishment placement will give your giraffe its individual character. Feel free to experiment with different color combinations or accessories to make the design truly your own.
For those new to amigurumi, this pattern offers an opportunity to practice essential techniques including magic rings, increases and decreases, color changes, and three-dimensional assembly. For experienced crocheters, the detailed accessories and character features provide satisfying challenges.
Whether creating this giraffe as a gift or for your personal collection, the finished project represents hours of careful craftsmanship resulting in a handmade treasure that can be passed down through generations. Share your creations on social media with #AmigurumiGiraffe to inspire and connect with others in the worldwide crochet community!
Happy crocheting, and enjoy your delightful amigurumi giraffe companion!
