

Table of Contents
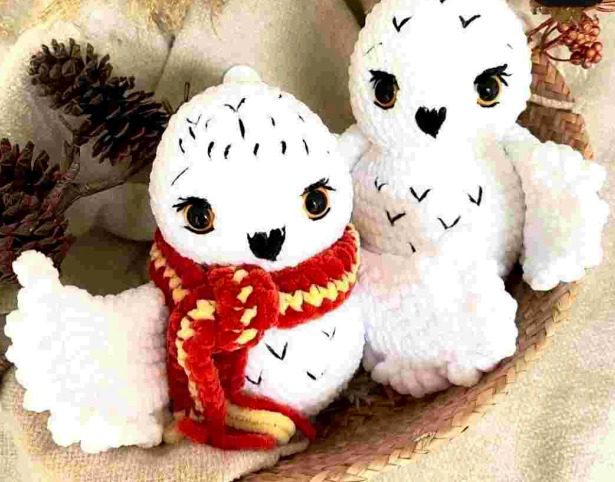
Creating a snowy owl amigurumi is a delightful project that combines soft plush yarn with detailed embroidery to bring these magical winter birds to life. Perfect Snowy Owl for Harry Potter fans, winter decor enthusiasts, or anyone who loves these beautiful arctic creatures, this step-by-step pattern will guide you through creating your own adorable owl companion complete with distinctive markings and expressive features.
Materials Needed for Your Snowy Owl
To create this charming Snowy Owl, you’ll need:
- Chenille yarn (like Durable Velvet, Himalaya Dolphin Baby) in white or Cotton yarn (like Scheepjes Catona, Rico Baby Dream dk) in white
- Safety eyes: 15mm for Chenille yarn version or 10mm for Cotton version
- Black cotton yarn for eye border and the pattern markings on head and belly
- Katia Velvet Fine or similar for embroidering the beak
- Crochet hook: 5mm for Chenille, 2.5mm for Cotton
- Scissors
- Blunt tapestry needle
- Stitch marker
- Pins
- Fiberfill stuffing
Snowy Owl Understanding Crochet Abbreviations
Before beginning your owl amigurumi, familiarize yourself with these standard crochet terms:
- MR – Magic Ring
- Rd – Round
- R – Row
- sc – single crochet
- ch – chain
- sl st – slip stitch
- inc – increase
- dec – decrease
- hdc – half double crochet
- dc – double crochet
- dc inc – two double crochet in one stitch
Snowy Owl Creating the Wings
Make 2 identical wings:
Round 1: 5 single crochet in magic ring (5) Round 2: Increase in all stitches (10) Round 3: Increase in all stitches (20) Round 4: (1 sc, increase) repeat 10 times (30) Round 5: (2 sc, increase) repeat 10 times (40) Round 6: (3 sc, increase) repeat 10 times (50) Round 7: (4 dc, dc increase) repeat 10 times (60)
To shape and close the wing:
- Fold the wing in half and crochet as follows to close it: (5 chain, 1 single crochet) repeat 22 times, working only in single crochet for the last 8 stitches.
- Fasten off, leaving a long yarn tail for sewing the wings to the body later.
- For better stability, you can first sew them with cotton yarn of the same color before attaching the chenille yarn.
Head and Body Construction
The owl’s head and body are worked as one continuous piece.
Start with the head: Round 1: 6 sc in magic ring (6) Round 2: Increase in all stitches (12) Round 3: (1 sc, increase) repeat 6 times (18) Round 4: (2 sc, increase) repeat 6 times (24) Round 5: (3 sc, increase) repeat 6 times (30) Round 6: (4 sc, increase) repeat 6 times (36) Round 7: 36 sc (36) Round 8: (5 sc, increase) repeat 6 times (42) Round 9: 42 sc (42) Round 10: (6 sc, increase) repeat 6 times (48) Rounds 11-14: 48 sc for 4 rounds (48) Round 15: (6 sc, decrease) repeat 6 times (42) Round 16: 42 sc (42) Round 17: (5 sc, decrease) repeat 6 times (36) Round 18: (2 sc, decrease) repeat 9 times (27) Round 19: (7 sc, decrease) repeat 3 times (24)
At this point, attach the safety eyes between Rounds 11-12 with a distance of 7 visible stitches between them. The stitch marker’s position should be in the middle of the backside of the head. Stuff the head firmly with fiberfill, focusing on filling the sides a little bit more to form cheeks. Shape the head gently while stuffing.
Continue with the body (don’t cut the yarn yet): Round 20: (3 sc, increase) repeat 6 times (30) Round 21: (1 sc, increase) repeat 15 times (45) Round 22: 3 sc, (5 sc, increase) repeat 7 times (52) Round 23: increase, 50 sc, increase (54) Rounds 24-28: 54 sc for 5 rounds (54) Round 29: (7 sc, decrease) repeat 6 times (48) Round 30: 48 sc (48) Round 31: (6 sc, decrease) repeat 6 times (42) Round 32: 42 sc (42) Round 33: (5 sc, decrease) repeat 6 times (36) Round 34: (4 sc, decrease) repeat 6 times (30) Round 35: (3 sc, decrease) repeat 6 times (24) Round 36: (2 sc, decrease) repeat 6 times (18) Round 37: (1 sc, decrease) repeat 6 times (12) Round 38: Decrease 6 times (6)
Begin stuffing the body firmly after Round 34. When finished, cut the yarn, thread it through a blunt needle, and pull it through the 6 remaining stitches to close the hole. Secure the yarn and hide the end inside the body.
Completing the Owl’s Features
Facial Details
Using black cotton yarn, embroider:
- Eyelashes around the upper parts of the safety eyes
- Lower eye rim
- Eyebrows above the eyes
The beak can be embroidered with black velvet yarn or regular cotton. Start in the center at the same height as the eye rim, making it 3 stitches wide with 2 stitches distance to each eye. Create a small triangle shape and fill it in, then add a small tip at the end.
Body Markings
Using black cotton yarn, embroider small “V” shapes on both the head and belly of the owl to create the characteristic snowy owl markings. You have creative freedom with the pattern design.
Wing Attachment
Sew the wings to the back of the owl’s body. You can also position them slightly to the sides of the belly for a different look.
Creating the Scarf (Optional)
If you’d like to add a scarf like the one shown:
Start with red yarn: Row 1: Chain 71 Row 2: Half double crochet into the 2nd chain from the hook, continue with HDC in each chain, chain 2, turn.
Switch to yellow yarn: Row 3: 70 single crochet, chain 2, turn.
Switch back to red yarn: Row 4: 70 single crochet.
Finish and weave in ends. Cut equal lengths of yarn and attach them at each end of the scarf to create tassels. Trim the excess yarn for a neat finish.
Final Touches
- Check that all parts are securely attached.
- Adjust the stuffing if needed for the perfect shape.
- Make sure all yarn ends are properly hidden.
- For an extra touch of personality, you can pose your owl slightly by gently manipulating the body.
Your snowy owl amigurumi is now complete! These charming creatures make wonderful gifts, especially during winter months or for Harry Potter enthusiasts. The plush texture of the yarn makes them especially huggable and perfect as children’s toys or decorative items.
Care Instructions
Your finished snowy owl should be spot cleaned only with a damp cloth if needed. Avoid machine washing as this may damage the structure and embroidered details. Store in a clean, dry place away from direct sunlight to maintain its pristine white appearance.
Check this out :Little Luiza Amigurumi Doll
Variations
- Create owls in different colors for various owl species
- Add a wizard hat for a more magical theme
- Make a smaller version for a baby owl
- Create a family by making different sizes
These adorable snowy owls with their distinctive markings and soft texture make wonderful handmade gifts that will be treasured for years to come. Whether displayed on a shelf, used as a winter decoration, or given to a child as a huggable friend, this amigurumi pattern creates a charming companion that captures the essence of these beautiful arctic birds.
