

Table of Contents
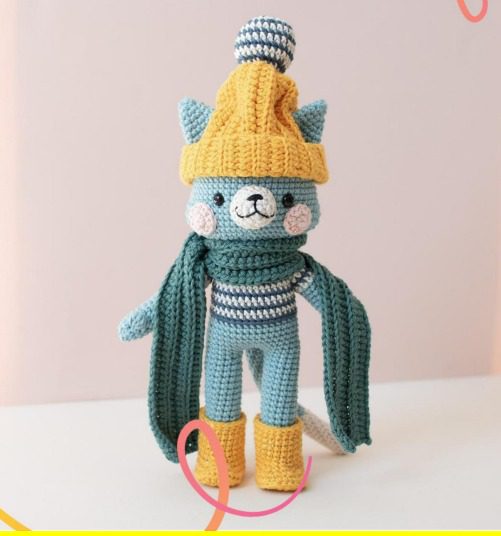
Creating amigurumi toys has become a beloved hobby for crafting enthusiasts worldwide, and this Winter Kitten pattern offers a delightful project that combines adorable features with seasonal charm. This sweet feline friend features a distinctive yellow beanie with pom-pom, matching yellow boots, a cozy striped sweater, and a long teal scarf that adds personality and warmth. Perfect for holiday gifting or adding to your handmade collection, this Winter Kitten amigurumi brings together various crochet techniques in one charming character that will appeal to crafters of all skill levels.
Materials Required for Your Winter Kitten
Before starting this heartwarming project, gather these essential materials:
Winter Kitten Yarn Selection
- Light blue yarn (medium weight) for the main body and head
- Teal yarn for the scarf and ear accents
- Yellow yarn for the beanie and boots
- White and navy yarn for the striped sweater pattern
- Pink yarn for the cheek accents
- White yarn for facial details
- Black embroidery floss or yarn for facial features
Winter Kitten Tools and Notions
- 3.5mm crochet hook (or size needed for tight, even stitches)
- Polyester fiberfill for stuffing
- Yarn needle for assembly and details
- Stitch markers to track your rounds
- Safety eyes (6mm) or embroidery floss for the eyes
- Small amount of black yarn for nose and mouth
- Scissors
- Pins for positioning pieces during assembly
The completed Winter Kitten will stand approximately 20cm tall when finished with the recommended materials.
Winter Kitten Understanding Pattern Terminology
Familiarize yourself with these standard crochet terms used throughout the pattern:
- Chain stitch forms the foundation of your work
- Single crochet creates the main structure of the kitten
- Increase allows your work to expand by working two stitches in one space
- Decrease combines two stitches into one to shape your work
- Magic ring creates a secure beginning circle for round pieces
- Working in specific loops creates texture and dimension
Winter Kitten Creating the Body
Start with light blue yarn to form the main body structure, working from bottom to top:
Begin with a magic ring and work 6 single crochet stitches into it.
Round 1: Increase in each stitch around (12 stitches) Round 2: Single crochet in first stitch, increase in next stitch; repeat around (18 stitches) Round 3: Single crochet in first 2 stitches, increase in next stitch; repeat around (24 stitches) Round 4: Single crochet in first 3 stitches, increase in next stitch; repeat around (30 stitches) Round 5: Single crochet in first 4 stitches, increase in next stitch; repeat around (36 stitches)
Rounds 6-14: Single crochet in each stitch around (36 stitches)
For rounds 15-18, create the striped sweater pattern by alternating white and navy yarn: Round 15: Working in back loops only, single crochet in each stitch around (36 stitches) Rounds 16-18: Alternate white and navy yarn every round, single crochet in each stitch (36 stitches)
Switch back to light blue yarn for the upper body: Rounds 19-20: Single crochet in each stitch around (36 stitches)
Begin decreasing to shape the neck: Round 21: Single crochet in first 4 stitches, decrease; repeat around (30 stitches) Round 22: Single crochet in first 3 stitches, decrease; repeat around (24 stitches)
Winter Kitten Creating the Head
Continue with light blue yarn: Round 23: Single crochet in first 2 stitches, increase in next stitch; repeat around (32 stitches) Round 24: Single crochet in first 3 stitches, increase in next stitch; repeat around (40 stitches) Rounds 25-30: Single crochet in each stitch around (40 stitches)
Begin decreasing to shape the top of the head: Round 31: Single crochet in first 3 stitches, decrease; repeat around (32 stitches) Round 32: Single crochet in first 2 stitches, decrease; repeat around (24 stitches) Round 33: Single crochet in first stitch, decrease; repeat around (16 stitches)
Stuff the body and head firmly before completing: Round 34: Decrease around (8 stitches)
Fasten off, leaving a tail for closing. Weave through the remaining stitches, pull tight, and secure.
Creating the Arms
Make 2 identical arms with light blue yarn:
Begin with a magic ring and 6 single crochet stitches. Round 1: Increase in each stitch around (12 stitches) Round 2: Single crochet in each stitch around (12 stitches) Rounds 3-15: Single crochet in each stitch around (12 stitches)
Fasten off, leaving yarn for attaching to the body. Stuff lightly, keeping the arms somewhat flat.
Creating the Legs and Boots
Make 2 identical legs starting with light blue yarn:
Begin with a magic ring and 6 single crochet stitches. Round 1: Increase in each stitch around (12 stitches) Round 2: Single crochet in first stitch, increase in next stitch; repeat around (18 stitches) Rounds 3-12: Single crochet in each stitch around (18 stitches)
Switch to yellow yarn for the boots: Round 13: Working in back loops only, single crochet in each stitch around (18 stitches) Rounds 14-18: Single crochet in each stitch around (18 stitches)
Stuff firmly and flatten the bottom slightly for standing. Fasten off, leaving yarn for attachment.
Creating the Ears
Make 2 ears using light blue yarn with teal accents:
Begin with light blue yarn and chain 6. Row 1: Single crochet in second chain from hook and across (5 stitches) Rows 2-6: Chain 1, turn, single crochet across (5 stitches)
Add teal border: Round 1: Working around the entire ear piece, single crochet evenly around the perimeter, working 3 single crochet in each corner to create points
Fasten off, leaving yarn for attachment to head.
Creating the Beanie
Using yellow yarn:
Begin with a magic ring and 6 single crochet stitches. Round 1: Increase in each stitch around (12 stitches) Round 2: Single crochet in first stitch, increase in next stitch; repeat around (18 stitches) Round 3: Single crochet in first 2 stitches, increase in next stitch; repeat around (24 stitches) Round 4: Single crochet in first 3 stitches, increase in next stitch; repeat around (30 stitches) Round 5: Single crochet in each stitch around, working in back loops only to create a ridge (30 stitches) Rounds 6-10: Single crochet in each stitch around (30 stitches)
Create the pom-pom topper using blue and white striped pattern: Begin with a magic ring and 6 single crochet stitches. Round 1: Increase in each stitch around (12 stitches) Round 2: Single crochet in each stitch around, alternating blue and white yarn (12 stitches) Round 3: Decrease around (6 stitches)
Stuff lightly, close, and attach to the center of the beanie.
Creating the Scarf
Using teal yarn:
Chain 75 stitches (or desired length). Row 1: Single crochet in second chain from hook and in each chain across. Rows 2-6: Chain 1, turn, single crochet across.
Fasten off and add fringe to both ends if desired.
Facial Features and Assembly
- Position and attach safety eyes to the face, approximately 3 rows down from the top of the head.
- Using black yarn, embroider a small triangular nose below the eyes.
- Add a simple smiling mouth with black embroidery floss.
- With pink yarn, create small circular cheek patches below the eyes.
- Sew the ears to the top of the head, positioning them with a slight outward tilt.
- Attach the arms to the sides of the body at the transition between the sweater and upper body.
- Sew the legs to the bottom of the body, ensuring they’re positioned to allow the kitten to stand.
- Place the beanie on the head, securing it with a few stitches.
- Wrap the scarf around the neck, crossing it in front and tacking it in place.
Check this out :Crochet an Adorable Rio Snail Amigurumi Toy
Conclusion
Your Winter Kitten amigurumi represents the perfect combination of cuteness and craftsmanship, resulting in a charming character that showcases your crochet abilities. The detailed design with its seasonal accessories creates a huggable friend that captures the cozy essence of winter in yarn form. When displayed on a shelf, desk, or given as a heartfelt gift, this handmade creation brings warmth and character to any space.
The versatility of this pattern allows for personal expression through color choices and minor modifications. You might create a collection of kittens in different color schemes, adapt the accessories for other seasons, or customize the facial features to achieve different expressions. Each variation brings its own charm while maintaining the adorable essence of the original design.
Throughout this project, maintaining consistent tension ensures professional results, while careful assembly brings your kitten to life with personality and dimension. The satisfaction of creating something by hand—stitch by stitch—adds special meaning to this finished piece that mass-produced items simply cannot match.
As you complete your Winter Kitten, take pride in having created not just a toy but a character with presence and personality. The time invested in crafting each element results in a unique treasure that reflects your creativity and skill, ready to become a cherished keepsake or meaningful gift. Enjoy the creative journey of amigurumi, where simple stitches transform into characters full of charm and warmth.
