

Table of Contents
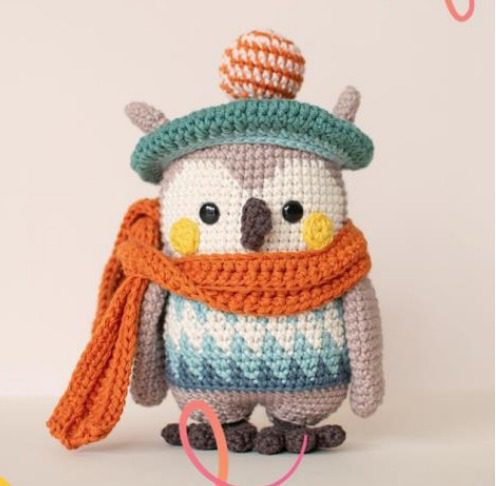
Creating adorable amigurumi toys has become increasingly popular among crafting enthusiasts, and the Winter Penguin pattern offers a delightful project for both beginners and experienced crocheters. This charming penguin features a distinctive green beret, cozy orange scarf, and an endearing striped sweater design that brings character and warmth to this wintery friend. Perfect for gifting during cold seasons or adding to your handmade collection, this penguin amigurumi combines simple techniques with charming details for a truly special finished piece.
Materials Needed for Your Winter Penguin
Before beginning your penguin amigurumi project, gather these essential materials:
Winter Penguin Yarn Requirements
- White cotton yarn (medium weight) for the main body and face
- Light blue to teal gradient yarn for the sweater design
- Orange yarn for the scarf and beak
- Green yarn for the beret
- Gray yarn for wings and feet
- Yellow yarn for cheek accents
- Black yarn or embroidery floss for eyes and details
Winter Penguin Tools and Notions
- 3.0mm crochet hook (or size needed to achieve tight stitches)
- Fiberfill stuffing
- Yarn needle for assembly
- Stitch markers
- Safety eyes (9mm) or black yarn for embroidered eyes
- Scissors
- Pins for positioning pieces before attachment
The finished penguin will stand approximately 18cm tall when completed with the recommended materials.
Winter Penguin Understanding Crochet Terminology
Familiarize yourself with these standard crochet terms before beginning:
- Chain stitch creates the foundation of your work
- Single crochet forms the majority of the penguin’s structure
- Increase allows your work to expand by working two stitches in one space
- Decrease combines two stitches into one to shape your work
- Magic ring creates a tight beginning circle for round pieces
- Front loop only and back loop only techniques create texture in the design
Creating the Winter Penguin Body
Start with white yarn to create the main body structure, working from bottom to top:
Begin by forming a magic ring and working 6 single crochet stitches into it.
Round 1: Increase in each stitch around (12 stitches) Round 2: Single crochet in first stitch, increase in next stitch; repeat around (18 stitches) Round 3: Single crochet in first 2 stitches, increase in next stitch; repeat around (24 stitches) Round 4: Single crochet in first 3 stitches, increase in next stitch; repeat around (30 stitches) Round 5: Single crochet in first 4 stitches, increase in next stitch; repeat around (36 stitches) Round 6: Single crochet in first 5 stitches, increase in next stitch; repeat around (42 stitches)
Rounds 7-12: Single crochet in each stitch around (42 stitches)
For rounds 13-15, change to the gradient blue yarn to create the sweater pattern: Round 13: Working in back loops only, single crochet in each stitch around (42 stitches) Rounds 14-15: Single crochet in each stitch around (42 stitches)
Switch back to white yarn for the upper body: Rounds 16-20: Single crochet in each stitch around (42 stitches)
Begin decreasing to shape the head: Round 21: Single crochet in first 5 stitches, decrease; repeat around (36 stitches) Round 22: Single crochet in first 4 stitches, decrease; repeat around (30 stitches) Round 23: Single crochet in first 3 stitches, decrease; repeat around (24 stitches) Round 24: Single crochet in first 2 stitches, decrease; repeat around (18 stitches)
Stuff the body firmly before completing the final rounds: Round 25: Single crochet in first stitch, decrease; repeat around (12 stitches) Round 26: Decrease around (6 stitches)
Fasten off, leaving a tail for closing. Use a yarn needle to weave through the remaining stitches, pull tight to close, and secure.
Winter Penguin Creating the Wings
Make 2 identical wings using gray yarn:
Begin with a magic ring and 6 single crochet stitches. Round 1: Increase in each stitch around (12 stitches) Round 2: Single crochet in first stitch, increase in next stitch; repeat around (18 stitches) Rounds 3-6: Single crochet in each stitch around (18 stitches) Round 7: Single crochet in first stitch, decrease; repeat around (12 stitches) Round 8: Decrease around (6 stitches)
Fasten off, leaving enough yarn for attaching to the body. Do not stuff the wings; they should remain flat.
Creating the Feet
Make 2 identical feet using gray yarn:
Chain 9 stitches. Row 1: Starting from second chain from hook, single crochet across (8 stitches) Row 2: Chain 1, turn, single crochet across (8 stitches) Row 3: Chain 1, turn, decrease, single crochet in next 4 stitches, decrease (6 stitches) Row 4: Chain 1, turn, decrease, single crochet in next 2 stitches, decrease (4 stitches)
Fasten off, leaving yarn for attaching to the body.
Creating the Beret
Using green yarn:
Begin with a magic ring and 6 single crochet stitches. Round 1: Increase in each stitch around (12 stitches) Round 2: Single crochet in first stitch, increase in next stitch; repeat around (18 stitches) Round 3: Single crochet in first 2 stitches, increase in next stitch; repeat around (24 stitches) Round 4: Single crochet in each stitch around, working in back loops only to create a ridge (24 stitches) Round 5: Single crochet in each stitch around (24 stitches) Round 6: Single crochet in first 2 stitches, decrease; repeat around (18 stitches)
Create the pom-pom topper by making a small orange ball: Begin with a magic ring and 6 single crochet stitches. Round 1: Increase in each stitch around (12 stitches) Round 2: Single crochet in each stitch around (12 stitches) Round 3: Decrease around (6 stitches)
Stuff lightly, close, and attach to the center of the beret.
Creating the Scarf
Using orange yarn:
Chain 60 stitches (or desired length). Row 1: Single crochet in second chain from hook and in each chain across. Rows 2-4: Chain 1, turn, single crochet across.
Fasten off and add fringe to both ends by cutting 10cm lengths of orange yarn and folding them in half to create tassels.
Facial Features and Assembly
- Attach safety eyes to the front of the head, positioning them about 4 rows down from the top closure.
- Using black yarn, embroider a small triangular nose between the eyes.
- With yellow yarn, add small circular cheek patches below the eyes.
- Sew the wings to the sides of the body, positioning them at the transition between white and blue sections.
- Attach the feet to the bottom of the body, ensuring they face forward and allow the penguin to stand upright.
- Sew the beret to the top of the head, positioning it slightly to one side for a jaunty look.
- Wrap the scarf around the neck, crossing it in front and tacking it in place with a few secure stitches.
Your winter penguin amigurumi is now complete! This adorable character makes a wonderful gift for children, a charming home decoration during winter months, or a special addition to your handcrafted collection. The detailed design with its cozy winter accessories showcases your crochet skills while creating a characterful companion that’s sure to bring smiles.
Remember that tension is key when creating amigurumi toys. Working with slightly tight stitches helps prevent stuffing from showing through and gives your penguin a polished, professional appearance. Feel free to customize your penguin with different color combinations for the accessories to create your own unique winter friend.
Happy crocheting, and enjoy watching your penguin character come to life stitch by stitch!Réessayer
Check this out :Crochet an Adorable Axolotl Amigurumi
Conclusion
The Winter Penguin amigurumi represents a perfect blend of craftsmanship and charm, creating a huggable friend that showcases your crochet skills. This delightful character, with its distinctive green beret, cozy orange scarf, and adorable striped sweater, captures the essence of winter warmth in a portable package. The carefully designed pattern ensures that crocheters of various skill levels can successfully complete this project, with the end result being a professional-looking handmade toy that stands proudly at approximately 18cm tall.
When creating your penguin, remember that consistent tension throughout the project will yield the best results. The magic of this design lies in its details – the slightly tilted beret, the expressive face, and the carefully positioned wings and feet all contribute to bringing this character to life. Once completed, your penguin will stand independently, making it perfect for display on a shelf, desk, or as part of a seasonal arrangement.
This amigurumi pattern also offers excellent opportunities for personalization. Consider experimenting with different color combinations for the beret, scarf, and sweater to create unique penguin variations. You might create a family of penguins in coordinating winter outfits or adapt the colors to match a specific décor theme or sports team.
Beyond the joy of creating, handmade amigurumi toys like this penguin make thoughtful gifts for special occasions. Their handcrafted nature adds a personal touch that mass-produced items simply cannot match. Whether made for a child’s toy collection, a friend’s desk companion, or your own handmade menagerie, this winter penguin is sure to be treasured for years to come.
The time invested in meticulously crafting each stitch and carefully assembling each component results in more than just a toy – it creates a character with personality and charm that reflects the care put into its creation. Enjoy the process of bringing your Winter Penguin to life, and take pride in the beautiful finished amigurumi that showcases your crafting skills and creativity.
