

Table of Contents
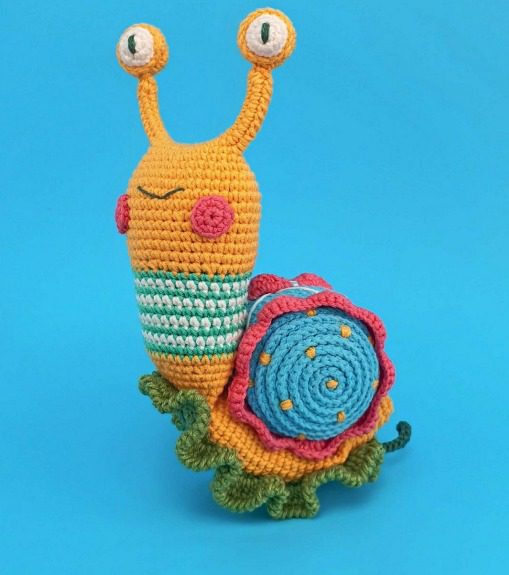
Crocheting amigurumi toys brings joy to crafters of all skill levels, and the Rio Snail pattern offers a delightful project that combines colorful yarn with creative design. This friendly snail features a cheerful yellow body with distinctive eyestalks, a striped shell in stunning blue tones, and charming green leafy elements that give it character and dimension. Whether you’re creating this adorable creature for a child’s toy collection or as a decorative piece for your home, this comprehensive tutorial will guide you through each step of the process from gathering materials to finishing touches.
Materials Needed for Your Rio Snail
Before beginning your crocheting journey, gather these essential materials:
Yarn Requirements
- Gazzal Jeans (58% cotton, 42% polyacrylic) – 170m/50g:
- Yellow yarn for the snail’s body
- Blue yarn for the shell
- Green yarn for the leaves
- Pink yarn for the shell border and cheeks
- Yarn and Colors Must-Have (100% cotton) – 125m/50g:
- Dark green yarn for the stem and embroidery details
- Emerald green yarn for the spiral pattern
- YarnArt IDEAL (100% cotton) – 170m/50g:
- White yarn for the shell, eyes, and embroidery details
Rio Snail Tools and Notions
- 1.75mm crochet hook
- Sewing needle for joining pieces
- Scissors
- Stuffing material for toys
- Stitch marker
- Pins
- Wire (approximately 14cm) for eye stems
The finished snail will measure approximately 22cm when using the recommended yarn weights.
Rio Snail Understanding Crochet Terminology
Before diving into the pattern, familiarize yourself with these standard crochet abbreviations:
- Ch – Chain
- Sc – Single crochet
- Inc – Increase (two single crochets in one stitch)
- Dec – Decrease (two stitches worked together)
- Sl st – Slip stitch
- Hdc – Half double crochet
- Dc – Double crochet
- Tr – Treble crochet
- MR – Magic ring
- BLO – Back loop only
- FLO – Front loop only
- St(s) – Stitch(es)
Creating the Rio Snail Head and Body
Step 1: Starting the Head
Begin with yellow yarn and create a foundation chain of 32 stitches. Work in rows to form the base of the head:
Row 1: Start in the second chain from the hook, work 1 increase, 29 single crochet, 4 single crochet in the last stitch. Do not turn your work; continue crocheting along the opposite side of the foundation chain with 29 single crochet and 1 increase (66 stitches total).
Row 2: Work 2 increases, 29 single crochet, 4 increases, 29 single crochet, and 2 increases (74 stitches).
Step 2: Marking and Continuing
Mark the last stitch with a stitch marker, cut and secure the yarn end on the wrong side.
Step 3: Dividing for Eye Stalks
The next row divides your work into four sections: 22 stitches for the first eye stalk base, 15 stitches for the head, 22 stitches for the second eye stalk base, and 15 stitches for the remaining head portion.
Row 3: Work 15 single crochet, skip 22 stitches, work 15 single crochet (photo references would show this division). Leave the remaining stitches unworked. Join with a single crochet into the first stitch of row 3 to close the round.
Step 4: Forming Eye Stalks
Count 11 stitches from the marker, attach yellow yarn to the 12th stitch, and begin creating the eye stalks. Work in rounds, gradually decreasing to form the tapered shape.
Rio Snail Creating the Decorative Shell
The shell consists of two connected parts worked in blue yarn with white spiral detailing, finished with a pink decorative border.
Part 1: Base of Shell
Row 1: Create 6 single crochet in a magic ring. Row 2: Work 6 increases (12 stitches). Row 3: Single crochet, increase repeat 6 times (18 stitches). Row 4: Single crochet, increase, 2 single crochet repeat 5 times, ending with single crochet (24 stitches). Row 5: 3 single crochet, increase repeat 6 times (30 stitches). Row 6: 2 single crochet, increase, 4 single crochet repeat 5 times, ending with 2 single crochet (36 stitches). Row 7: 5 single crochet, increase repeat 6 times (42 stitches). Row 8: 3 single crochet, increase, 6 single crochet repeat 5 times, ending with 3 single crochet (48 stitches). Row 9: 7 single crochet, increase repeat 6 times (54 stitches).
Part 2: Continuing the Shell
Work single crochet stitches in rows, alternating blue and white yarn to create the spiral effect that gives the shell its distinctive look.
Rio Snail Additional Components
Creating the Leaf
Use green yarn to create an elongated leaf shape that will be attached to the snail’s body: Row 1: Chain 23, then work single crochet across. Row 2: Increase at beginning and end of row, with single crochet in between. Rows 3-4: Create increases at specific intervals to form the leaf shape. Rows 5-7: Work half double crochet stitches around the edge to create the rounded leaf shape.
Making the Eyes
Create two identical eye components using white yarn for the base and yellow yarn for the outer edge: Row 1: Work 6 single crochet in a magic ring. Rows 2-5: Increase following a specific pattern to create the rounded eye shape. Stuff lightly and insert wire to help the eyes stand upright.
Creating the Cheeks
Make two small pink circles using this pattern: Row 1: Work 6 single crochet in a magic ring. Row 2: Work 6 increases (12 stitches).
Detailed Round Instructions for Rio Snail Body
Continuing the Body Section
Round 4: 30 single crochet. Round 5: 2 single crochet, (increase, 4 single crochet) repeat 5 times, 2 single crochet (36 stitches). Round 6: (5 single crochet, increase) repeat 6 times (42 stitches). Rounds 7-9: 42 single crochet for 3 rounds. Round 10: (5 single crochet, decrease) repeat 6 times (36 stitches). Rounds 11-14: 36 single crochet for 4 rounds. Round 15: 2 single crochet, (decrease, 4 single crochet) repeat 5 times, 2 single crochet (30 stitches).
Shell Connection Section
Round 16: Alternate green and white yarn in stripes for this section. Rounds 16-24: Work in alternating colors, maintaining 30 stitches per round. Round 25: 30 single crochet. Round 26: (3 single crochet, decrease) repeat 6 times (24 stitches).
Narrowing the Body
Round 27: Begin gradually filling with stuffing, but don’t make it too firm. 24 single crochet. Round 28: 24 single crochet. Round 29: (Single crochet, decrease, 2 single crochet) repeat 5 times, single crochet (18 stitches). Round 30: 18 single crochet.
Forming the Tail Section
Round 31: 9 single crochet (work around the piece, joining edges). Round 32: Chain 1, 9 single crochet across front loops on one side, then 9 single crochet across remaining loops (18 stitches). Round 33: Single crochet, (increase, 2 single crochet) repeat 5 times, single crochet (24 stitches). Rounds 34-50: 24 single crochet for 17 rounds (the tail will form a long cylinder).
Finishing the Tail
Round 51: 12 single crochet (join in spiral). Round 52: Chain 1, 12 single crochet across front loops, then 12 single crochet across remaining loops (24 stitches). Round 53: (4 single crochet, decrease) repeat 4 times (20 stitches). Round 54: 20 single crochet. Round 55: (3 single crochet, decrease) repeat 4 times (16 stitches).
Tapering the Tail End
Rounds 56-57: 16 single crochet for 2 rounds. Round 58: (2 single crochet, decrease) repeat 4 times (12 stitches). Rounds 59-60: 12 single crochet for 2 rounds. Round 61: (2 single crochet, decrease) repeat 3 times (9 stitches). Round 62: (Single crochet, decrease) repeat 3 times (6 stitches).
Shell Spiral Pattern Instructions
When creating the spiral pattern on the shell, work in continuous rounds without joining:
- Start with blue yarn in the center
- Join white yarn and work alternating rounds of blue and white
- Create 9 spiral rounds total, gradually increasing the circumference
- For round 10 (edge): create 54 single crochet stitches
- Add pink border with: (1 single crochet, 1 half double crochet, 3 double crochet in next stitch, 1 half double crochet, 1 single crochet) repeated around edge
Assembly and Finishing
- Attach the eyes to the stalks, ensuring they’re positioned symmetrically.
- Using yellow and white yarn, create embroidered details on the shell.
- Attach the shell to the snail’s body, positioning it so it connects to the body, lower section, and tail.
- Secure the leaf to the underside of the snail, using the front edge of row 4 for attachment.
- Add dark green embroidery details to the leaf for texture.
- Embroider a small smile between rows 7-9 of the head, approximately 7 stitches long.
- Attach the pink cheeks on either side of the smile, about 8 stitches apart.
Customization Ideas
Once you’ve mastered the basic Rio Snail pattern, consider these variations:
- Create a family of snails in different sizes by adjusting your hook size
- Experiment with different color combinations for seasonal themes
- Add embellishments like tiny flowers or beads for extra detail
- Create a hanging version with an added loop for displaying on walls or mobiles
This charming amigurumi snail makes an excellent gift for children and adults alike. The combination of textures and colors creates a visually appealing toy that’s sure to become a treasured handmade item. By following this detailed tutorial, even beginner crocheters can successfully complete this intermediate-level project with beautiful results.
Check this out :Crochet a Toy Story Alien Amigurumi
Conclusion
The Rio Snail amigurumi pattern combines multiple crochet techniques to create a charming, whimsical toy with vibrant personality. The construction process—from forming the expressive eye stalks to crafting the spiral shell and attaching the leafy base—provides an excellent opportunity to practice various amigurumi skills within a single project.
Once completed, your Rio Snail will stand approximately 22cm tall, making it an ideal size for display or play. The sturdy construction, reinforced with careful stitching at connection points, ensures the toy will maintain its shape even with regular handling. The combination of different yarn textures and colors creates visual interest that draws attention to the special details like the spiral shell pattern and expressive face.
Remember that tension consistency is key throughout this project, especially when working the decreases that shape the snail’s body. Take your time with the assembly process, using pins to position pieces correctly before sewing them together. The wire supports in the eye stalks can be gently bent to create different expressions, allowing you to personalize your snail’s character.
Whether you’re creating this amigurumi as a gift, for your personal collection, or as a creative challenge, the Rio Snail pattern offers a rewarding crochet experience that results in a truly unique handcrafted treasure. With practice, you might even develop your own variations, creating a whole garden of colorful snail friends in different sizes and color schemes.
Happy crocheting, and enjoy watching your Rio Snail come to life stitch by stitch!
