

Table of Contents
Amigurumi dolls have captured the hearts of crochet enthusiasts worldwide with their charming designs and intricate details. If you’re looking to create a truly special handmade doll, the Bia amigurumi pattern offers a delightful project that showcases advanced crochet techniques while resulting in an adorable finished piece. This comprehensive guide will walk you through creating this charming doll with her stylish outfit, accessories, and distinctive features.
Understanding the Bia Doll Pattern
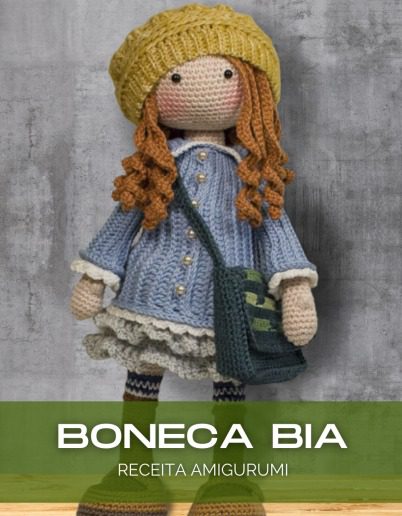
The Bia doll pattern creates a posable amigurumi doll with a yellow beret, beautiful brown curly hair, blue coat dress, and messenger bag accessory. This intermediate-level pattern requires familiarity with basic crochet stitches and techniques, but even with some complex elements, each component is straightforward when approached methodically.
Bia Materials Required
Before beginning your crochet journey, gather these essential materials:
Yarn Selection
- DK weight cotton yarn in the following colors:
- Skin tone for head, body, arms, and legs
- White for collar and trim details
- Blue for the main dress
- Brown for hair and shoes
- Yellow for beret and shoe accents
- Green for messenger bag
- Various accent colors for flowers and details
Tools and Accessories
- Crochet hooks in sizes US 1½ (2.5mm), US 3½ (4.0mm), and US 5 (4.5mm)
- 8mm safety eyes for the doll
- Fiberfill stuffing
- Tapestry needles (regular and extra-long)
- Stitch markers
- Scissors
- 1.5mm electrical wire (40cm length) for arm structure
- Small buttons for decorative elements
- Sewing thread for attaching details
Creating the Bia Doll Body Structure
Bia Head Construction
Round 1: Create a magic ring with 6 single crochet (sc) Round 2: Increase to 12 stitches (increase in each stitch) Round 3: 1 sc, 1 increase repeat 6 times (18 stitches) Round 4: 1 sc, 1 increase, 1 sc repeat 6 times (24 stitches) Round 5: 3 sc, 1 increase repeat 6 times (30 stitches) Round 6: 2 sc, 1 increase, 2 sc repeat 6 times (36 stitches) Rounds 7-30: Continue following the increase and decrease pattern as specified in the detailed instructions Round 34: 3 sc, 1 decrease repeat 6 times (24 stitches) Round 35: 1 sc, 1 decrease, 1 sc repeat 6 times (18 stitches) Round 36: 7 sc, 1 decrease repeat 2 times (16 stitches)
Place the safety eyes between rounds 22-23, approximately 5 stitches apart. Stuff the head firmly and close the opening with the invisible decrease rounds. Leave a long tail for attaching to the body.
Bia Body Construction
Begin at the neck with a magic ring of 8 stitches, increasing gradually according to the pattern. The body shape forms with strategic increases and decreases through approximately 47 rounds, ending with 6 stitches that will be closed off. Stuff the body firmly, particularly in the neck area to support the head.
Bia Arms and Legs
For each arm and leg, start with a magic ring and follow the specified rounds of increases and decreases. Insert wire into the arms for structure and posability. For legs, consider adding cardboard or plastic inserts in the feet to help the doll stand independently.
Creating Bia’s Stylish Outfit
Bia Blue Coat Dress
The coat dress begins with a foundation chain of 55 stitches worked in rows to create the body of the garment. After completing the required rows, fold the piece in half and join the sides with single crochet stitches. Work the button placket along one edge and add decorative border stitches in contrasting color yarn.
For the collar, pick up stitches around the neckline and work in pattern to create a neat, folded collar. Add pearl beads as buttons along the front opening.
Bia Messenger Bag
Work the front panel of the bag in rows, then create the flap that will fold over. Add a decorative button closure and thin strap that will cross over the doll’s body.
Yellow Beret
The beret begins with a ribbed band worked in rows, then joined to form a circle. Work in rounds from this band, increasing strategically to form the characteristic beret shape. Add decorative surface details as desired.
Bia Assembly and Finishing Touches
- Attach the head to the body using strong thread and mattress stitches
- Join the arms to the body at shoulder height, making sure they can move freely
- Attach legs at the bottom of the body
- Position the underskirt and dress on the body
- Sew the hair/wig securely to the head
- Place the beret on the head
- Add the messenger bag across the body
- Use a tiny amount of blush for rosy cheeks
Tips for Successful Amigurumi Doll Creation
- Maintain consistent tension throughout your work for a professional finish
- Stuff firmly but evenly, adding small amounts of filling at a time
- When joining limbs, ensure they’re positioned symmetrically
- Use stitch markers to keep track of your rounds
- Block pieces gently before assembly for a neater appearance
- Take your time with facial details as these bring your doll to life
Check this out :Crochet Adorable Shepherdess and Lamb Amigurumi Dolls
Conclusion
Creating the Bia amigurumi doll showcases your crochet skills while producing a charming handmade treasure. While the pattern may seem complex at first glance, approaching each component step-by-step makes this an achievable and rewarding project. Whether crafting for yourself or as a special gift, this adorable doll with her stylish outfit will delight crochet enthusiasts and collectors alike.
Remember that your finished doll is a personal creation, and small variations make each Bia unique. Enjoy the process of bringing this charming character to life through your crochet work, and feel free to add your own creative touches to make her truly one-of-a-kind.
