

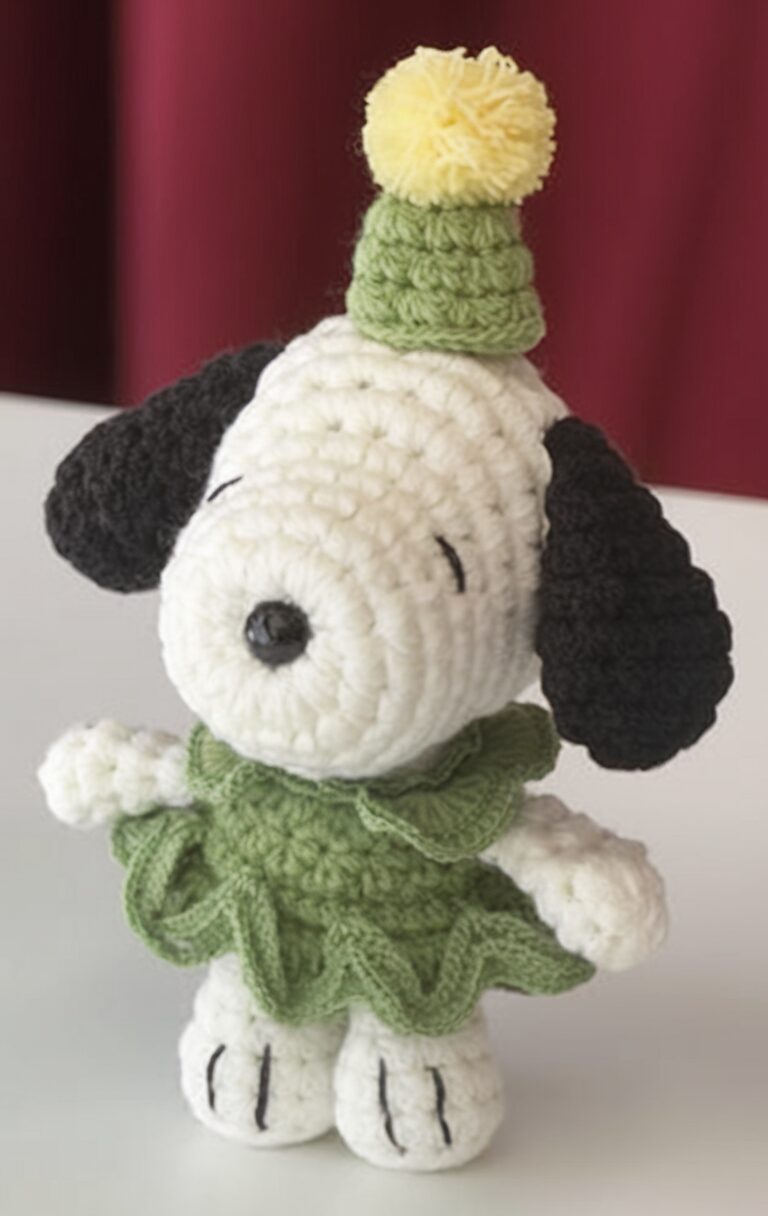
Looking for a Mini Snoopy Crochet a heartwarming handmade gift that brings instant smiles? This adorable Mini Snoopy crochet pattern creates the perfect pint-sized companion that captures all the charm of everyone’s favorite beagle! At just 11 cm tall when completed, this little Snoopy is ideal for holiday gifting, desk decorations, or adding to your amigurumi collection.
What makes this pattern special is the festive holiday outfit—complete with a cute hat and ruffled skirt that adds a seasonal touch perfect for winter celebrations. Children and adults alike will fall in love with this tiny, huggable version of the classic character dressed in his holiday best!
Materials Needed
- 2.5 mm cotton yarn in white, black, and green
- 2.5 mm crochet hook
- Safety eyes (6 mm)
- Black safety nose or embroidery thread
- Stitch markers
- Yarn needle
- Sewing pins for placement
- Polyester fiberfill stuffing
- Scissors
Abbreviations (US Terms)
- R: Round
- MR: Magic ring
- Ch: Chain
- Sc: Single crochet
- Inc: Increase (2 sc in same stitch)
- Dec: Decrease (sc2tog)
- Slst: Slip stitch
- Dc: Double crochet
- BLO: Back loop only
- FO: Fasten off
- Hdc: Half double crochet
Finished Size
The completed Mini Snoopy Crochet will stand approximately 11 cm (4.3 inches) tall—the perfect pocket-sized companion!
Detailed Instructions of Mini Snoopy Crochet
Head
R1. 6 sc in MR (6) R2. Inc in each st around (12) R3. (Sc, inc) repeat 6 times (18) R4-6. Sc in each st around for 3 rounds (18) R7. 7 sc, 4 inc, 7 sc (22) R8. 9 sc, 4 inc, 9 sc (26) R9-11. Sc in each st around for 3 rounds (26) R12. (11 sc, dec) repeat 2 times (24) R13. (2 sc, dec) repeat 6 times (18) R14. (Sc, dec) repeat 6 times (12) — start stuffing firmly R15. Dec around (6) — cut yarn and fasten off, using yarn tail to close opening
Ears (Make 2)
R1. 6 sc in MR (6) R2. Inc in each st around (12) R3-4. Sc in each st around for 2 rounds (12) R5. (2 sc, dec) repeat 3 times (9) R6. Sc in each st around (9) R7. (Sc, dec) repeat 3 times (6) R8. Fold in half and crochet 3 sc through both sides to close the ear
Do not stuff the ears. Leave a long tail for sewing to the head.
Legs & Body
Legs (Make 2)
Start with white yarn: R1. 5 sc in MR (5) R2. Inc in each st around (10) R3. 10 sc in BLO (10) — this creates a defined foot edge R4. (3 sc, dec) repeat 2 times (8) R5. (2 sc, dec) repeat 2 times (6) R6. Sc in each st around (6)
Fasten off the first leg. For the second leg, do not fasten off after R6, instead make 1 ch and continue on to join the legs.
Body
Change to green yarn after completing the second leg. From R7 onward, remember to make a slip stitch and chain 1 at the beginning of each round.
R7. 6 sc on first leg, 1 sc in chain space, 6 sc on second leg, 1 sc in chain space (14) R8. (6 sc, inc) repeat 2 times (16) R9. (Sc, inc) repeat 8 times (24) R10. 24 sc in BLO (24) — place a stitch marker in the front loop of the first stitch for later ruffle work R11. (2 sc, dec) repeat 6 times (18) — begin stuffing firmly R12. (Sc, dec) repeat 6 times (12) R13. 12 sc in BLO (12) — place a stitch marker in the front loop of the last stitch for later ruffle work R14. Sc in each st around (12)
Cut yarn and leave a long tail for attaching to the head.
Decorative Ruffles
Lower Ruffle:
- Start from the marked stitch of R10 of the body (where you placed the stitch marker).
- Attach green yarn and work pattern ([sc, hdc, dc in the same stitch], [dc, hdc, sc in the same stitch], slst in next stitch) repeat 8 times.
- Slip stitch to the first stitch to secure.
Upper Ruffle:
- Start from the marked stitch of R13 of the body (where you placed the second stitch marker).
- Attach green yarn and work pattern ([sc, hdc, dc in the same stitch], [dc, hdc, sc in the same stitch], slst in next stitch) repeat 4 times.
- Slip stitch to the first stitch to secure.
Arms (Make 2)
R1. 6 sc in MR (6) R2-4. Sc in each st around for 3 rounds (6) R5. Fold in half and crochet 3 sc through both sides to close
Stuff lightly, cut the yarn, and sew between R11-12 of the body.
Hat
R1. 6 sc in MR (6) R2. (Sc, inc) repeat 3 times (9) R3. Sc in each st around (9) R4. (2 sc, inc) repeat 3 times (12)
Cut the yarn and leave a long tail for sewing to the head.
Pompom for Hat of Mini Snoopy Crochet
- Cut a 20 cm (8 inch) length of yarn and set aside.
- Wrap yarn around one finger approximately 15-20 times.
- Carefully slide the wrapped yarn off your finger and tie it tightly in the middle with the 20 cm yarn you set aside.
- Cut both sides of the loops with scissors.
- Trim and fluff the pompom into a round shape (aim for a diameter of about 1.5 cm).
- Use the long tails to sew the pompom securely to the top of the hat.
Assembly Instructions of the Mini Snoopy Crochet
- Face Details:
- Insert the safety nose between R1-2 of the head.
- Attach safety eyes between R6-7 of the head.
- If you prefer, you can embroider the nose and eyes instead of using safety parts.
- Ears:
- Sew ears on the sides of the head between R10-12.
- Position them symmetrically for the classic Snoopy look.
- Body Attachment:
- Firmly stuff the body before attaching to the head.
- Use the long tail from the body to sew it securely to the bottom of the head.
- The body should be centered with the face pointing forward.
- Arms:
- Attach arms between R11-12 of the body.
- Position them slightly forward for a natural pose.
- Hat:
- Sew the hat to the top of Snoopy’s head, slightly tilted for a jaunty look.
- Attach the finished pompom to the top of the hat.
Creative Variations to Try
This basic pattern can be customized in many ways to create different versions of Snoopy:
- Color Variations: Try a red and white striped outfit for a candy cane theme, or blue for a winter wonderland look.
- Accessory Options: Add a tiny scarf, mittens, or earmuffs for extra winter charm.
- Classic Snoopy: Omit the hat and skirt for a traditional look.
- Flying Ace: Add a small brown scarf and pilot goggles for the famous Flying Ace version.
- Holiday Themes: Create a tiny present or Christmas tree to accompany your Snoopy.
Tips for Success
- Magic Ring Mastery: Practice your magic ring technique before starting—it creates a secure beginning with no center hole.
- Consistent Tension: Keep your tension even throughout for the best proportions.
- Careful Stuffing: Stuff firmly but evenly, especially in the head and body, to maintain the shape.
- Stitch Counting: Count stitches at the end of each round to ensure accuracy.
- Placement Testing: Use pins to test the placement of ears, arms, and hat before sewing them permanently.
Why This Mini Snoopy Makes a Perfect Gift
There’s something magical about handmade gifts, especially when they feature beloved characters like Snoopy. This mini amigurumi is particularly well-suited for gifting because:
- The small size makes it perfect as a stocking stuffer
- It works up quickly, ideal for last-minute holiday crafting
- The festive outfit adds seasonal charm
- It appeals to both children and nostalgic adults
- The finished piece uses minimal materials, making it budget-friendly
Whether you’re creating this adorable Snoopy for yourself or as a thoughtful gift, the cheerful result is sure to bring smiles all around!
Display Ideas
Once completed, your Mini Snoopy can be displayed in many charming ways:
- As an ornament on a Christmas tree (add a small loop at the top of the hat)
- On a desk or shelf as a year-round decoration
- In a holiday-themed amigurumi collection
- As part of a miniature winter scene
- Attached to gift packages as a special bonus present
Finishing Touches
For the most professional-looking finish, pay special attention to these details:
- Trim any stray yarn fibers carefully
- Ensure all parts are securely attached
- Shape the pompom symmetrically for the best appearance
- Position the hat at a slight angle for extra character
- Add small stitches for a mouth if desired
With these instructions and tips, your Mini Snoopy will be ready to spread holiday cheer! The simple techniques and adorable results make this pattern enjoyable for crocheters of all skill levels.
Happy crocheting, and may your Mini Snoopy Crochet bring as much joy to others as creating him brings to you!
Design credit: ddoding
