

Table of Contents
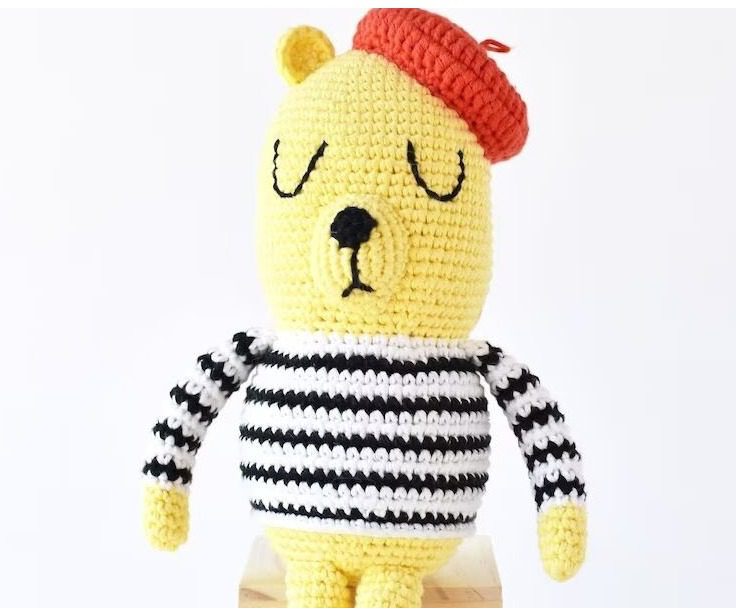
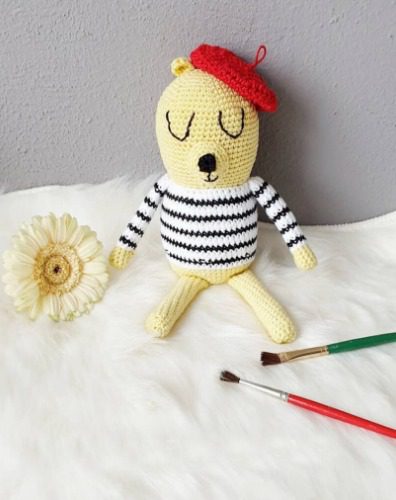
Create Bear Amigurumi a charming, French-inspired teddy bear with this comprehensive Monsieur Bear amigurumi pattern. This dapper gentleman bear, complete with a striped shirt and jaunty red beret, brings Continental flair to your crochet collection. Whether you’re crafting for yourself or as a gift, this detailed guide will walk you through creating your own sophisticated bear companion from start to finish.
Essential Materials For Your Bear Amigurumi
Before beginning your Monsieur Bear project, gather these materials:
- Medium weight yarn (worsted or aran) in 4 colors:
- Color A – Body color – 40 yards (recommended: Paintbox Yarns Cotton Aran Daffodil Yellow)
- Color B – Main shirt color – 28 yards (recommended: Paintbox Yarns Cotton Aran Paper White)
- Color C – Contrast color and nose – 24 yards (recommended: Paintbox Yarns Cotton Aran Pure Black)
- Color D – Beret color – 11 yards (recommended: Paintbox Yarns Cotton Aran Tomato Red)
- Crochet hook size 2.75 mm (C) (recommended: Clover Amour)
- Toy stuffing (recommended: Fairfield Poly-Fil)
- Stitch markers
- Embroidery needle
- Tapestry needle (size 16)
- Scissors
- Sewing pins
Bear Amigurumi Understanding Size and Gauge
With the recommended materials, your finished Monsieur Bear will stand approximately 11 inches tall. The gauge for this size is 12 single crochet stitches × 13 rows = 2×2 inches. While precise gauge isn’t critical, maintaining consistent tension throughout your work is essential to prevent stuffing from showing through.
For a smaller bear, you can use DK weight yarn with a 2.25 mm (B) hook instead of the recommended medium weight yarn.
Bear Amigurumi Crochet Terminology Used
This pattern uses US terminology:
- Chain (ch): Creates the foundation for your work
- Magic ring (mr): Creates a tight center circle to begin spherical shapes
- Round(s) (rnd/rnds): Indicates working in circular rounds
- Stitch(es) (st/sts): The basic unit of crochet
- Slip stitch (sl st): Used to join rounds without adding height
- Single crochet (sc): The basic stitch used most frequently in amigurumi
- Increase (inc): Working two stitches in one stitch
- Invisible decrease (inv dec): A decrease technique that creates a seamless look
- Half double crochet (hdc): A stitch between single and double crochet in height
- Double crochet (dc): Creates taller stitches used in the beret
- Front loop only (FLO): Working through only the front loop of a stitch
- Back loop only (BLO): Working through only the back loop of a stitch
Bear Amigurumi Special Techniques
Several special techniques are used in this pattern:
- Magic Ring: Creates a tight center with no hole for starting spherical shapes.
- Invisible Decrease: Creates a smoother look than regular decreases.
- Standing Single Crochet: Allows you to join a new color without using a chain stitch.
- Color Changes: Special technique for clean color transitions in striped patterns.
Bear Amigurumi Creating The Muzzle
Begin with the bear’s distinctive muzzle:
Round 1: With Color A, chain 5, single crochet in 2nd chain from hook, single crochet 2, single crochet 3 in next stitch, single crochet 2, increase (10 stitches total). Round 2: Work 1 increase, 2 single crochet, 2 increases and repeat once (16 stitches total). Round 3: Work 1 single crochet, 1 increase, 3 single crochet, 1 increase, 1 single crochet, 1 increase and repeat once (22 stitches total). Round 4: Single crochet around (22 stitches total).
Slip stitch into next stitch, fasten off, leaving a 15-inch tail for attaching later.
Bear Amigurumi Crafting The Nose
The small black nose adds character to your bear:
Round 1: With Color C, make a magic ring, single crochet 8 into the ring. Slip stitch into first stitch.
Leave a 20-inch tail for attaching and creating the mouth embroidery. Weave in the beginning yarn tail.
Bear Amigurumi Head And Body Construction
The head and body are worked as one continuous piece:
Round 1: With Color A, make a magic ring, single crochet 6 into the ring (6 stitches total). Round 2: Increase in each stitch around (12 stitches total). Round 3: Work 1 single crochet, 1 increase and repeat 6 times around (18 stitches total). Round 4: Work 2 single crochet, 1 increase and repeat 6 times around (24 stitches total). Round 5: Work 3 single crochet, 1 increase and repeat 6 times around (30 stitches total). Round 6: Single crochet around (30 stitches total). Round 7: Work 4 single crochet, 1 increase and repeat 6 times around (36 stitches total). Round 8: Work 5 single crochet, 1 increase and repeat 6 times around (42 stitches total). Round 9: Work 6 single crochet, 1 increase and repeat 6 times around (48 stitches total). Round 10: Single crochet around (48 stitches total). Round 11: Work 7 single crochet, 1 increase and repeat 6 times around (54 stitches total). Rounds 12-24: Single crochet around for 13 rounds (54 stitches total). Round 25: Work 7 single crochet, 1 invisible decrease and repeat 6 times around (48 stitches total). Round 26: Single crochet around (48 stitches total). Round 27: Work 6 single crochet, 1 invisible decrease and repeat 6 times around (42 stitches total). Round 28: Work 5 single crochet, 1 invisible decrease and repeat 6 times around (36 stitches total).
For the following rounds, you’ll begin incorporating color changes. Remember to count each slip stitch as a normal stitch, making sure to single crochet into each slip stitch:
Round 29: Single crochet 1, change to Color B, slip stitch, single crochet 3, increase, single crochet 5, increase and repeat 5 times (42 stitches total). Cut Color A and weave in end. Round 30: Single crochet 6, increase and repeat 6 times around (48 stitches total).
At this point, attach the muzzle and embroider the eyes before continuing.
Round 31: Single crochet 2, change to Color C, slip stitch, increase, single crochet 7, increase and repeat 5 times, single crochet 4 (54 stitches total). Don’t cut Colors B or C—you’ll carry them up on the inside. Round 32: Single crochet 3, change to Color B, slip stitch, single crochet around (54 stitches total). Round 33: Single crochet around (54 stitches total). Round 34: Single crochet 3, change to Color C, slip stitch, single crochet around (54 stitches total). Round 35: Single crochet 4, change to Color B, slip stitch, single crochet around (54 stitches total). Round 36: Single crochet around (54 stitches total). Round 37: Single crochet 4, change to Color C, slip stitch, single crochet around (54 stitches total). Round 38: Single crochet 5, change to Color B, slip stitch, single crochet around (54 stitches total). Round 39: Single crochet around (54 stitches total). Round 40: Single crochet 5, change to Color C, slip stitch, single crochet around (54 stitches total). Round 41: Single crochet 6, change to Color B, slip stitch, single crochet around (54 stitches total). Round 42: Single crochet around (54 stitches total). Round 43: Single crochet 6, change to Color C, slip stitch, invisible decrease, single crochet 7, invisible decrease and repeat 5 times (48 stitches total).
The following rounds use front loop only (FLO), back loop only (BLO), and standing single crochet:
Round 44: Single crochet 7, change to Color B, in front loop only, slip stitch 1, single crochet around (48 stitches total). Cut Color C. Round 45: In front loop only, single crochet 7, slip stitch 1. With Color A in back loop only of Round 43, make a standing single crochet, continuing in back loop only, single crochet around (48 stitches total). Cut Color B and weave in ends. Round 46: Remove marker, in back loop only of Round 45, single crochet 7. In both loops, single crochet 1, place marker, single crochet around (48 stitches total). Round 47: Single crochet 6, invisible decrease and repeat 6 times around (42 stitches total). Round 48: Single crochet around (42 stitches total). Round 49: Single crochet 5, invisible decrease and repeat 6 times around (36 stitches total). Round 50: Single crochet 4, invisible decrease and repeat 6 times around (30 stitches total).
Stuff the body firmly and continue stuffing until closed:
Round 51: Single crochet 3, invisible decrease and repeat 6 times around (24 stitches total). Round 52: Single crochet 2, invisible decrease and repeat 6 times around (18 stitches total). Round 53: Single crochet 1, invisible decrease and repeat 6 times around (12 stitches total). Round 54: Invisible decrease and repeat 6 times (6 stitches total).
Fasten off, leaving a 12-inch tail. Finish off and weave in ends.
Bear Amigurumi Creating The Arms
Make two identical arms:
Round 1: With Color A, make a magic ring, single crochet 8 into the ring (8 stitches total). Round 2: Single crochet 3, increase and repeat 2 times (10 stitches total). Rounds 3-5: Single crochet around, change to Color B in last single crochet of Round 5 (10 stitches total for 3 rounds).
In the following rounds, count each slip stitch as a normal stitch, making sure to single crochet in each slip stitch:
Round 6: Slip stitch, single crochet 9 (10 stitches total). Cut Color A, double knot Color A and B ends inside arm to secure before stuffing. Round 7: Single crochet 1, change to Color C, slip stitch, single crochet 8 (10 stitches total). Don’t cut Color B or C—carry them through the inside. Double knot Color C yarn end inside arm. Round 8: Single crochet 2, change to Color B, slip stitch, single crochet 7 (10 stitches total). Round 9: Single crochet around (10 stitches total). Round 10: Single crochet 2, change to Color C, slip stitch, single crochet 7 (10 stitches total). Round 11: Single crochet 3, change to Color B, slip stitch, single crochet 6 (10 stitches total). Round 12: Single crochet around (10 stitches total). Round 13: Single crochet 3, change to Color C, slip stitch, single crochet 6 (10 stitches total). Round 14: Single crochet 4, change to Color B, slip stitch, single crochet 5 (10 stitches total). Round 15: Single crochet around (10 stitches total). Round 16: Single crochet 4, change to Color C, slip stitch, single crochet 5 (10 stitches total). Round 17: Single crochet 5, change to Color B, slip stitch, single crochet 4 (10 stitches total). Round 18: Single crochet around (10 stitches total). Round 19: Single crochet 5, change to Color C, slip stitch, single crochet 4 (10 stitches total). Round 20: Single crochet 6, change to Color B, slip stitch, single crochet 3 (10 stitches total). Round 21: Single crochet 9, slip stitch into last stitch of round (10 stitches total).
Fasten off, leaving a 15-inch tail for attaching. Lightly stuff to allow bending at the elbow.
Bear Amigurumi Creating The Legs
Make two identical legs:
Round 1: With Color A, make a magic ring, single crochet 8 into the ring (8 stitches total). Round 2: Single crochet 3, increase and repeat 2 times (10 stitches total). Round 3: Single crochet 4, increase and repeat 2 times (12 stitches total). Rounds 4-23: Single crochet around for 20 rounds (12 stitches total).
Fasten off, leaving a 15-inch tail for attaching. Weave in beginning yarn tail. Lightly stuff to allow bending at the knee.
Bear Amigurumi Crafting The Ears
Make one or two ears (you’ll be covering one side with the beret):
Round 1: With Color A, make a magic ring, single crochet 7 into the ring, slip stitch into first stitch of round (7 stitches total). Round 2: Chain 1 (counts as stitch), turn work, half double crochet into same stitch, half double crochet 1, half double crochet increase and repeat 2 times, half double crochet 2, slip stitch into last stitch (10 stitches total).
Fasten off, leaving a 12-inch tail for attaching. Weave in beginning yarn tail.
Bear Amigurumi Creating The Beret
The beret is worked in joined rounds, not a continuous spiral:
Round 1: With Color D, start with a magic ring, leaving an 8-inch tail on the outside for the beret’s loop. Chain 3 (counts as stitch), double crochet 10 (11 stitches total). Round 2: Slip stitch into chain of last round, chain 3 (counts as stitch), double crochet in same stitch, double crochet increase and repeat 10 times (22 stitches total). Round 3: Slip stitch into chain of last round, chain 3 (counts as stitch), double crochet increase, double crochet 1, double crochet increase and repeat 10 times (33 stitches total). Round 4: Slip stitch into chain of last round, chain 3 (counts as stitch), double crochet 1, double crochet increase, double crochet 2, double crochet increase and repeat 10 times (44 stitches total). Round 5: Slip stitch into chain of last round, chain 3 (counts as stitch), double crochet around (44 stitches total). Round 6: Slip stitch into chain of last round, chain 1 (counts as stitch), single crochet 1, invisible decrease, single crochet 2, invisible decrease and repeat 10 times (33 stitches total).
Fasten off, leaving a 30-inch tail for attaching. Make a loop with the yarn tail at the top of the beret. Weave through a stitch inside the hat and double knot to secure.
Bear Amigurumi Detailed Assembly Instructions
Bear Amigurumi Assembling The Muzzle
First, attach the nose to the muzzle and use the excess yarn tail to embroider the mouth:
- Position the nose under the 3rd round of the muzzle with the knot towards the bottom.
- Insert the needle in the center of the muzzle.
- Working counter-clockwise, bring the needle up through the next stitch of the muzzle and nose.
- Insert the needle into the muzzle through the same hole you came up. Repeat this process until you’ve gone around the nose.
- Bring the needle up through the center of the muzzle.
- Bring the yarn down the center of the muzzle and insert into the hole after Round 1.
- Bring the needle up through the hole to the left and under Round 3.
- Bring the needle and yarn through the center line.
- Insert the needle under the 2nd round to the right of center. Double knot in back to secure.
Bear Amigurumi Attaching The Muzzle To The Face
- Tuck the knot in by bringing the needle up through the stitch to the right.
- Center the muzzle on the face on the opposite side of the color changes, between Rounds 17 and 27.
- After positioning the muzzle, insert the needle through a hole on the face between Rounds 26 and 27.
- Working counter-clockwise, bring the needle up through the stitch above.
- Bring the needle up through the next stitch of the muzzle.
- Insert the needle back into the same hole you came up through in step 4. Repeat steps 4-6 until you’ve attached most of the muzzle.
- Stuff the muzzle when you’ve gone most of the way around. Continue repeating steps 4-6 until you’ve completely attached the muzzle.
- Once you’ve made it around the muzzle, insert the needle into the 1st stitch attached.
- Weave the yarn through a stitch inside of the head and double knot to secure.
Bear Amigurumi Embroidering The Eyes
Create U-shaped eyes on your bear’s face:
- Cut a 30-inch piece of black yarn, thread your embroidery needle, and double knot the end.
- Starting from inside the head, bring the needle up through a stitch at the 13th round.
- Insert the needle into a stitch below.
- Bring the needle up through a stitch.
- Insert the needle into the bottom of the previous stitch.
- Repeat steps 4 and 5 until you complete your eye.
- Mirror these steps for the second eye. Secure the thread by weaving through a stitch on the inside of the head and double knotting.
Position the eyes from Round 13 to below Round 17, with appropriate spacing between them.
Bear Amigurumi Attaching The Arms
- Pinch each arm with the color changes toward you.
- Insert the needle into the next stitch to hide the knot and begin sewing the arm closed.
- Insert the needle through top and bottom stitches.
- Make sure the yarn is coming over the arm opening and not to the side of it.
- Repeat step 3 four more times until the arm opening is sewn shut.
- Make sure color changes are on the inside of the bear’s arm, insert your needle through the bottom of a stitch under Round 29.
- Insert the needle into the bottom of the arm (through both sides of the arm).
- Insert the needle into the same hole that the needle came out of in step 6 and out through the hole to the left.
- Repeat steps 7 and 8 until you reach the end of the arm. After the last stitch, insert the needle through the same hole the yarn came out.
- To secure, bring the needle out through the body, weave through a few stitches and bring through the body again. Cut the yarn close to the body.
Attach both arms between Rounds 29 and 30 of the body.
Bear Amigurumi Attaching The Legs
- Place a sewing pin in the center of your bear at Round 50. You will be connecting the legs to either side of the sewing pin.
- Insert the needle through the next stitch to hide the knot.
- Insert the needle under Round 50.
- Insert the needle in the next stitch of the leg from inside to outside.
- Going into the same hole the yarn came out of in step 3, insert the needle under Round 49.
- Insert the needle in the next stitch from inside to outside.
- Insert the needle in the same hole the yarn came out of and bring it out one to the left. Repeat steps 6 and 7 four more times.
- Insert the needle in the next stitch of the leg from inside to outside.
- Insert the needle under Round 49.
- Insert the needle in the next stitch of the leg from inside to outside.
- Insert the needle under Round 50.
- Insert the needle in the next stitch of the leg from inside to outside.
- Insert the needle in the same hole the yarn came out of and bring it out one to the left. Repeat steps 12 and 13 four more times.
- Insert the needle into the top of the 1st stitch attached.
- Bring the needle out through another part of the body.
- Weave the yarn through a few stitches. Repeat step 15 and cut close to the body to secure.
Attach both legs between Rounds 48 and 51 of the body, pinching them slightly to allow better bending.
Bear Amigurumi Attaching The Ears
- Insert the needle through the next stitch to hide the knot.
- Insert the needle from front to back between Rounds 4 and 5 of the head.
- Insert the needle in a hole on the bottom of the ear from back to front.
- Insert the needle through a stitch between Rounds 5 and 6.
- Repeat steps 3 and 4 (moving to a space between the next 2 rounds) until you’ve attached the ear to 4 stitches.
- Bring the needle up through the head, weave through a few stitches, bring the needle up through the head again and cut.
Attach both ears to the top of the bear’s head. If you prefer, you can omit the second ear since it will be covered by the beret.
Attaching The Beret
- Thread the needle with the yarn tail. Insert from inside of the beret to outside in the next stitch to hide the knot.
- Position the beret over the bear’s right ear where you’d like it to go. Work clockwise around the hat.
- Insert the needle into holes between stitches.
- Insert the needle in the next stitch from inside to outside of the beret.
- Insert the needle into the same stitch you came out of in step 3 and out through the next stitch to the left. Repeat steps 4 and 5 until you’ve worked around the hat.
- To secure, bring the needle through the head, weave through a few stitches, bring the needle through the head again and cut the yarn close to the head.
Color Change Technique
For smooth color transitions in the striped sections:
- Make a single crochet as normal until you get to the last yarn over.
- Complete the last yarn over with your new color.
- Pull through both loops on the hook.
- Follow each color change with a slip stitch in the next stitch with the new color.
- Tie loose yarn ends inside the body or weave them in.
Care Instructions And Display Ideas
Your completed Monsieur Bear deserves proper care and display:
Care Suggestions
- Spot Cleaning: Use a slightly damp cloth with mild soap when necessary. Avoid saturating the amigurumi as this may damage the stuffing.
- Dust Removal: Use a soft brush to gently remove dust from crevices.
- Storage: When not on display, store in a clean, dry container away from direct sunlight to prevent color fading.
Display Ideas
- Shelf Display: Position on a bookshelf as a decorative accent.
- Themed Collection: Create a French-themed display with other European-inspired handcrafts.
- Child’s Room: Place in a child’s bedroom as a sophisticated plush companion.
Check this out :Magical Amigurumi Unicorn Pattern
Customization Options
Make your Monsieur Bear unique with these creative variations:
- Color Combinations: Experiment with different color schemes for the bear’s body, shirt, and beret.
- Size Variations: Scale the pattern up using chunky yarn and a larger hook, or create a miniature version with fingering weight yarn and a smaller hook.
- Accessory Additions: Add a tiny scarf, glasses, or mustache for extra Parisian charm.
- Family Creation: Make a Madame Bear companion using the same basic pattern with feminine details.
Your completed Monsieur Bear amigurumi represents hours of careful craftsmanship and attention to detail. Each stitch contributes to creating a sophisticated plush companion with Continental flair. The skills you’ve developed through this pattern will enhance your overall crochet abilities and provide inspiration for future creative projects.
Whether displayed proudly in your home, given as a thoughtful gift, or treasured as a personal creation, your handmade Monsieur Bear stands as a testament to your patience and artistry—a dapper gentleman bear that brings a touch of French elegance to any collection.
