

Table of Contents
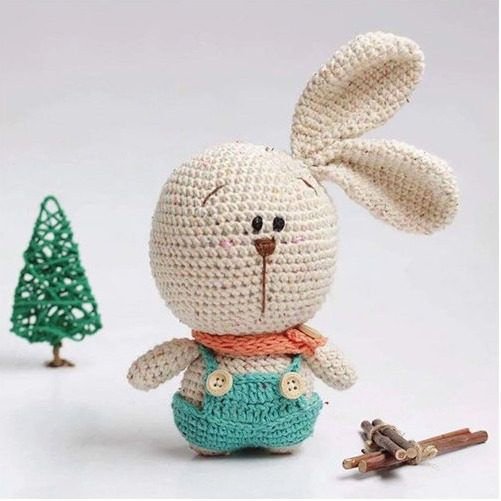
Create Amigurumi Bunny your own charming amigurumi bunny with this detailed crochet pattern! This delightful rabbit features a sweet face, long floppy ears, and cute accessories including green overalls and an adorable carrot-shaped bag. Perfect for Easter decorations, nursery decor, or as a special handmade gift, this intermediate-level pattern will guide you through each step of bringing this lovable bunny to life. Whether you’re creating it for a child or as a charming addition to your amigurumi collection, this pattern combines classic bunny charm with creative accessories for a truly special finished project.
Essential Materials for Your Amigurumi Bunny
Before beginning your bunny project, gather these supplies:
Amigurumi Bunny Yarn Colors
- Color A (white): Alize Cotton Gold Tweed 01 (100g, 330m) or similar
- Color B (orange): YarnArt Jeans 23 (50g, 160m) or similar
- Color C (green): Alize Cotton Gold 610 (100g, 330m) or similar
Amigurumi Bunny Additional Supplies
- Crochet hook size 2-2.5mm
- Knitting needles size 3.5-4mm (for the scarf)
- Three wooden buttons
- Black, brown, and pink embroidery thread
- Tapestry needles
- Pins for assembly
- Stitch markers
- Scissors
- Polyester fiberfill for stuffing
Understanding Amigurumi Bunny Terminology
This Amigurumi Bunny uses US crochet terms with the following abbreviations:
- Ch – Chain
- Sc – Single Crochet
- Inc – Single Crochet Increase (2 sc in same stitch)
- Dec – Single Crochet Decrease (2 sc worked together)
- Hdc – Half Double Crochet
- Slst – Slip Stitch
- Mr – Magic Ring
- Dc – Double Crochet
- Tr – Treble Crochet
- (…) – Work all stitches in the same stitch
- […]…x – Repeat instructions in brackets the specified number of times
- Bobble – Bobble Stitch
- BLO – Back Loop Only
- FLO – Front Loop Only
- Rnd – Round
- Sts – Stitches
Creating Amigurumi Bunny Legs
Make two identical legs using Color A (white):
Round 1: Create 6 single crochet into a magic loop (6) Round 2: Work [1 single crochet, 1 increase] 3 times (9) Round 3: Work [2 single crochet, 1 increase] 3 times (12) Round 4: Work [3 single crochet, 1 increase] 3 times (15)
Break the yarn after completing the first leg. Make the second leg following the same pattern, but do not cut the yarn when finished. Connect the two legs together by working 15 single crochet on the first leg, then 15 single crochet on the second leg for a total of 30 stitches. Continue directly to the body.
Forming Amigurumi Bunny Body
Continue using Color A (white) from the connected legs:
Round 1: Work [4 single crochet, 1 increase] 6 times (36) Rounds 2-7: Single crochet in each stitch around for 6 rounds (36) Round 8: Work [4 single crochet, 1 decrease] 6 times (30) Round 9: Single crochet in each stitch around (30) Round 10: Work [3 single crochet, 1 decrease] 6 times (24) Round 11: Single crochet in each stitch around (24) Round 12: Work [2 single crochet, 1 decrease] 6 times (18) Round 13: Single crochet in each stitch around (18)
Break the yarn, leaving a long tail. Stuff the body firmly.
Crafting Amigurumi Bunny Arms
Make two identical arms using Color A (white):
Round 1: Create 6 single crochet into a magic loop (6) Round 2: Work [1 single crochet, 1 increase] 3 times (9) Rounds 3-7: Single crochet in each stitch around for 5 rounds (9) Round 8: Decrease once, single crochet 7 (8) Round 9: Decrease once, single crochet 6 (7) Round 10: Decrease once, single crochet 5 (6)
Break the yarn, leaving a long tail. Stuff the arms lightly and sew the two edges together to flatten slightly.
Shaping Amigurumi Bunny Head
Use Color A (white) for this section:
Round 1: Create 6 single crochet into a magic loop (6) Round 2: Increase in each stitch around (12) Round 3: Work [1 single crochet, 1 increase] 6 times (18) Round 4: Work [2 single crochet, 1 increase] 6 times (24) Round 5: Work [3 single crochet, 1 increase] 6 times (30) Round 6: Work [4 single crochet, 1 increase] 6 times (36) Round 7: Work [5 single crochet, 1 increase] 6 times (42) Round 8: Work [6 single crochet, 1 increase] 6 times (48) Round 9: Work [7 single crochet, 1 increase] 6 times (54) Round 10: Single crochet in each stitch around (54) Round 11: Work [8 single crochet, 1 increase] 6 times (60) Rounds 12-19: Single crochet in each stitch around for 8 rounds (60) Round 20: Work [8 single crochet, 1 decrease] 6 times (54) Round 21: Single crochet in each stitch around (54) Round 22: Work [7 single crochet, 1 decrease] 6 times (48) Round 23: Work [6 single crochet, 1 decrease] 6 times (42) Round 24: Work [5 single crochet, 1 decrease] 6 times (36) Round 25: Work [4 single crochet, 1 decrease] 6 times (30) Round 26: Work [3 single crochet, 1 decrease] 6 times (24) Round 27: Work [2 single crochet, 1 decrease] 6 times (18)
Break the yarn, leaving a long tail for sewing. Stuff the head firmly.
Creating the Bunny Ears
Make two identical ears using Color A (white):
Round 1: Create 6 single crochet into a magic loop (6) Round 2: Increase in each stitch around (12) Round 3: Work [1 single crochet, 1 increase] 6 times (18) Round 4: Work [2 single crochet, 1 increase] 6 times (24) Rounds 5-10: Single crochet in each stitch around for 6 rounds (24) Round 11: Work [2 single crochet, 1 decrease] 6 times (18) Rounds 12-14: Single crochet in each stitch around for 3 rounds (18) Round 15: Work [1 single crochet, 1 decrease] 6 times (12) Rounds 16-17: Single crochet in each stitch around for 2 rounds (12)
Break the yarn, leaving a long tail. Fold each ear in half and sew the two edges together.
Adding a Fluffy Tail
Use Color B (orange) for the bunny’s tail:
Round 1: Create 6 single crochet into a magic loop (6) Round 2: Work [1 single crochet, 1 increase] 3 times (9) Round 3: Single crochet in each stitch around (9)
Break the yarn, leaving a long tail for sewing. Stuff the tail lightly.
Making a Carrot Bag (Optional)
This cute accessory uses Color B (orange) for the carrot and Color C (green) for the leafy top:
Round 1: Using Color B, create 3 single crochet into a magic loop (3) Round 2: Increase in each stitch around (6) Round 3: Work [1 single crochet, 1 increase] 3 times (9) Round 4: Single crochet in each stitch around (9) Round 5: Work [2 single crochet, 1 increase] 3 times (12) Round 6: Single crochet in each stitch around (12) Round 7: Work [3 single crochet, 1 increase] 3 times (15) Round 8: Single crochet in each stitch around, then change to Color C (green) (15) Round 9: Work (chain 4, slip stitch 1) 15 times around (75)
For the strap, make a chain of 45 using Color C. Connect the strap to the bag. Use brown thread to embroider details on the bag to enhance the carrot appearance. Take a piece of Color B yarn through the 8th round and then tighten the mouth of the bag, tie a bow.
Creating Green Overalls
Use Color C (green) for this charming outfit:
Round 1: Chain 40, slip stitch into the first chain to make a ring (40) Rounds 2-3: Single crochet in each stitch around for 2 rounds (40) Round 4: Single crochet 17, chain 6 (to create a hole for the tail), skip 6 stitches, single crochet 17 (40) Round 5: Single crochet 17, single crochet 6 into the chain space, single crochet 17 (40)
Break the yarn. From now on, work only on the front side (the back side has the tail hole). Join the yarn at the 36th stitch of the last round.
Round 6: Chain 3 (counts as 1 double crochet), double crochet 11, turn (12) Round 7: Chain 3 (counts as 1 double crochet), skip 1 stitch, double crochet 9 (10)
Do not break the yarn. Continue with chain 20 to make one strap, slip stitch to the back side of the overalls, and break the yarn. Join the yarn at the other side for the front panel, chain 20 to make the second strap, slip stitch to the back side of the overalls. Attach two wooden buttons on the front below the straps. Weave in the remaining yarn.
Knitting a Scarf
Use Color B (orange) and your knitting needles:
Round 1: Cast on 6 stitches (6) Round 2: Knit 6 (6) Round 3: Purl 6 (6)
Repeat rounds 2 and 3 until the scarf reaches approximately 15 centimeters in length. Cast off, break the yarn, and weave in the ends. Use a tapestry needle to attach a wooden button to the scarf.
Final Assembly Instructions
- Head and Body: Sew the head securely to the body, aligning it with the neck opening.
- Arms: Attach the arms to the sides of the body, positioning them at a slight angle.
- Ears: Sew the ears to the top of the head, ensuring they’re evenly spaced and have a natural, floppy position.
- Tail: Attach the tail to the back of the body, centered where the hole in the overalls will be.
- Facial Features:
- Use black thread to embroider the eyes
- Use brown thread to embroider the nose, mouth, and eyebrows
- Use pink thread to embroider small circles for the cheeks
- Clothing: Dress the bunny in the green overalls, ensuring the tail comes through the tail hole. Wrap the scarf around the neck and secure it with the button if desired.
- Accessories: Position the carrot bag over one shoulder if you’ve created this optional accessory.
Customization Ideas for Your Bunny
Once you’ve mastered the basic pattern, consider these creative variations:
- Color Combinations: Experiment with different yarn colors for the bunny. Try gray, brown, or even pastel colors for a unique look.
- Seasonal Themes: Adapt the accessories for different holidays or seasons. Create a Santa hat for Christmas, a flower crown for spring, or a tiny pumpkin bag for fall.
- Clothing Options: Design additional outfits beyond the overalls, such as a dress, pajamas, or a raincoat with a tiny umbrella.
- Size Adjustments: Use different yarn weights and appropriate hook sizes to create bunnies of various sizes, from tiny keychains to large stuffed animals.
Why This Amigurumi Bunny Pattern Is Special
This bunny amigurumi pattern stands out for several reasons that make it appealing to crochet enthusiasts:
The design combines a classic bunny shape with charming accessories that add personality and character. The long, floppy ears and cute facial features create an instantly recognizable and appealing rabbit, while the addition of clothing and accessories elevates this from a simple stuffed animal to a detailed character.
The construction method for the ears—creating tubes that are then flattened and sewn—results in ears that have a natural droop and realistic appearance. This technique adds dimension and life to the finished bunny, making it more visually interesting than flat ear designs.
The coordinated accessories—green overalls, orange scarf, and carrot bag—create a cohesive theme that enhances the bunny’s charm. The carrot bag, in particular, is a creative touch that reinforces the bunny character while adding play value for children or display appeal for collectors.
This pattern helps develop important amigurumi skills like creating and attaching clothing items, working with multiple colors, and achieving proper stuffing techniques for different body parts. Whether made as a gift, an Easter decoration, or for a personal collection, this bunny will surely become a treasured handmade item.
The Joy of Creating Seasonal Amigurumi
Creating an amigurumi bunny brings special satisfaction, particularly as bunnies are beloved characters with strong seasonal associations. While this bunny is charming year-round, it makes an especially meaningful project in the spring or as Easter approaches. Many crafters find that creating seasonal decorations by hand adds a personal touch to holiday celebrations and creates lasting keepsakes that can be brought out year after year.
The process of creating this bunny—from shaping the distinctive long ears to crafting the tiny carrot bag—builds skills that transfer to many other amigurumi projects. As you work through each component, you’ll develop techniques for creating expressive features, functional accessories, and clothing items that can enhance future creations.
The finished bunny makes an excellent gift for children or collectors. Its soft texture and charming appearance appeal to people of all ages, while the lack of small, detachable parts (when embroidered features are used instead of plastic eyes) makes it suitable even for young children. Many crafters find that handmade gifts like this bunny carry special meaning, representing the time and care invested in creating something unique for a loved one.
Joining the Amigurumi Community
Once you’ve completed your bunny, consider sharing photos of your creation on social media or in crochet forums. The amigurumi community is supportive and enthusiastic, often providing encouragement and ideas for future projects. Using hashtags related to amigurumi, bunny crafts, or seasonal crochet can help others find your work and connect with you.
Many crafters find that joining online groups or local crafting circles enhances their enjoyment of amigurumi creation. These communities offer opportunities to share techniques, troubleshoot challenges, and find inspiration for modifications or new projects. Your bunny with its carrot bag might inspire others to try creating accessorized amigurumi or to design their own bunny variations.

Check this out :Mage And Wizard Amigurumi Crochet Pattern
Creating Lasting Memories with Your Amigurumi Bunny
As you complete the final stitches of your amigurumi bunny, take a moment to appreciate what you’ve created. This charming character, with its floppy ears and sweet expression, represents your crafting journey and the skills you’ve developed along the way.
In our world of mass-produced toys and decorations, handmade amigurumi like your bunny stand out as uniquely personal and meaningful. Whether kept as part of your own collection, displayed as a seasonal decoration, or given as a heartfelt gift, your bunny carries with it the care and creativity you’ve invested in every stitch.
Many crafters find that their amigurumi creations become cherished items that are passed down through families or that spark delightful memories years later. The distinctive character of your handmade bunny, with its custom-crafted accessories and personal touches, makes it not just a toy but a keepsake that tells a story about the hands that made it.
Happy crocheting, and may your bunny be the first of many wonderful amigurumi creations!
