

Table of Contents
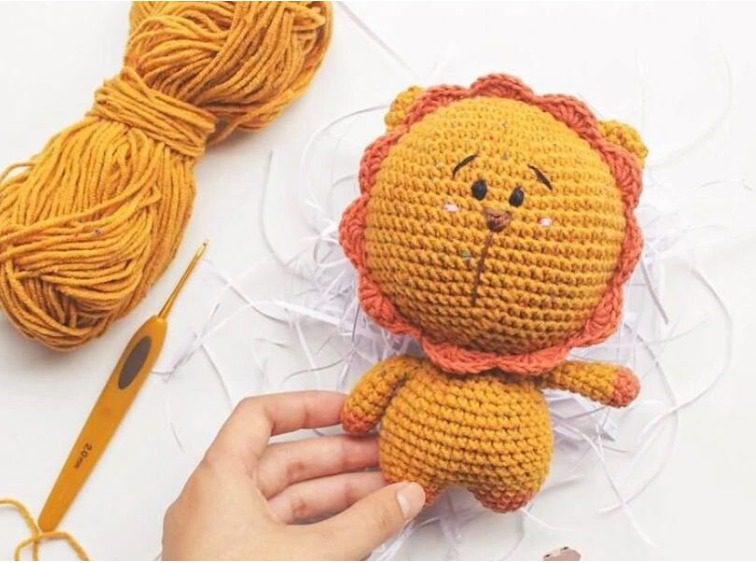
Are you looking to add a majestic yet cute lion to your amigurumi collection? This Amigurumi Lion comprehensive guide will walk you through creating your own adorable crochet lion from start to finish. Perfect for beginners and experienced crocheters alike, this pattern uses simple techniques to create a charming lion that will delight both children and adults.
What You Need to Make Your Amigurumi Lion
Before diving into the pattern, gather these materials to ensure a smooth crocheting experience:
Amigurumi Lion Yarn Selection
- Orange yarn (YarnArt Jeans 23 or similar, 50g/160m) for the legs and mane
- Yellow yarn (YarnArt Jeans 35 or similar, 50g/160m) for the body and head
Amigurumi Lion Essential Tools
- Crochet hook (2-2.5mm)
- Knitting needles (3.5-4mm)
- One wooden button
- Brown and pink embroidery thread
- Tapestry needles
- Pins for placement
- Stitch markers to track your progress
- Scissors
Understanding Amigurumi Lion Terminology
This pattern uses standard US crochet terms:
- Magic Ring: Creates a tight center for your work
- Single Crochet (sc): The foundation stitch for most of this pattern
- Increase (inc): Two single crochets in the same stitch
- Decrease (dec): Combining two stitches into one
- Chain (ch): Creates the foundation for your work
- Slip Stitch (slst): Joins rounds or creates decorative elements
- Half Double Crochet (hdc): Taller than a single crochet
- Double Crochet (dc): Creates height in your work
- Treble Crochet (tr): The tallest basic stitch used in this pattern
- Back Loop Only (BLO): Working through only the back loop of a stitch
- Front Loop Only (FLO): Working through only the front loop of a stitch
Creating Your Amigurumi Lion Step by Step
Amigurumi Lion Starting with the Legs (Orange Yarn)
For each leg, you’ll follow these rounds (make two identical legs):
Round 1: Create a magic ring and work 6 single crochets into it (6 stitches) Round 2: [1 single crochet, increase] repeat 3 times (9 stitches) Round 3: [2 single crochets, increase] repeat 3 times (12 stitches) Round 4: [3 single crochets, increase] repeat 3 times (15 stitches)
For the first leg, cut the yarn leaving a tail. For the second leg, keep the yarn attached after completion. Connect the two legs by working 15 single crochets across the first leg and then 15 single crochets across the second leg for a total of 30 stitches. This creates the foundation for your lion’s body.
Amigurumi Lion Forming the Body (Yellow Yarn)
Switch to yellow yarn and continue building up from the joined legs:
Round 1: [4 single crochets, increase] repeat 6 times (36 stitches) Rounds 2-7: Work single crochet in each stitch around for 6 complete rounds (36 stitches) Round 8: [4 single crochets, decrease] repeat 6 times (30 stitches) Round 9: Single crochet in each stitch around (30 stitches) Round 10: [3 single crochets, decrease] repeat 6 times (24 stitches) Round 11: Single crochet in each stitch around (24 stitches) Round 12: [2 single crochets, decrease] repeat 6 times (18 stitches) Rounds 13-16: Work single crochet in each stitch around for 4 complete rounds (18 stitches)
Leave a long tail of yarn for sewing later. Before closing completely, stuff the body firmly to give your lion a plump, huggable shape.
Crafting the Arms (Start with Orange, Switch to Yellow)
Make two identical arms:
Round 1: Create a magic ring and work 6 single crochets into it (6 stitches) using orange yarn Round 2: [1 single crochet, increase] repeat 3 times, then switch to yellow yarn (9 stitches) Rounds 3-7: Work single crochet in each stitch around for 5 complete rounds (9 stitches) Round 8: Decrease once, then single crochet in each of the remaining 7 stitches (8 stitches) Round 9: Decrease once, then single crochet in each of the remaining 6 stitches (7 stitches) Round 10: Decrease once, then single crochet in each of the remaining 5 stitches (6 stitches)
Leave a long tail of yarn, add just a light amount of stuffing (arms should be somewhat flexible), then sew the edges together to close each arm.
Shaping the Head (Yellow Yarn)
The head requires the most detailed work and gives your lion its character:
Round 1: Create a magic ring and work 6 single crochets into it (6 stitches) Round 2: Increase in each stitch around (12 stitches) Round 3: [1 single crochet, increase] repeat 6 times (18 stitches) Round 4: [2 single crochets, increase] repeat 6 times (24 stitches) Round 5: [3 single crochets, increase] repeat 6 times (30 stitches) Round 6: [4 single crochets, increase] repeat 6 times (36 stitches) Round 7: [5 single crochets, increase] repeat 6 times (42 stitches) Round 8: [6 single crochets, increase] repeat 6 times (48 stitches) Round 9: [7 single crochets, increase] repeat 6 times (54 stitches) Round 10: Single crochet in each stitch around (54 stitches) Round 11: [8 single crochets, increase] repeat 6 times (60 stitches) Rounds 12-19: Work single crochet in each stitch around for 8 complete rounds (60 stitches) Round 20: [8 single crochets, decrease] repeat 6 times (54 stitches) Round 21: Single crochet in each stitch around (54 stitches) Round 22: [7 single crochets, decrease] repeat 6 times (48 stitches) Round 23: [6 single crochets, decrease] repeat 6 times (42 stitches) Round 24: [5 single crochets, decrease] repeat 6 times (36 stitches) Round 25: [4 single crochets, decrease] repeat 6 times (30 stitches) Round 26: [3 single crochets, decrease] repeat 6 times (24 stitches) Round 27: [2 single crochets, decrease] repeat 6 times (18 stitches)
Leave a long tail for attaching the head to the body. Fill the head with stuffing, working it into all areas for a well-shaped result.
Adding the Ears (Yellow Yarn)
Create two identical ears:
Round 1: Create a magic ring and work 6 single crochets into it (6 stitches) Round 2: Increase in each stitch around (12 stitches) Rounds 3-4: Work single crochet in each stitch around for 2 complete rounds (12 stitches)
Leave a long tail of yarn on each ear. For a three-dimensional effect, fold each ear in half and sew the edges together with the tail.
Finishing with the Tail (Yellow and Orange Yarn)
The tail adds balance to your amigurumi lion:
Step 1: Using yellow yarn, chain 6 stitches Step 2: Starting from the second stitch from the hook, work 5 single crochets Step 3: Switch to orange yarn, chain 5 stitches Step 4: Join with a slip stitch to the first chain to create a loop at the end of the tail
Leave enough yarn to securely attach the tail to the back of the body.
Creating the Majestic Mane (Orange Yarn)
The mane is what transforms your amigurumi into a recognizable lion:
Round 1: Work 44 single crochets evenly spaced around the lion’s head Round 2: For a full, fluffy effect, work this pattern: [skip 1 stitch, work 6 front loop stitches in the next stitch, skip 1 stitch, work 1 single crochet] repeat this sequence 11 times (creates 77 stitches total)
Bringing Your Lion to Life with Finishing Touches
The final details make your amigurumi lion truly come alive:
- Use black embroidery thread to create expressive eyes and eyebrows
- With brown thread, carefully embroider the nose and mouth
- Add pink embroidered cheeks for a charming, friendly appearance
- Securely attach all pieces: head to body, arms to shoulders, ears to head, and tail to the back
Tips for Perfect Amigurumi Results
- Maintain consistent tension throughout your work for a professional look
- Count stitches at the end of each round to stay on track
- Stuff firmly but not too tightly, especially in smaller parts
- Use stitch markers to mark the beginning of rounds
- Take your time with the embroidered features as they define your lion’s personality
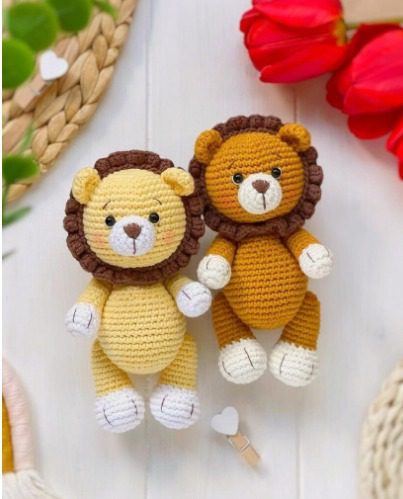
Variations to Make Your Lion Unique
While following this pattern creates a classic lion, consider these variations to personalize your creation:
- Experiment with different yarn colors for a fantasy-colored lion
- Add a small crown for a lion king theme
- Create a mane with varying lengths for added texture
- Incorporate a small scarf or accessory for seasonal variations
- Scale the pattern up or down by changing hook size and yarn weight
Care Instructions for Your Finished Amigurumi
To keep your handcrafted lion looking its best:
- Spot clean with a damp cloth and mild soap
- Allow to air dry completely
- Avoid machine washing or drying
- Store away from direct sunlight to prevent color fading
- Gently brush the mane occasionally to maintain its fluffy appearance
Assembling Your Lion
Now that you’ve created all the individual parts, it’s time to bring your amigurumi lion to life:
- Position and attach the head: Place the head on top of the body, using pins to hold it in position before sewing. Use the long tail you left on the head to sew it securely to the body with small, tight stitches.
- Attach the arms: Position the arms on either side of the body, slightly toward the front. Sew them in place using the long tails you left.
- Add the ears: Attach the folded ears to the top of the head, positioning them symmetrically. Sew them securely with the yarn tails.
- Secure the tail: Attach the tail to the back of the body, using the tail end to sew it firmly in place.
- Add facial features: Using black embroidery thread, carefully stitch the eyes and eyebrows. With brown thread, create the nose and mouth. Add pink cheeks with pink thread to give your lion a friendly appearance.
Take your time with this assembly process. The positioning of each element significantly impacts the final look of your amigurumi lion.
Final Thoughts and Advanced Techniques
As you gain experience with amigurumi, consider these advanced techniques to enhance your lion:
- Jointed limbs: Use buttons or safety joints to create movable arms and legs
- Weighted base: Add small weighted beads to the bottom of the body to help your lion sit upright
- Surface texture: Experiment with different stitch patterns for the mane to create varying textures
- Dimensional features: Add small felt pieces for the inner ears or nose for extra dimension
- Custom accessories: Create tiny accessories like a crown, scarf, or bow tie for themed variations
Troubleshooting Common Issues
If you encounter difficulties while making your lion, consider these solutions:
- Visible stuffing: If stuffing shows through your stitches, try using a smaller hook or working your stitches more tightly
- Misshapen parts: Blocking can help reshape parts that aren’t forming correctly
- Uneven stitches: Count your stitches at the end of each round and use stitch markers
- Difficulty with the mane: Work slowly and maintain even tension for the front loop stitches
- Attachment problems: Use pins to position pieces before sewing, and use mattress stitch for invisible seams
Check this out :Crochet Adorable Amigurumi Rabbits
Showcase Your Creation
Once you’ve completed your amigurumi lion, share your success with the crafting community! Take photos from different angles and in good lighting to highlight your workmanship. Many crocheters enjoy seeing variations of the same pattern, so don’t hesitate to share your unique touches.
This adorable amigurumi lion makes a wonderful gift for children, a charming decoration for your home, or a delightful addition to your handmade toy collection. With its friendly face and huggable form, this lion is sure to become a treasured item.
The beauty of amigurumi lies in its versatility and personalization. Each crocheter brings their own style to the pattern, resulting in a one-of-a-kind creation. Whether this is your first amigurumi project or you’re an experienced crafter, this lion pattern offers both enjoyment in the process and satisfaction in the finished product.
Remember that perfection comes with practice. If your first lion doesn’t turn out exactly as you imagined, consider it a learning experience and try again. Each amigurumi you create will improve your skills and techniques.
Happy crocheting, and enjoy watching your yarn transform into this majestic little lion!
