

Table of Contents
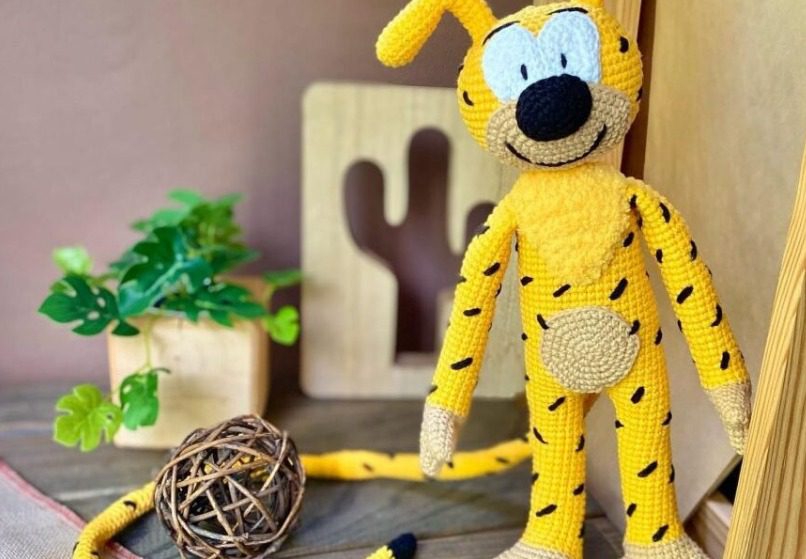
Bring Marsupilami the iconic Marsupilami to life with this detailed amigurumi pattern! Known for its extraordinarily long tail, distinctive spotted coat, and playful personality, the Marsupilami is a beloved comic book character that makes a perfect crochet project. This comprehensive guide will walk you through creating your own huggable version with its characteristic yellow fur, beige facial features, and those unmistakable black spots. Whether you’re a fan of the character or simply looking for a unique amigurumi challenge, this pattern offers an engaging project with delightful results.
Understanding the Marsupilami Character
The Marsupilami is a fictional animal species created by Belgian cartoonist André Franquin. These extraordinary creatures are characterized by their bright yellow fur, incredibly long and versatile tails, monkey-like behavior, and distinctive “Houba! Houba!” call. Their tails function almost like an extra limb, giving them remarkable agility. This amigurumi design captures the character’s essence with its proportionally long tail, expressive face, and detailed limbs.
Essential Materials for Your Marsupilami Project
Before embarking on your Marsupilami amigurumi journey, gather these supplies:
- Yarn: DK-medium weight cotton yarn in:
- Yellow (for the body, head, tail, ears)
- Light peach or beige (for facial features, hands, and feet)
- Small amounts of white and black (for eyes and nose)
- Hook: 2.5mm crochet hook (or size appropriate for your yarn to maintain tight stitches)
- Notions: Embroidery and darning needles
- Stuffing: Polyester fiberfill
- Optional: Stitch markers for tracking rounds
Understanding Marsupilami Terminology
This pattern uses standard crochet abbreviations:
- Ch – Chain
- St(s) – Stitch(es)
- Sc – Single crochet
- Inc – Increase (two single crochets in one stitch)
- Dec – Decrease (two stitches worked together, using invisible decrease technique)
- R – Round
- Magic ring – Adjustable starting loop
The work is done in continuous rounds (spiral work) without joining. Using stitch markers to track your rounds is highly recommended.
Creating the Marsupilami’s Head
The head forms the foundation of your character’s personality:
Round 1: With yellow yarn, chain 6, then work 4 single crochets, 3 single crochets in one stitch, work around the chain, 3 single crochets, 2 single crochets in one stitch (12 stitches total) Round 2: Work [increase, single crochet] 6 times (18 stitches) Round 3: Work [increase, 2 single crochets] 6 times (24 stitches) Round 4: Work [increase, 3 single crochets] 6 times (30 stitches) Round 5: Work [increase, 4 single crochets] 6 times (36 stitches) Round 6: Work [increase, 5 single crochets] 6 times (42 stitches) Round 7: Work [increase, 6 single crochets] 6 times (48 stitches) Round 8: Work [increase, 7 single crochets] 6 times (54 stitches) Round 9: Work 54 single crochets (54 stitches) Round 10: Work [increase, 8 single crochets] 6 times (60 stitches) Rounds 11-14: Work 60 single crochets for 4 rounds (60 stitches) Round 15: Work [decrease, 8 single crochets] 6 times (54 stitches) Round 16: Work 54 single crochets (54 stitches) Round 17: Work [decrease, 7 single crochets] 6 times (48 stitches) Round 18: Work [decrease, 6 single crochets] 6 times (42 stitches) Round 19: Work [decrease, 5 single crochets] 6 times (36 stitches) Round 20: Work [decrease, 4 single crochets] 6 times (30 stitches) Round 21: Work [decrease, 3 single crochets] 6 times (24 stitches) Round 22: Work [decrease, 2 single crochets] 6 times (18 stitches)
At this point, stuff the head firmly.
Round 23: Work [decrease, single crochet] 6 times (12 stitches)
Fasten off, weaving in the end. Add more stuffing if needed to achieve a firm, round head.
Marsupilami Creating the Feet, Legs, and Body
The distinctive feet and legs of the Marsupilami give it its characteristic stance.
Marsupilami Feet and Legs (Make 2)
Start with light peach or beige yarn for the feet. First, make the three leg fingers separately:
For Two Side Fingers (Make 2 for Each Foot): Round 1: Work 4 single crochets in a magic ring Round 2: Work [increase, single crochet] 2 times (6 stitches) Rounds 3-4: Work 6 single crochets for 2 rounds (6 stitches) Fasten off one side finger, but leave the second unfinished.
For Middle Finger (Make 1 for Each Foot): Round 1: Work 4 single crochets in a magic ring Round 2: Work [increase, single crochet] 2 times (6 stitches) Rounds 3-5: Work 6 single crochets for 3 rounds (6 stitches) Fasten off.
Continuing with the Unfinished Side Finger: Round 5: Position the middle finger and work 3 single crochets over it, bring the next finger and work 6 single crochets around it (positioning it toward the back of the middle finger), continue with 3 more single crochets on the middle finger, and 6 single crochets on the starting finger (18 stitches total) Rounds 6-7: Work 18 single crochets for 2 rounds (18 stitches)
Start stuffing the fingers at this point.
Round 8: To connect the thumb, work 3 single crochets, then 3 single crochets through both the thumb and working piece to join them, work 12 single crochets (18 stitches) Round 9: Work 3 single crochets, 3 single crochets over just the thumb stitches (unworked ones), work 12 single crochets (18 stitches) Round 10: Work 10 single crochets, chain 1, turn Round 11: Work 14 single crochets, chain 1, turn Round 12: Work 7 single crochets, chain 1, fold the last row in half and slip stitch through 7 stitches to close the back of the foot
This creates a rounded foot with an opening at the top for continuing with the leg.
Change to yellow yarn at the end of Round 12. Add more stuffing to the foot and continue stuffing the leg as you work.
Round 13: Work 12 single crochets around the top edge of the foot (12 stitches) Round 14: Work 12 single crochets in back loops only (this creates a ridge for optional fur additions) Rounds 15-28: Work 12 single crochets for 14 rounds (12 stitches)
To add knee detail, work 3 cluster stitches (each with 2 double crochets) in the front area of Round 19.
Fasten off at the end of Round 28 for the right leg.
Left Foot Variation
Follow the same pattern but modify Rounds 8-12:
Round 8: Work 7 single crochets, 3 single crochets through both the thumb and working piece, work 8 single crochets (18 stitches) Round 9: Work 7 single crochets, 3 single crochets over just the thumb stitches, work 8 single crochets (18 stitches) Round 10: Work 1 single crochet, chain 1, turn Round 11: Work 14 single crochets, chain 1, turn Round 12: Work 7 single crochets, chain 1, fold in half
Continue with the leg pattern as above, but do not fasten off after Round 28.
Connecting Legs and Creating Body
Round 1: Chain 3, continue with 12 single crochets on right leg, work 3 single crochets over the back of the starting chain, work 12 single crochets on left leg (30 stitches) Round 2: Work [increase, 4 single crochets] 6 times (36 stitches) Rounds 3-12: Work 36 single crochets for 10 rounds (36 stitches) Round 13: Work [decrease, 4 single crochets] 6 times (30 stitches) Rounds 14-15: Work 30 single crochets for 2 rounds (30 stitches) Round 16: Work [decrease, 3 single crochets] 6 times (24 stitches) Rounds 17-21: Work 24 single crochets for 5 rounds (24 stitches) Round 22: Work [decrease, 2 single crochets] 6 times (18 stitches) Round 23: Work 18 single crochets (18 stitches)
Stuff the body firmly at this point.
Round 24: Work [decrease, single crochet] 6 times (12 stitches) Round 25: Work 12 single crochets in back loops only (12 stitches) Round 26: Work 12 single crochets (12 stitches)
Finish stuffing the body and add extra stuffing to the neck area when attaching the head.
Creating the Arms
The Marsupilami’s arms allow it to grab things and swing from trees.
Fingers and Hands (Make 2)
Each hand has four fingers with the middle finger slightly longer.
For Two Side Fingers (Make 2 for Each Hand): Round 1: Work 4 single crochets in a magic ring Round 2: Work [increase, single crochet] 2 times (6 stitches) Rounds 3-4: Work 6 single crochets for 2 rounds (6 stitches) Fasten off one finger, but leave the second unfinished.
For Middle Finger (Make 1 for Each Hand): Round 1: Work 4 single crochets in a magic ring Round 2: Work [increase, single crochet] 2 times (6 stitches) Rounds 3-5: Work 6 single crochets for 3 rounds (6 stitches) Fasten off.
Continuing with the Unfinished Side Finger: Round 5: Position the middle finger and work 3 single crochets over it, bring the next finger and work 6 single crochets around it, continue with 3 more single crochets on the middle finger, and 6 single crochets on the starting finger (18 stitches total) Rounds 6-7: Work 18 single crochets for 2 rounds (18 stitches)
Stuff the fingers firmly.
Round 8: To connect the thumb, work 5 single crochets, 3 single crochets through both the thumb and working piece, work 10 single crochets (18 stitches) Round 9: Work 5 single crochets, 3 single crochets over just the thumb stitches, work 10 single crochets (18 stitches)
Change to yellow yarn. Stuff the hand and continue stuffing the arm as you work.
Round 10: Work [decrease, single crochet] 6 times (12 stitches) Round 11: Work in back loops only [decrease, 4 single crochets] 2 times (10 stitches) Rounds 12-31: Work 10 single crochets for 20 rounds (10 stitches)
To add elbow detail, work 3 cluster stitches (each with 2 double crochets) around Rounds 17-18.
Fasten off, leaving a long end for sewing to the body.
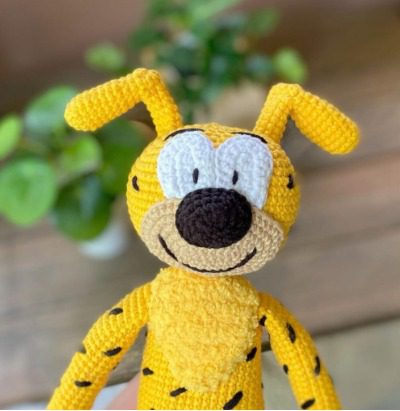
Facial Features and Details
Eyes (Make 2)
With White Yarn: Round 1: Work 5 single crochets in a magic ring Round 2: Work 5 increases (10 stitches) Round 3: Work [increase, single crochet] 5 times (15 stitches) Round 4: Work [increase, 2 single crochets] 5 times (20 stitches)
Fasten off, leaving a long end for sewing. Add black pupils to the inner sides of the eyes, between Rounds 2-3, using yarn or paint.
Position the white eye parts next to each other on the upper half of the head, meeting the mouth piece in the middle.
Nose
With Black Yarn: Round 1: Chain 8, work 6 single crochets, 3 single crochets in one stitch, work 5 single crochets, 2 single crochets in one stitch (16 stitches) Round 2: Work [increase, single crochet] 8 times (24 stitches) Round 3: Work 24 single crochets (24 stitches) Round 4: Work [decrease, single crochet] 8 times (16 stitches)
Fasten off, leaving a long end for sewing. Stuff the nose well and position it to touch the outer eye line, spanning 4-5 rounds over the mouth piece.
Mouth/Facial Piece
With Light Peach or Beige Yarn: Round 1: Chain 6, work 4 single crochets, 3 single crochets in one stitch, work 3 single crochets, 2 single crochets in one stitch (12 stitches) Round 2: Work [increase, single crochet] 6 times (18 stitches) Round 3: Work [increase, 2 single crochets] 6 times (24 stitches) Round 4: Work [increase, 3 single crochets] 6 times (30 stitches) Round 5: Work [increase, 4 single crochets] 6 times (36 stitches) Round 6: Work [increase, 5 single crochets] 6 times (42 stitches)
Fasten off, leaving a long end for sewing to the head.
Ears (Make 2)
With Yellow Yarn: Round 1: Work 6 single crochets in a magic ring Round 2: Work 6 increases (12 stitches) Round 3: Work [increase, single crochet] 6 times (18 stitches) Round 4: Work [increase, 2 single crochets] 6 times (24 stitches) Rounds 5-8: Work 24 single crochets for 4 rounds (24 stitches) Round 9: Work [decrease, 10 single crochets] 2 times (22 stitches) Round 10: Work 22 single crochets (22 stitches) Round 11: Work [decrease, 9 single crochets] 2 times (20 stitches) Round 12: Work 20 single crochets (20 stitches) Round 13: Work [decrease, 8 single crochets] 2 times (18 stitches) Round 14: Work 18 single crochets (18 stitches) Round 15: Work [decrease, 7 single crochets] 2 times (16 stitches) Round 16: Work 16 single crochets (16 stitches) Round 17: Work [decrease, 6 single crochets] 2 times (14 stitches) Round 18: Work 14 single crochets (14 stitches) Round 19: Work [decrease, 5 single crochets] 2 times (12 stitches) Rounds 20-27: Work 12 single crochets for 8 rounds (12 stitches)
Flatten the ears and fasten off, leaving a long end for sewing to the head.
Belly Patch
With Light Peach or Beige Yarn: Round 1: Work 6 single crochets in a magic ring Round 2: Work 6 increases (12 stitches) Round 3: Work [increase, single crochet] 6 times (18 stitches)
Fasten off, leaving a long end for sewing to the lower part of the body.
Creating the Signature Long Tail
The Marsupilami’s tail is its most recognizable feature:
With Yellow Yarn: Round 1: Work 6 single crochets in a magic ring Rounds 2+: Continue working 6 single crochets per round to create a tail approximately 12 inches (26 cm) long
For the last 5 rounds, work [increase, 2 single crochets] 2 times (8 stitches) to create a slightly thicker end for attaching to the body. Work 4 more rounds of 8 single crochets for a secure connection.
Fasten off, leaving a long end for sewing to the body.
Optional Fish Accessory
Create a small fish for your Marsupilami to hold:
Tail Fins (Make 2)
Round 1: Work 4 single crochets in a magic ring Round 2: Work [increase, single crochet] 2 times (6 stitches) Round 3: Work [increase, 2 single crochets] 2 times (8 stitches) Round 4: Work 4 decreases (4 stitches)
Connect both fin pieces, working 8 single crochets around both pieces.
Round 5: Work [increase, 3 single crochets] 2 times (10 stitches) Round 6: Work [increase, 4 single crochets] 2 times (12 stitches) Round 7: Work [increase, 5 single crochets] 2 times (14 stitches) Round 8: Work [increase, 6 single crochets] 2 times (16 stitches) Round 9: Work [increase, 3 single crochets] 4 times (20 stitches) Rounds 10-12: Work 20 single crochets for 3 rounds (20 stitches)
Begin stuffing the fish as you decrease:
Round 13: Work [decrease, 3 single crochets] 4 times (16 stitches) Round 14: Work [decrease, 2 single crochets] 4 times (12 stitches) Round 15: Work [decrease, single crochet] 4 times (8 stitches) Round 16: Work 4 decreases (4 stitches)
Fasten off, weaving in the end to close the opening securely.
Fish Fins
For the upper fin, slip stitch to the 8th round top stitch on the body, chain 1, half double crochet in the same stitch, 2 double crochets in the next two stitches, half double crochet in the 4th stitch and single crochet in the same stitch. Fasten off.
For the lower side fins, start at the 7th round stitch, chain 1, half double crochet in the same stitch, 2 double crochets in the next stitch, half double crochet and single crochet in the third stitch. Fasten off and repeat on the other side.
Add white yarn for the eyes and black details for pupils.
Assembly Instructions
- Facial Features: Sew the mouth piece to the lower front of the head. Position the white eye parts on the upper half of the head. Add the nose so it touches the outer eye line and spans 4-5 rounds over the mouth piece.
- Head and Body: Connect the head to the body by sewing around the neck opening, adding extra stuffing for firmness.
- Arms: Attach the arms around Rounds 24-25 of the body.
- Ears: Sew the ears on the top sides of the head around Rounds 5-6, positioning them to point upward.
- Tail: Attach the tail centered on the lower back of the body, 5-6 rounds up from where the legs connect.
- Belly Patch: Sew the belly patch to the lower front of the body.
- Spots: Embroider black spots across the yellow body to create the classic Marsupilami pattern.
- Optional Neck Fur: If desired, add extra yarn through the front loops around the neck area to create fur, trimming it in a V shape (longer in front and back).
- Fish Accessory: If made, position the fish in one of the Marsupilami’s hands.
Tips for Perfect Marsupilami Features
- Long Tail: The tail should be flexible enough to pose yet sturdy enough to maintain its shape
- Facial Expression: Take time with the placement of eyes and nose to capture the character’s playful look
- Spots Pattern: Study reference images to place the black spots in an authentic pattern
- Stuffing: Pack stuffing firmly, especially in the head and body, for a durable finish
- Posing: The Marsupilami looks great in a slightly crouched position, with its long tail curved around
Creative Variations
Once you’ve mastered the basic pattern, consider these creative adaptations:
- Baby Marsupilami: Reduce the number of increase rounds for a smaller, younger character
- Different Poses: Adjust the limb positioning for climbing, jumping, or hanging positions
- Habitat Elements: Create small palm trees or jungle vines for a display setting
- Marsupilami Family: Create a mama, papa, and baby trio in varying sizes
- Color Variations: While the classic Marsupilami is yellow with black spots, you might create special editions with unique color schemes
Check this out :Magical Unicorn Amigurumi Crochet Pattern
Conclusion
Creating this Marsupilami amigurumi allows you to bring a beloved comic character to life through your crochet skills. The distinctive features—especially that amazingly long tail—result in a unique character piece that stands out in any amigurumi collection. Whether you’re a longtime fan of the character or new to its charm, this project offers both a creative challenge and a delightful result.
The finished Marsupilami makes a wonderful gift for comic book enthusiasts, collectors of unique characters, or anyone who appreciates handmade toys with personality. Display it proudly in your collection or give it a special place in a child’s room for imaginative play inspired by this extraordinary fictional species.
Happy crocheting, and may your Marsupilami bring “Houba! Houba!” joy to your home!
